

本文详细解析uniapp中web-view组件与原生页面之间的双向通信机制。涵盖uniapp向webview发送消息的evalJS调用方式,以及webview通过uni.postMessage向uniapp回传数据的实现方法。提供从项目目录配置、官方库引入到完整代码示例的全流程指南,解决混合开发中的交互难题。
前言
本文重点探讨在uniapp开发环境中,原生页面与web-view组件内部网页之间进行数据交互的双向通信方案。
准备工作
uniapp项目配置
集成webview组件
<web-view src="/hybrid/html/index.html"></web-view>Web项目搭建
目录结构规范
需在uniapp项目根目录下创建hybrid/html目录,并将Web项目文件存放于此,否则web-view组件将无法正确加载和调用相关资源文件。
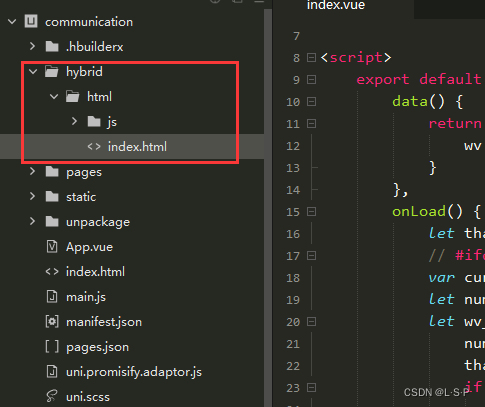
引入官方支持库
在Web项目中引入uni官方提供的uni.webview.js库,该库可从uniapp官方示例仓库下载。下载后将其放置于Web项目的js文件夹内,并在Web页面中通过script标签引入即可使用。
<script type="text/javascript" src="js/uni.webview.1.5.2.js"></script>通信机制详解
uniapp向webview发送消息
接收消息(Webview端)
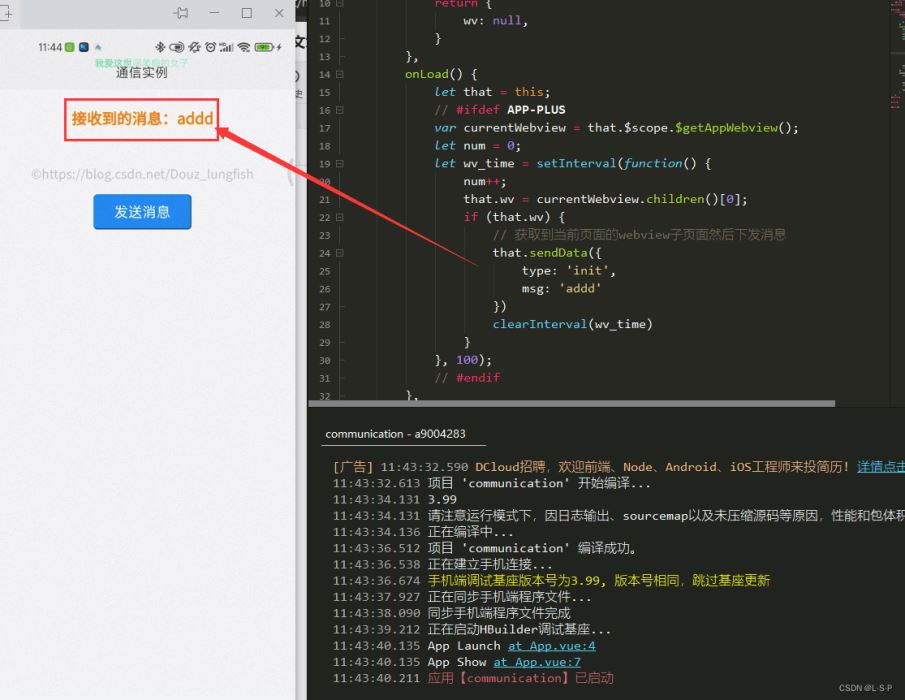
uniapp向webview传递消息的本质是调用webview内部页面的JavaScript方法。因此,首先需要在webview组件对应的index.html文件中定义一个用于接收消息的JS函数:
function webReceiveData (data) {
    var parseData = JSON.parse(data)
	document.getElementById('msg').innerText = `接收到的消息:${parseData.msg}`
}
发送消息(uniapp端)
要实现向webview传递数据,第一步是获取当前页面中的webview组件实例,随后调用该实例中预先定义的接收方法。参考以下代码逻辑:首先获取当前页面的webview实例并赋值给变量wv,在确认获取成功后,调用sendData方法向webview发送数据。sendData方法内部通过evalJS执行webview内的JS函数,从而完成消息下发。
onLoad() {
	let that = this;
	// #ifdef APP-PLUS
	var currentWebview = that.$scope.$getAppWebview();
	let num = 0;
	let wv_time = setInterval(function() {
		num++;
		that.wv = currentWebview.children()[0];
		if (that.wv) {
			// 获取到当前页面的webview子页面然后下发消息
			that.sendData({
				type: 'init',
				msg: 'addd'
			})
			clearInterval(wv_time)
		}
	}, 100);
	// #endif
},
methods: {
	sendData (data) {
		let that = this
		that.wv.evalJS("webReceiveData('" + JSON.stringify(data) + "')");
	},
}
webview向uniapp发送消息
接收消息(uniapp端)
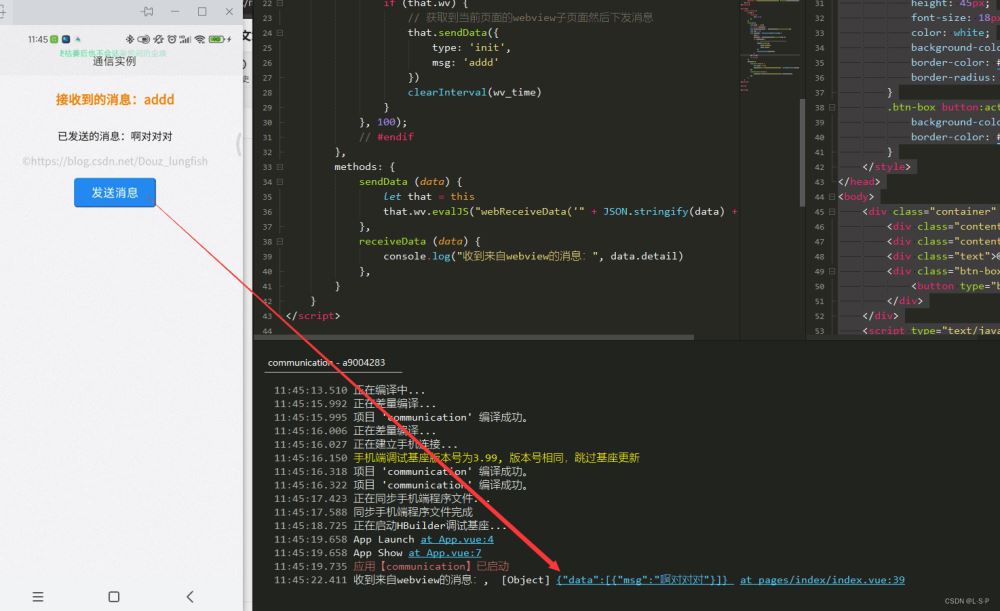
在uniapp页面中,需为web-view组件绑定@message事件监听器。
<web-view src="/hybrid/html/index.html" @message="receiveData"></web-view>定义处理@message事件的具体方法receiveData,用于接收并处理来自webview的数据。
receiveData (data) {
    console.log("收到来自webview的消息:", data.detail)
}
发送消息(Webview端)
在webview页面中,通过调用uni.postMessage方法即可实现向uniapp发送消息。
function webSendData () {
	document.getElementById('send').innerText = `已发送的消息:啊对对对`
	uni.postMessage({
		data: {
			msg: '啊对对对'
		}
	});
}
完整代码示例
uniapp端完整实现
<template>
	<view class="content">
		<web-view src="/hybrid/html/index.html" @message="receiveData"></web-view>
	</view>
</template>
<script>
	export default {
		data() {
			return {
				wv: null,
			}
		},
		onLoad() {
			let that = this;
			// #ifdef APP-PLUS
			var currentWebview = that.$scope.$getAppWebview();
			let num = 0;
			let wv_time = setInterval(function() {
				num++;
				that.wv = currentWebview.children()[0];
				if (that.wv) {
					// 获取到当前页面的webview子页面然后下发消息
					that.sendData({
						type: 'init',
						msg: 'addd'
					})
					clearInterval(wv_time)
				}
			}, 100);
			// #endif
		},
		methods: {
			sendData (data) {
				let that = this
				that.wv.evalJS("webReceiveData('" + JSON.stringify(data) + "')");
			},
			receiveData (data) {
				console.log("收到来自webview的消息:", data)
			},
		}
	}
</script>
<style>
</style>
Web端完整实现
<!DOCTYPE html>
<html lang="zh">
<head>
	<meta charset="UTF-8">
	<meta name="viewport" content="width=device-width, initial-scale=1.0">
	<title>通信实例</title>
	<style type="text/css">
		.container {
			display: flex;
			flex-direction: column;
		}
		.content {
			text-align: center;
			margin: 15px 0;
		}
		#msg {
			font-size: 1.2rem;
			font-weight: bold;
			color: #ff7d00;
		}
		.text {
			text-align: center;
			color: #c5c8ce;
		}
		.btn-box {
			text-align: center;
			margin: 15px 0;
		}
		.btn-box button {
			width: 125px;
			height: 45px;
			font-size: 18px;
			color: white;
			background-color: #1989fa;
			border-color: #2b85e4;
			border-radius: 5px;
		}
		.btn-box button:active {
			background-color: #88c1fa;
			border-color: #5cadff;
		}
	</style>
</head>
<body>
	<div class="container" id="lauwen">
		<div class="content" id="msg"></div>
		<div class="content" id="send"></div>
		<div class="text">©https://blog.csdn.net/Douz_lungfish</div>
		<div class="btn-box">
			<button type="button" onclick="webSendData()">发送消息</button>
		</div>
	</div>
	<script type="text/javascript" src="js/uni.webview.1.5.2.js"></script>
	<script type="text/javascript">
		function webReceiveData (data) {
			var parseData = JSON.parse(data)
			document.getElementById('msg').innerText = `接收到的消息:${parseData.msg}`
		}
		function webSendData () {
			document.getElementById('send').innerText = `已发送的消息:啊对对对`
			uni.postMessage({
				data: {
					msg: '啊对对对'
				}
			});
		}
	</script>
</body>
</html>
至此,关于uniapp中web-view组件双向通信的教程已介绍完毕。如需了解更多uniapp web-view相关内容,建议查阅本站过往文章或继续浏览后续系列教程,感谢支持。