

本文详细讲解如何在项目中安装并配置Jest以支持TypeScript单元测试。涵盖从初始化jest --init、选择jsdom环境,到安装jsdom依赖及eslint插件的全过程。重点解析jest.config.js与tsconfig.json的路径别名配置,以及ts-jest的使用建议,帮助开发者快速建立稳定的测试环境。
本文旨在指导读者在项目环境中完成Jest单元测试框架的安装与基础配置工作。
具体操作步骤如下
参考链接:Jest官方快速入门文档
第一步,执行安装命令
npm i jest ts-jest @types/jest -D第二步,进行初始化设置
npx jest --init请参照界面提示进行选择操作
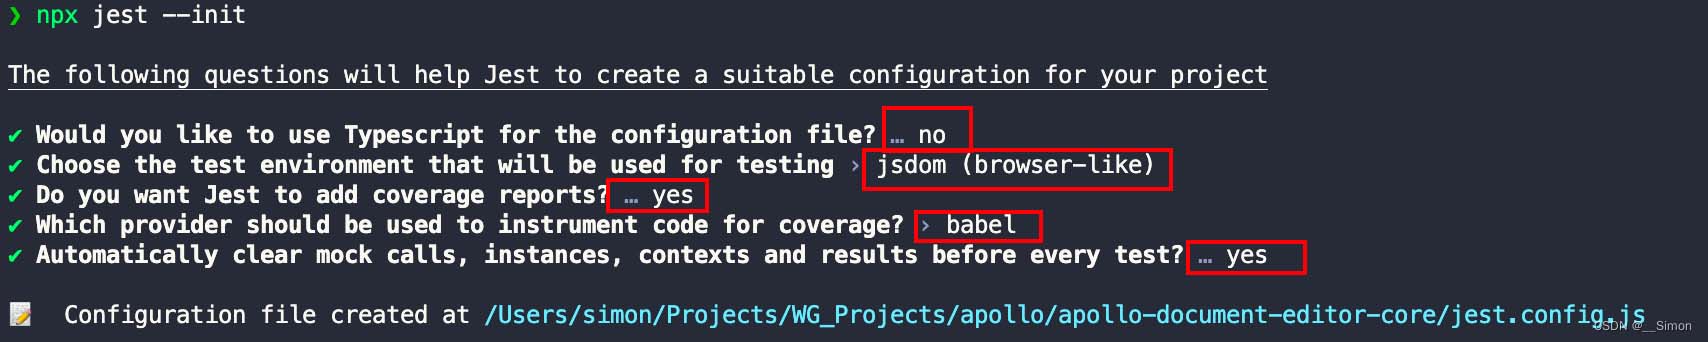
注意事项如下
- -
no:若不使用TypeScript,可改用jest.config.js作为配置文件; - -
jsdom:指定测试环境为jsdom,适用于需要在类浏览器DOM环境下运行的项目测试; - -
yes:确认是否生成测试报告; - -
babel:选择由Babel提供的测试报告生成方式。官方说明指出v8报告功能仍处于试验阶段,要求Node.js 14以上版本,且稳定性尚待验证,因此此处选用Babel方案。
第三步,安装jsdom运行环境
- 注意Jest 28及以上版本已移除内置的jsdom插件,必须单独安装该依赖。
- 同时安装官方推荐的eslint插件以规范代码检查。
npm i jest-environment-jsdom eslint-plugin-jest eslint-import-resolver-typescript jest-canvas-mock -D
第四步,构建测试目录结构
在项目根目录下新建test文件夹,并在其内部创建__mocks和__tests__两个子目录。此外,还需生成.eslintrc.js和tsconfig.json两个配置文件。
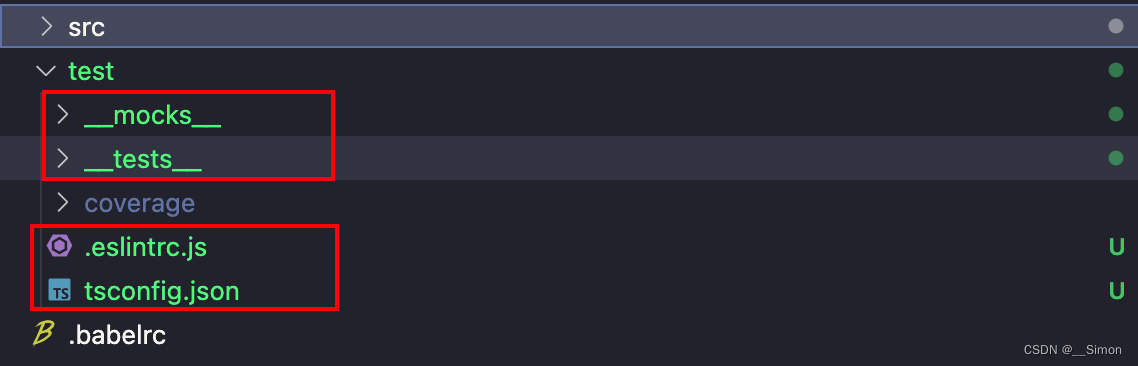
补充配置参考示例
jest.config.js文件内容
/*
 * For a detailed explanation regarding each configuration property, visit:
 * https://jestjs.io/docs/configuration
 */

const { pathsToModuleNameMapper } = require('ts-jest');
const { compilerOptions } = require('./tsconfig.json');

module.exports = {
  // A preset that is used as a base for Jest's configuration
  preset: 'ts-jest',
  // The test environment that will be used for testing
  testEnvironment: 'jsdom',
  // The paths to modules that run some code to configure or set up the testing environment before each test
  setupFiles: ['jest-canvas-mock'],
  // Automatically clear mock calls, instances, contexts and results before every test
  clearMocks: true,
  // Indicates whether the coverage information should be collected while executing the test
  collectCoverage: true,
  // The directory where Jest should output its coverage files
  coverageDirectory: 'test/coverage',
  // The root directory that Jest should scan for tests and modules within
  // rootDir: undefined,
  // rootDir: __dirname,
  // An array of file extensions your modules use
  moduleFileExtensions: ['ts', 'js'],
  // A map from regular expressions to module names or to arrays of module names that allow to stub out resources with a single module
  moduleNameMapper: pathsToModuleNameMapper(compilerOptions.paths, {
    prefix: '<rootDir>/',
  }),
  // The glob patterns Jest uses to detect test files
  testMatch: ['<rootDir>/test/__tests__/**/*.test.ts'],
  // A map from regular expressions to paths to transformers
  transform: {
    '^.+\\.ts$': 'ts-jest',
  },
};
针对测试用例配置eslint规则
位于/test/.eslintrc.js文件
module.exports = {
  extends: ['../.eslintrc.js'],
  settings: {
    'import/resolver': {
      typescript: {
        alwaysTryTypes: true, // always try to resolve types under `<root>@types` directory even it doesn't contain any source code, like `@types/unist`

        // Choose from one of the "project" configs below or omit to use <root>/tsconfig.json by default
        // use <root>/path/to/folder/tsconfig.json
        project: 'tsconfig.json',
      },
    },
  },
  plugins: ['jest'],
  overrides: [
    // unit-tests
    {
      files: ['**/__tests__/**'],
      rules: {
        'jest/no-disabled-tests': 'warn',
        'jest/no-focused-tests': 'error',
        'jest/no-identical-title': 'error',
        'jest/prefer-to-have-length': 'warn',
        'jest/valid-expect': 'error',
      },
    },
  ],
};
代码覆盖率报告文件不应提交至版本控制系统,需将test/coverage目录路径追加至.gitignore文件中。
...

# Unit test / coverage reports
test/coverage
在tsconfig.json中配置路径别名映射
第五步,开始编写单元测试
在test/__tests__目录下为各个模块建立对应的测试目录及文件,进而编写具体的单元测试代码。
遵循文件命名规范:*.test.ts
第六步,总结与常见问题排查
- 默认preset设为babel-jest。由于Babel对TypeScript的支持主要依赖代码转换(Transpilation),而Jest在运行时并不执行类型检查。因此,建议安装ts-jest以启用类型检查功能。
- 配置过程中耗时较多的是处理tsconfig.json路径别名,以及解决由此引发的TypeScript和ESLint报错问题;
- 上述配置的路径别名只需在tsconfig.json中定义一次,即可在TypeScript、ESLint以及Jest配置中通用读取;
- 此外,关于Webpack的路径别名配置,社区也有读取tsconfig配置的解决方案;
以上内容基于个人实践经验整理,仅供参考,欢迎支持本站。