
本文深入讲解基于原生JavaScript与HTML5 Canvas构建简易思维导图的核心逻辑,涵盖树形数据建模、两阶段递归排版、三次贝塞尔连线绘制与视口拾取交互。

当前位置:首页 > JavaScript 项目实战 > 正文
基于Canvas原生JavaScript实现简易思维导图的核心逻辑
作者:像素漫游
时间:2026-11-22
浏览:115
文章目录
在前端构建树形可视化组件时,许多开发者会优先尝试基于 DOM 或 SVG 拼接节点。然而当节点规模达到数百上千、或者需要频繁实现视口平移缩放、自定义连线弯曲度与离线导出时,DOM 方案往往会受到排版开销与渲染性能的制约。HTML5 Canvas 提供了完全由脚本控制的像素绘制能力,是构建高性能思维导图的底层利器。实现简易思维导图并不依赖庞大的第三方可视化库,其核心本质由四项相互协作的基础机制构成:定义自包含的树形数据模型、执行双阶段递归排版以计算绝对坐标、基于三次贝塞尔曲线完成节点与连线渲染,以及逆向映射鼠标事件以实现视口漫游与节点拾取。本文将使用原生 JavaScript,逐一剖析并实现这套完整的核心闭环。
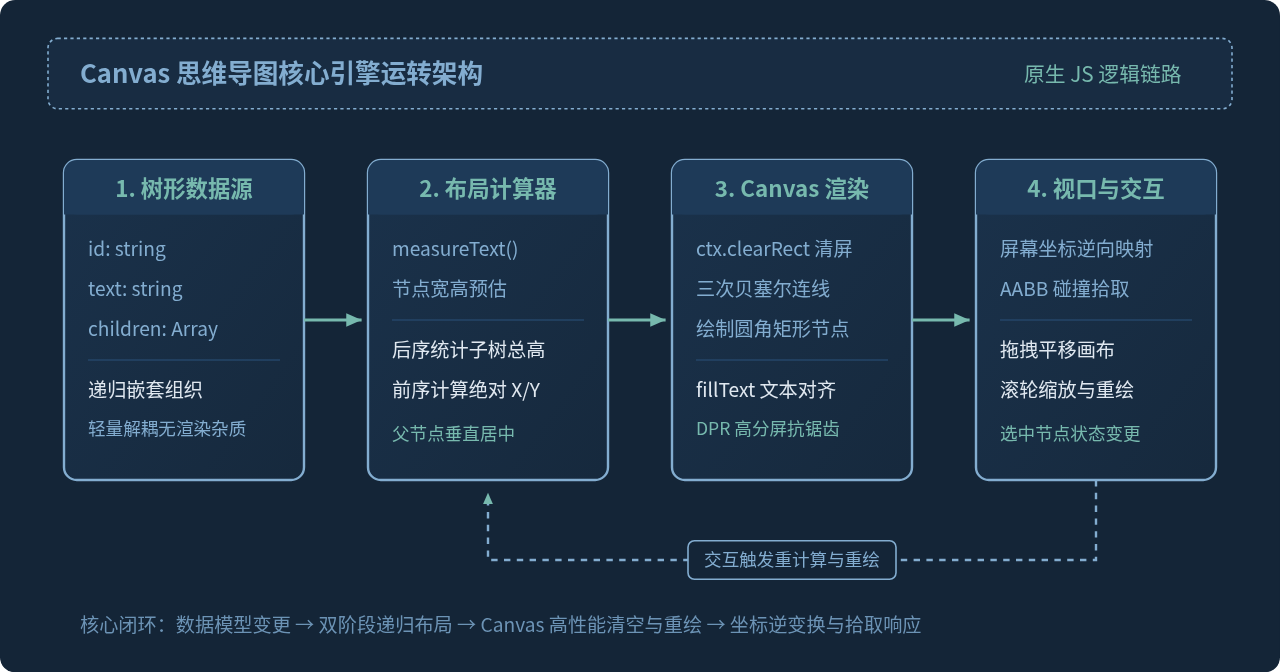
一、数据结构设计与节点尺寸动态度量
思维导图在本质上是一棵具备层级归属的 N 叉树。为了实现纯粹的数据与视图解耦,数据结构应只保留节点身份与内容信息,坐标与尺寸则作为排版过程中的动态推导属性。一个规范的节点结构如下:
// 基础思维导图树形数据结构
const mindMapData = {
  id: "root",
  text: "中心主题",
  children: [
    {
      id: "node-1",
      text: "分支一:技术原理",
      children: [
        { id: "node-1-1", text: "树形递归遍历", children: [] },
        { id: "node-1-2", text: "几何坐标分配", children: [] }
      ]
    },
    {
      id: "node-2",
      text: "分支二:Canvas渲染",
      children: [
        { id: "node-2-1", text: "三次贝塞尔连线", children: [] }
      ]
    }
  ]
};
在进行树形排版之前,必须首先获取每个节点的实际宽度与高度。如果采用固定宽高,文字较短时会导致空间浪费,文字较长时则发生溢出裁切。Canvas 2D 上下文提供了 ctx.measureText(text).width API,能够根据当前的字体样式实时测量文本所占像素宽度。结合预设的水平内边距(paddingX)与垂直内边距(paddingY),便能在排版开始前准确预估节点轮廓:
// 递归测量树中所有节点的矩形包围尺寸
function computeNodeDimensions(node, ctx, config) {
  ctx.font = config.font || "14px sans-serif";
  const metrics = ctx.measureText(node.text);

  // 节点宽度 = 文本宽度 + 左右内边距
  node.width = Math.ceil(metrics.width) + config.paddingX * 2;
  // 节点高度 = 固定行高(或字体高度) + 上下内边距
  node.height = config.lineHeight + config.paddingY * 2;

  // 递归处理所有子节点
  if (node.children && node.children.length > 0) {
    for (let i = 0; i < node.children.length; i++) {
      computeNodeDimensions(node.children[i], ctx, config);
    }
  }
}
注意事项:执行
measureText 时使用的 ctx.font 字符串必须与后续实际绘制文字时完全一致(包含字号、字重与字体族),否则测算出的尺寸与最终绘制内容不匹配,会导致文本贴边或超出边框。
二、二次递归树形排版算法
思维导图排版的核心挑战在于:子节点拥有各自的高度与分支,且兄弟分支之间不能发生视觉重叠;同时,父节点的垂直位置应当始终位于其所有直接子节点垂直跨度的几何中心。为了满足这一约束,排版计算必须分为两次相互独立的递归遍历:
- 后序遍历(自底向上):从叶子节点开始,计算每个节点及其所有后代构成的“子树总占位高度(subtreeHeight)”。叶子节点的占位高度即为其自身高度;非叶子节点的占位高度则是其所有子节点的占位高度之和,再加上子节点之间的垂直间距。
- 前序遍历(自顶向下):从根节点开始分配实际的
x与y坐标。子节点的水平坐标x为父节点的x + width + dx(dx为层级间距);在垂直方向上,利用之前计算好的子树高度依次为子节点排列位置,并将父节点自身的y居中对齐到子树的中心线。
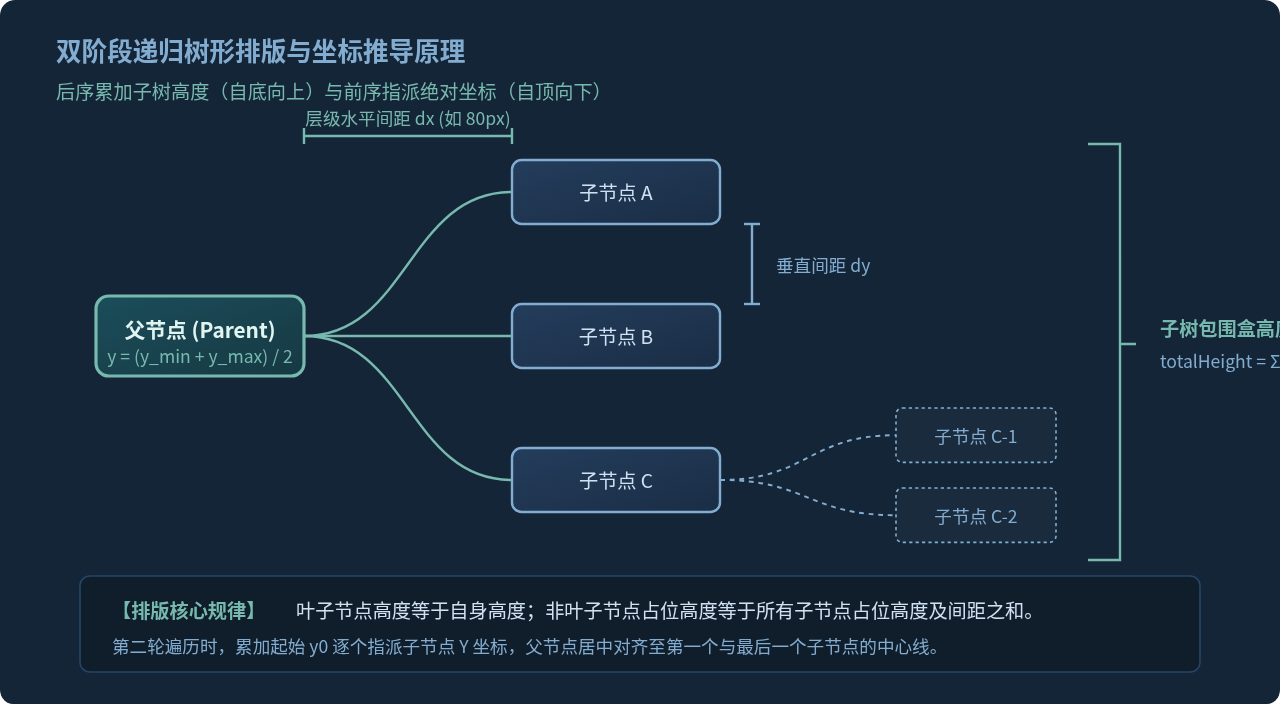
以下是完整的排版算法实现:
// 阶段 1:后序遍历计算子树占位总高度
function calculateSubtreeHeights(node, config) {
  if (!node.children || node.children.length === 0) {
    node.subtreeHeight = node.height;
    return node.subtreeHeight;
  }

  let totalChildrenHeight = 0;
  for (let i = 0; i < node.children.length; i++) {
    totalChildrenHeight += calculateSubtreeHeights(node.children[i], config);
  }

  // 加上子节点之间的垂直缝隙 (children.length - 1) * dy
  const totalGaps = (node.children.length - 1) * config.gapY;
  node.subtreeHeight = Math.max(node.height, totalChildrenHeight + totalGaps);
  return node.subtreeHeight;
}

// 阶段 2:前序遍历指定绝对坐标
function assignNodeCoordinates(node, x, startY, config) {
  node.x = x;

  if (!node.children || node.children.length === 0) {
    // 叶子节点直接位于起始 Y 处
    node.y = startY;
    return;
  }

  let currentY = startY;
  const childX = x + node.width + config.gapX;
  const childCenters = [];

  for (let i = 0; i < node.children.length; i++) {
    const child = node.children[i];
    assignNodeCoordinates(child, childX, currentY, config);
    // 记录子节点的垂直中心点
    childCenters.push(child.y + child.height / 2);
    // 下一个兄弟节点的起始 Y 推进当前子树所占高度与间距
    currentY += child.subtreeHeight + config.gapY;
  }

  // 父节点垂直居中对齐至第一个子节点与最后一个子节点的中心点平均值
  const firstCenter = childCenters[0];
  const lastCenter = childCenters[childCenters.length - 1];
  node.y = (firstCenter + lastCenter) / 2 - node.height / 2;
}
三、Canvas 连线绘制与三次贝塞尔曲线算法
在思维导图中,从父节点连接到子节点的线条通常不是生硬的直线折线,而是平滑的 S 形水平切向曲线。使用 Canvas 的 ctx.bezierCurveTo 可以完美绘制出具有现代设计感的三次贝塞尔曲线(Cubic Bézier Curve)。
三次贝塞尔曲线由四个点控制:起点 $P_0$、终点 $P_3$,以及两个控制点 $P_1$ 和 $P_2$。为了实现水平切线平滑过渡,连线起点取父节点右侧中心点 $(x_1 + w_1, y_1 + h_1/2)$,终点取子节点左侧中心点 $(x_2, y_2 + h_2/2)$。控制点 $P_1$ 与 $P_2$ 的 X 坐标均设为起点与终点水平中线 $(x_1 + x_2)/2$,而 Y 坐标分别锁定在起点的 $y_1$ 与终点的 $y_2$。这样可以保证曲线在离开父节点和进入子节点时切线均为水平方向,曲率平缓均匀。
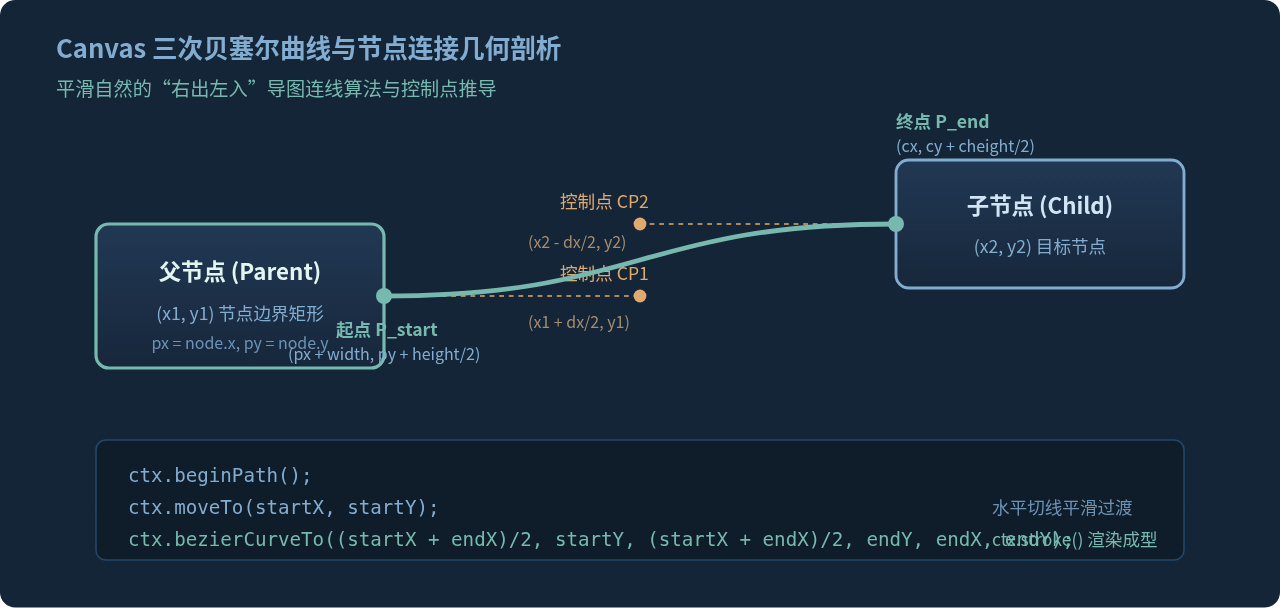
在绘制节点本身时,为了提升视觉品质,我们使用圆角矩形来承载文字内容。配合原生 CanvasRenderingContext2D.prototype.roundRect(现代浏览器通用原生支持)或贝塞尔路径,可以轻松实现优雅的节点渲染:
// 绘制连接曲线与节点内容
function renderMindMap(node, ctx, config) {
  // 1. 递归绘制所有连线(先画线,保证连线处于节点底部)
  drawLinks(node, ctx, config);
  // 2. 递归绘制所有节点外框与文本
  drawNodes(node, ctx, config);
}

function drawLinks(node, ctx, config) {
  if (!node.children || node.children.length === 0) return;

  const startX = node.x + node.width;
  const startY = node.y + node.height / 2;

  for (let i = 0; i < node.children.length; i++) {
    const child = node.children[i];
    const endX = child.x;
    const endY = child.y + child.height / 2;

    const midX = (startX + endX) / 2;

    ctx.beginPath();
    ctx.moveTo(startX, startY);
    ctx.bezierCurveTo(midX, startY, midX, endY, endX, endY);
    ctx.strokeStyle = config.lineColor || "#83ADD0";
    ctx.lineWidth = config.lineWidth || 2;
    ctx.stroke();

    drawLinks(child, ctx, config);
  }
}

function drawNodes(node, ctx, config) {
  // 绘制节点背景(圆角矩形)
  ctx.beginPath();
  if (ctx.roundRect) {
    ctx.roundRect(node.x, node.y, node.width, node.height, 6);
  } else {
    ctx.rect(node.x, node.y, node.width, node.height);
  }
  ctx.fillStyle = node.id === "root" ? "#1b4d5a" : "#243d5c";
  ctx.fill();
  ctx.strokeStyle = node.selected ? "#77B9AE" : "#83ADD0";
  ctx.lineWidth = node.selected ? 2 : 1;
  ctx.stroke();

  // 绘制文字,垂直居中
  ctx.font = config.font || "14px sans-serif";
  ctx.fillStyle = "#ffffff";
  ctx.textAlign = "center";
  ctx.textBaseline = "middle";
  ctx.fillText(node.text, node.x + node.width / 2, node.y + node.height / 2);

  if (node.children) {
    for (let i = 0; i < node.children.length; i++) {
      drawNodes(node.children[i], ctx, config);
    }
  }
}
四、视口变换与节点拾取检测
思维导图通常需要支持画布无限平移、缩放(Zoom & Pan)以及鼠标点击选中节点。在 Canvas 中,所有的元素并不像 DOM 那样原生具备独立的点击事件,而是由整块位图共同呈现在一个 <canvas> 容器内。因此,必须手动实现坐标逆变换与碰撞拾取算法。
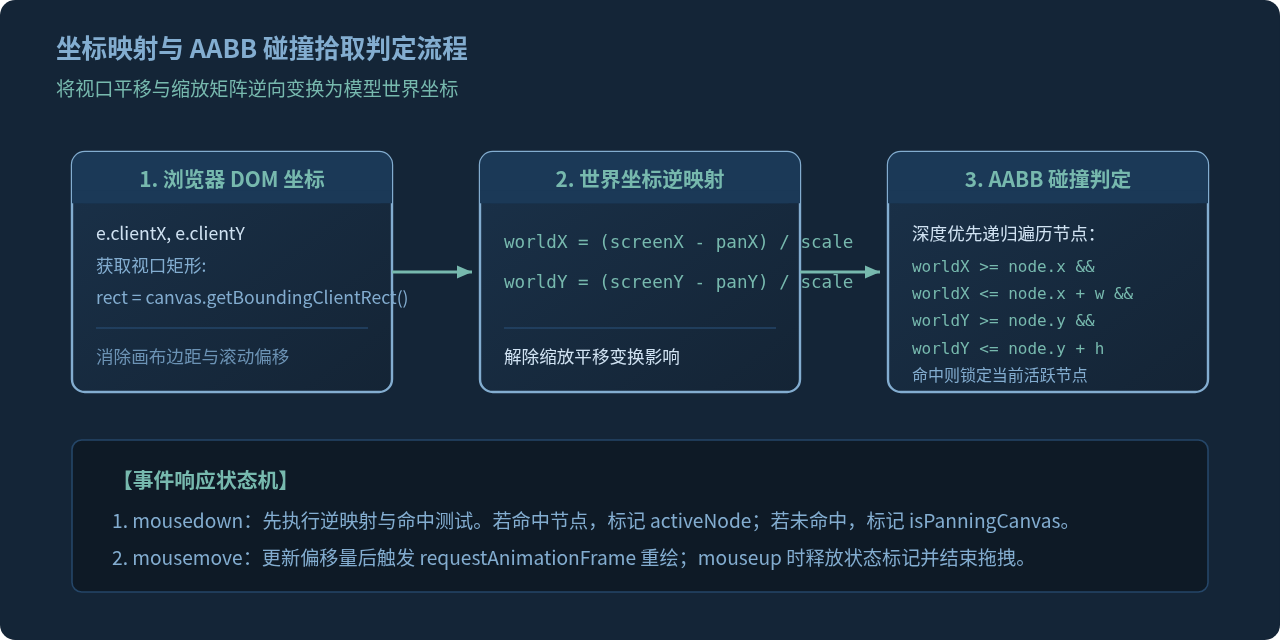
1. 屏幕坐标转世界坐标
当用户在页面上点击时,事件对象 MouseEvent 给出的是相对于浏览器视口的 clientX 与 clientY。由于画布本身可能被缩放了 scale 倍,并平移了 (panX, panY),我们需要将屏幕点击点反向映射回导图的世界几何坐标系中:
// 将鼠标屏幕坐标转化为 Canvas 世界坐标
function screenToWorld(clientX, clientY, canvas, viewport) {
  const rect = canvas.getBoundingClientRect();
  const screenX = clientX - rect.left;
  const screenY = clientY - rect.top;

  return {
    x: (screenX - viewport.panX) / viewport.scale,
    y: (screenY - viewport.panY) / viewport.scale
  };
}
2. 轴对齐包围盒(AABB)碰撞检测
得到世界坐标 (worldX, worldY) 后,采用深度优先搜索遍历整个树,对每个节点的矩形包围盒进行 AABB 命中测试:
// 命中拾取检测函数
function hitTest(node, worldX, worldY) {
  if (
    worldX >= node.x &&
    worldX <= node.x + node.width &&
    worldY >= node.y &&
    worldY <= node.y + node.height
  ) {
    return node;
  }

  if (node.children) {
    for (let i = 0; i < node.children.length; i++) {
      const hit = hitTest(node.children[i], worldX, worldY);
      if (hit) return hit;
    }
  }

  return null;
}
五、完整可运行示例与工程落地避坑
将上述所有核心模块组装起来,便构成了一个具备完整响应式重绘能力的思维导图运行时。在实际工程落地时,还需要解决以下高频遇到的细节问题:
| 技术要点 | 常见隐患 | 工程规范解决方案 |
|---|---|---|
| Retina 高分屏适配 | 文字边缘模糊、线条发虚锯齿严重 | 根据 window.devicePixelRatio(DPR)将 Canvas 物理像素等比扩大,同时将 CSS 逻辑样式宽高保持原样,并使用 ctx.scale(dpr, dpr) 归一化坐标系。 |
| 重绘卡顿与跳帧 | 每次鼠标移动事件频繁触发同步绘制 | 利用 requestAnimationFrame 实现防抖渲染循环,仅在视口参数或节点数据改变时标记 needsRedraw = true,避免无意义的重绘调用。 |
| 深层树爆栈风险 | 节点层级过深导致递归深度溢出 | 在超大型树(数万节点)场景下,可将递归算法改写为显式调用栈的双轮循环,或对视口外的节点实施裁剪剔除(Frustum Culling)。 |
下面是一个精简内聚、可直接拷贝至 HTML 运行的最小系统骨架:
<!DOCTYPE html>
<html>
<head>
  <style>
    body { margin: 0; overflow: hidden; background: #142537; }
    canvas { display: block; width: 100vw; height: 100vh; }
  </style>
</head>
<body>
  <canvas id="mindMap"></canvas>
  <script>
    const canvas = document.getElementById("mindMap");
    const ctx = canvas.getContext("2d");

    const config = {
      font: "14px sans-serif",
      paddingX: 16,
      paddingY: 10,
      lineHeight: 18,
      gapX: 70,
      gapY: 20,
      lineColor: "#83ADD0",
      lineWidth: 2
    };

    const viewport = { panX: 80, panY: 200, scale: 1 };
    let isDragging = false;
    let lastMousePos = { x: 0, y: 0 };

    function resize() {
      const dpr = window.devicePixelRatio || 1;
      canvas.width = window.innerWidth * dpr;
      canvas.height = window.innerHeight * dpr;
      ctx.scale(dpr, dpr);
      render();
    }
    window.addEventListener("resize", resize);

    function render() {
      ctx.save();
      ctx.clearRect(0, 0, window.innerWidth, window.innerHeight);
      // 应用视口变换
      ctx.translate(viewport.panX, viewport.panY);
      ctx.scale(viewport.scale, viewport.scale);

      // 计算尺寸与布局
      computeNodeDimensions(mindMapData, ctx, config);
      calculateSubtreeHeights(mindMapData, config);
      assignNodeCoordinates(mindMapData, 0, 0, config);

      // 渲染连线与节点
      renderMindMap(mindMapData, ctx, config);
      ctx.restore();
    }

    canvas.addEventListener("mousedown", (e) => {
      isDragging = true;
      lastMousePos = { x: e.clientX, y: e.clientY };

      const world = screenToWorld(e.clientX, e.clientY, canvas, viewport);
      const clicked = hitTest(mindMapData, world.x, world.y);
      if (clicked) {
        console.log("点击选中节点:", clicked.text);
      }
    });

    window.addEventListener("mousemove", (e) => {
      if (!isDragging) return;
      const dx = e.clientX - lastMousePos.x;
      const dy = e.clientY - lastMousePos.y;
      viewport.panX += dx;
      viewport.panY += dy;
      lastMousePos = { x: e.clientX, y: e.clientY };
      render();
    });

    window.addEventListener("mouseup", () => { isDragging = false; });

    // 初始化运行
    resize();
  </script>
</body>
</html>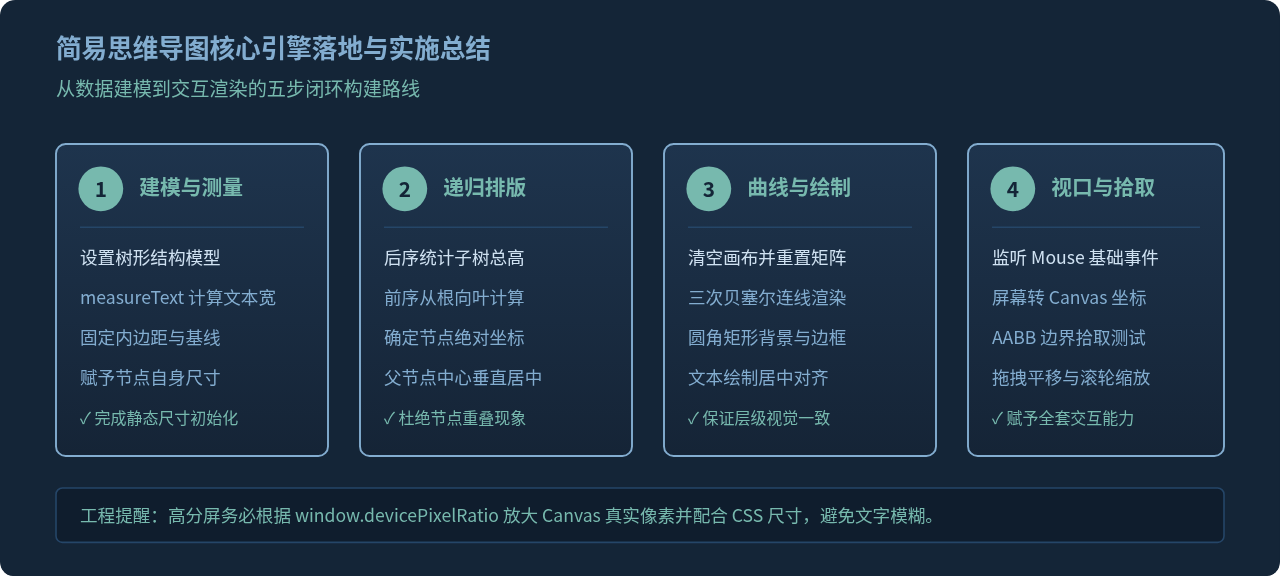
六、总结
基于 HTML5 Canvas 原生开发简易思维导图,其技术路线直观清晰、不依赖冗杂封装。通过树形数据建模与文本度量确立尺寸边界,依托后序与前序双轮递归算法化解节点重叠与父级居中对齐难题,借助三次贝塞尔曲线算法输出顺滑连线,再经由视口逆矩阵映射与 AABB 碰撞检测赋予定位交互能力。这四项核心机制相互支撑,构成了现代图表引擎与白板工具最底层的基石逻辑。读者在此基础上可进一步扩展快捷键增删节点、折叠收起分支以及文本行内编辑等高级功能。
实用工具推荐
电子包浆
使用 ›绿化、压缩、噪点和虚拟水印,自由调节做旧程度。
图片压缩
使用 ›选择画质和输出格式,预览压缩前后的大小。
作者最新文章
相关文章