
针对JavaScript初学及进阶开发者在编写俄罗斯方块时常见的单文件全局变量混杂问题,本文详细介绍如何运用ES6 Class将核心逻辑重构为Piece(方块)、Board(棋盘)与TetrisGame(控制器)三大类,实现职责解耦、状态封装与多实例复用。

当前位置:首页 > JavaScript 代码规范与重构 > 正文
使用ES6 Class重构JavaScript俄罗斯方块代码结构
作者:木棉
时间:2026-11-19
浏览:662
文章目录
JavaScript进阶
面向对象编程
代码重构
适用场景:原生JS游戏逻辑解耦与架构升级
在开发经典原生 JavaScript 俄罗斯方块时,最常见的做法是在一个脚本文件中直接编写几百行过程代码。状态变量如 board、currentPiece、score、dropCounter 和 timer 散落于全局作用域,而 collide()、rotate()、draw() 等函数直接修改外部变量。这种结构在初期能够快速运行,但只要尝试加入“按键暂停”、“下一个方块预览”或“同屏双人对战”功能,全局状态就会互相踩踏,逻辑维护迅速陷入混乱。
本文将使用 ES6 class 语法,通过职责单一原则对俄罗斯方块的代码结构进行系统性重构。我们将把分散的状态与过程抽离封装为三个核心类:Piece(方块实体类)负责自身形状与旋转;Board(棋盘规则类)负责网格数据、越界与碰撞检测;TetrisGame(控制中枢类)负责主循环、输入响应与渲染驱动。重构后的代码不仅消除了全局变量污染,还天然支持在同一页面内无缝创建多个独立运行的游戏实例。
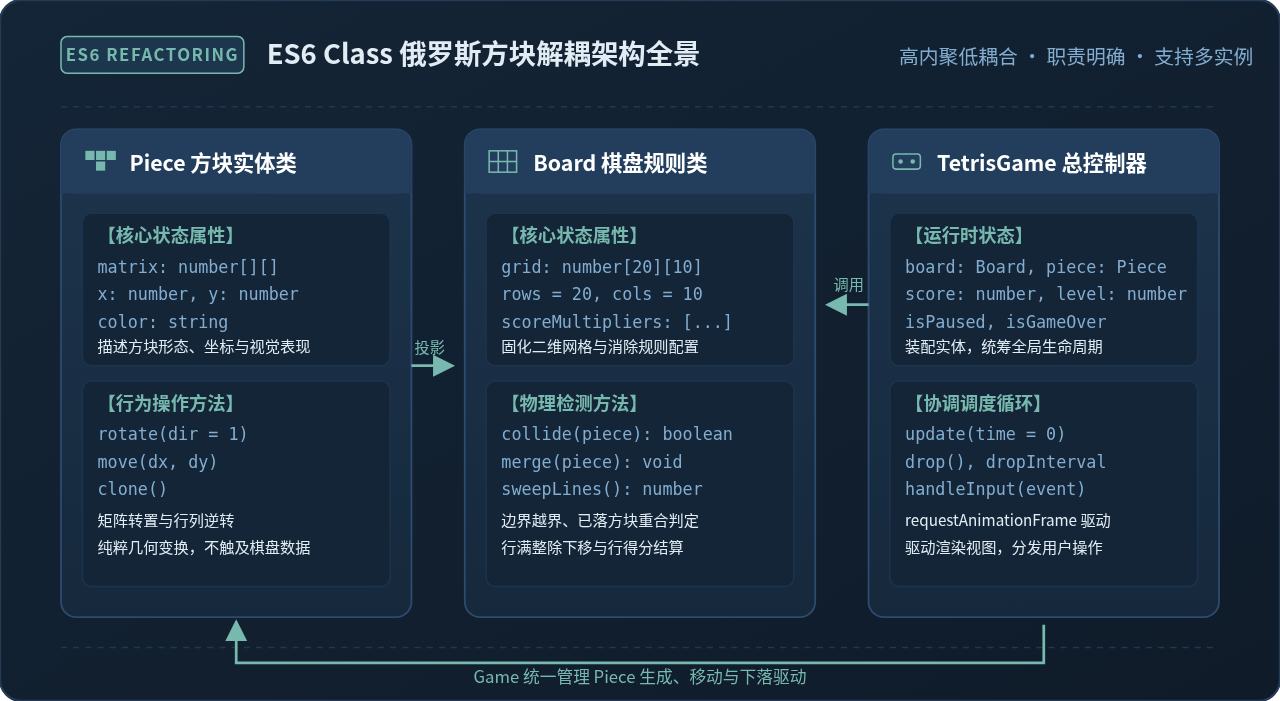
一、重构动机与面向对象职责切分
为了让重构有的放矢,我们需要先理清面向过程代码的痛点,并确立清晰的类职责边界。在传统的单脚本实现中,方块的坐标计算与棋盘的数组边界高度耦合。例如,旋转函数往往在变换矩阵的同时直接去读取棋盘二维数组;一旦发生撞墙,又在同一个函数内手动尝试复原坐标,导致函数副作用极重。
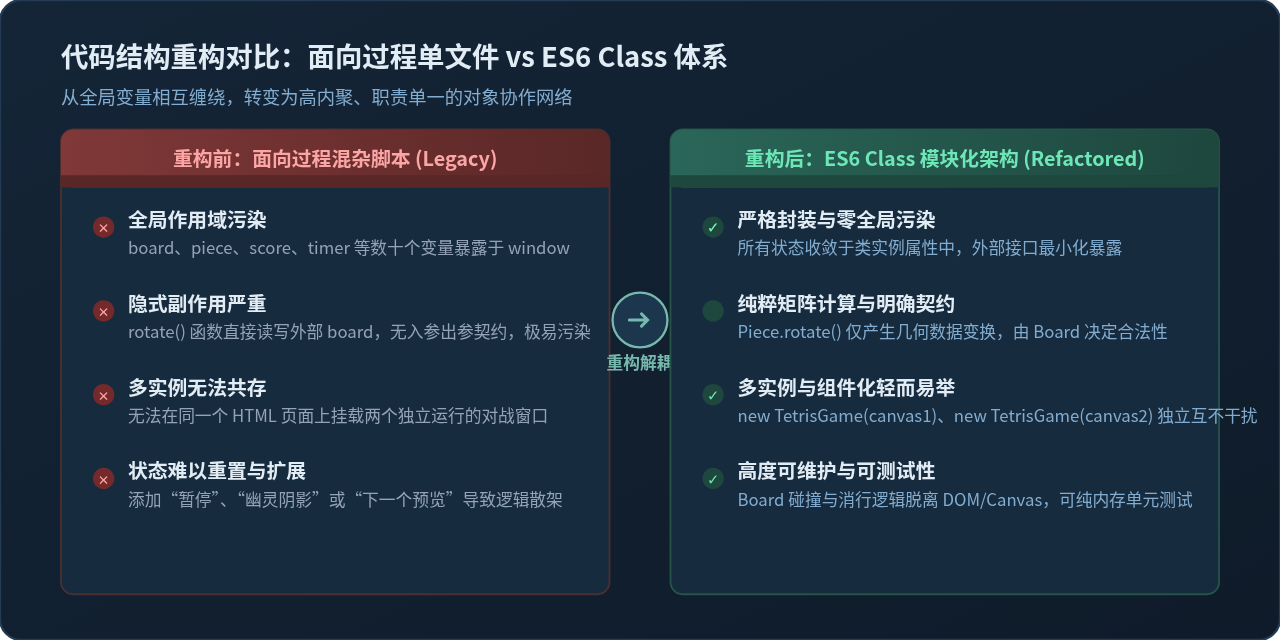
在 ES6 Class 体系下,我们将游戏划分为三个高内聚的核心类,各自履行明确的单一职责:
| 类名 | 核心管理属性 | 关键公开方法 | 职责定位 |
|---|---|---|---|
| Piece | matrix, x, y, color |
rotate(), move(), clone() |
方块实体:仅维护形状矩阵与相对位移,不依赖任何外部棋盘数据。 |
| Board | grid[20][10], width, height |
collide(), merge(), sweepLines() |
物理规则:掌控 20×10 空间网格,裁定移动与旋转的合法性,执行消除。 |
| TetrisGame | board, piece, score, isPaused |
update(), drop(), handleInput() |
控制调度:管理 requestAnimationFrame 帧循环、按键绑定及 Canvas 绘制。 |
二、步骤一:封装方块实体类(Piece)
重构的第一步是抽离出与平台完全无关的纯数据与几何对象。Piece 类不需要知道 Canvas 的存在,更不需要知道棋盘的大小。它只关注两件事:当前由哪一个形状矩阵构成,以及如何在空间中进行自身旋转与位移。
1. 经典四联骨牌形状矩阵
俄罗斯方块由 7 种标准四联骨牌(I、J、L、O、S、T、Z)组成,在代码中可以用 0 和 1(或非零颜色编号)构成的二维方阵表示:
const SHAPES = {
  I: [
    [0, 1, 0, 0],
    [0, 1, 0, 0],
    [0, 1, 0, 0],
    [0, 1, 0, 0]
  ],
  T: [
    [0, 1, 0],
    [1, 1, 1],
    [0, 0, 0]
  ],
  O: [
    [1, 1],
    [1, 1]
  ],
  L: [
    [0, 2, 0],
    [0, 2, 0],
    [0, 2, 2]
  ],
  J: [
    [0, 3, 0],
    [0, 3, 0],
    [3, 3, 0]
  ],
  S: [
    [0, 4, 4],
    [4, 4, 0],
    [0, 0, 0]
  ],
  Z: [
    [5, 5, 0],
    [0, 5, 5],
    [0, 0, 0]
  ]
};
2. 顺时针与逆时针矩阵旋转算法
对一个正方形矩阵进行顺时针 90 度旋转,在数学上等价于两个连续操作:矩阵转置(行列对调),然后将每一行元素水平镜像反转(reverse)。逆时针旋转则先反转行再转置。这样即可用仅 6 行代码完成精准旋转,彻底告别写死旋转形态的冗长 switch 结构。
// Piece.js: 独立的方块实体类
export class Piece {
  constructor(type, matrix, color) {
    this.type = type;
    this.matrix = matrix.map(row => [...row]); // 深拷贝矩阵防污染
    this.color = color;
    this.x = 3; // 默认水平居中出生位置
    this.y = 0; // 默认顶部出生位置
  }

  // 相对位移方法
  move(dx, dy) {
    this.x += dx;
    this.y += dy;
  }

  // 顺时针 (dir = 1) 或 逆时针 (dir = -1) 矩阵旋转
  rotate(dir = 1) {
    const rows = this.matrix.length;
    // 1. 转置矩阵: [row][col] -> [col][row]
    for (let y = 0; y < rows; ++y) {
      for (let x = 0; x < y; ++x) {
        const temp = this.matrix[y][x];
        this.matrix[y][x] = this.matrix[x][y];
        this.matrix[x][y] = temp;
      }
    }
    // 2. 根据方向反转各行
    if (dir > 0) {
      this.matrix.forEach(row => row.reverse());
    } else {
      this.matrix.reverse();
    }
  }

  // 克隆方法,用于碰撞预测与回退
  clone() {
    const copy = new Piece(this.type, this.matrix, this.color);
    copy.x = this.x;
    copy.y = this.y;
    return copy;
  }
}
三、步骤二:封装棋盘物理与规则类(Board)
Board 负责充当游戏世界的“物理引擎”。它由一个 20 行 × 10 列的二维数组承载,负责保存所有已经落定堆叠的固化方块,并向外界提供标准的边界检测与消除接口。
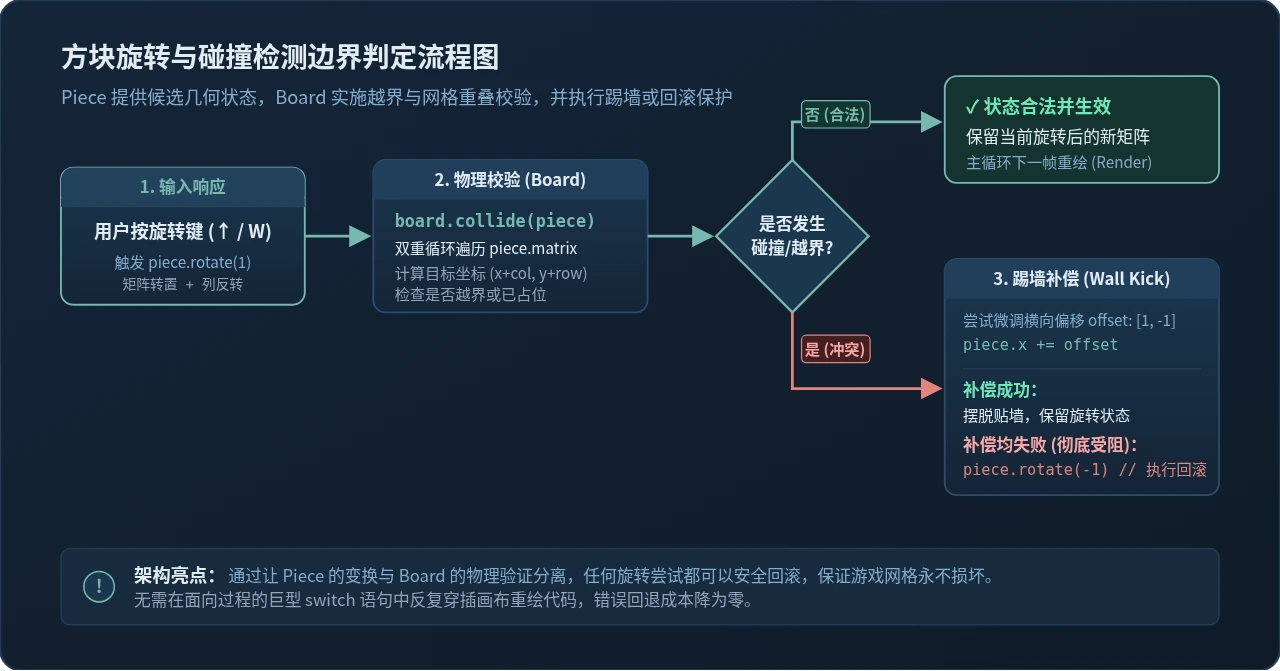
1. 碰撞检测逻辑(collide)
碰撞检测是俄罗斯方块的核心判定。很多初学者习惯在检测到碰撞后直接写死 game.isOver = true,破坏了模块纯度。在 Board 类中,collide(piece) 应该是一个纯判断方法:遍历待测方块的矩阵,只要有非零单元格超出棋盘左右下边界,或者对应网格已经存在落定方块,即返回 true,否则返回 false。
2. 满行消除与行下移算法(sweepLines)
当方块触底固化(merge)后,调用 sweepLines() 扫描整盘。从底端逐行向上检查,只要某一行所有元素均非零,说明满行。我们使用 splice 剔除该行并在网格最顶端 unshift 一行全零数组,即可自然完成整体下移并统计得分。
// Board.js: 棋盘网格与物理边界类
export class Board {
  constructor(rows = 20, cols = 10) {
    this.rows = rows;
    this.cols = cols;
    this.grid = this.createGrid();
  }

  createGrid() {
    return Array.from({ length: this.rows }, () => new Array(this.cols).fill(0));
  }

  reset() {
    this.grid = this.createGrid();
  }

  // 核心检测: 判定给定方块在当前坐标下是否发生重叠或越界
  collide(piece) {
    const m = piece.matrix;
    for (let y = 0; y < m.length; ++y) {
      for (let x = 0; x < m[y].length; ++x) {
        if (m[y][x] !== 0) {
          const targetX = piece.x + x;
          const targetY = piece.y + y;

          // 越界校验 (左边界、右边界、下边界)
          if (targetX < 0 || targetX >= this.cols || targetY >= this.rows) {
            return true;
          }
          // 网格重合校验 (已固化方块,且位于棋盘范围内)
          if (targetY >= 0 && this.grid[targetY][targetX] !== 0) {
            return true;
          }
        }
      }
    }
    return false;
  }

  // 固化方块到网格中
  merge(piece) {
    piece.matrix.forEach((row, y) => {
      row.forEach((value, x) => {
        if (value !== 0) {
          const gridY = piece.y + y;
          const gridX = piece.x + x;
          if (gridY >= 0 && gridY < this.rows && gridX >= 0 && gridX < this.cols) {
            this.grid[gridY][gridX] = piece.color;
          }
        }
      });
    });
  }

  // 扫描满行并消除,返回消除行数
  sweepLines() {
    let linesCleared = 0;
    outer: for (let y = this.rows - 1; y >= 0; --y) {
      for (let x = 0; x < this.cols; ++x) {
        if (this.grid[y][x] === 0) {
          continue outer;
        }
      }
      // 该行已满: 移除并从顶部插入空行
      const emptyRow = new Array(this.cols).fill(0);
      this.grid.splice(y, 1);
      this.grid.unshift(emptyRow);
      linesCleared++;
      ++y; // 由于下移了一行,需重新检查当前索引行
    }
    return linesCleared;
  }
}
四、步骤三:重构实操四步法与控制器总枢(TetrisGame)
在分离了 Piece 和 Board 之后,我们将进入重构实施的核心流水线:通过 TetrisGame 类组装各个子系统,并在其中统管游戏主循环、时间片推进与键盘事件分发。
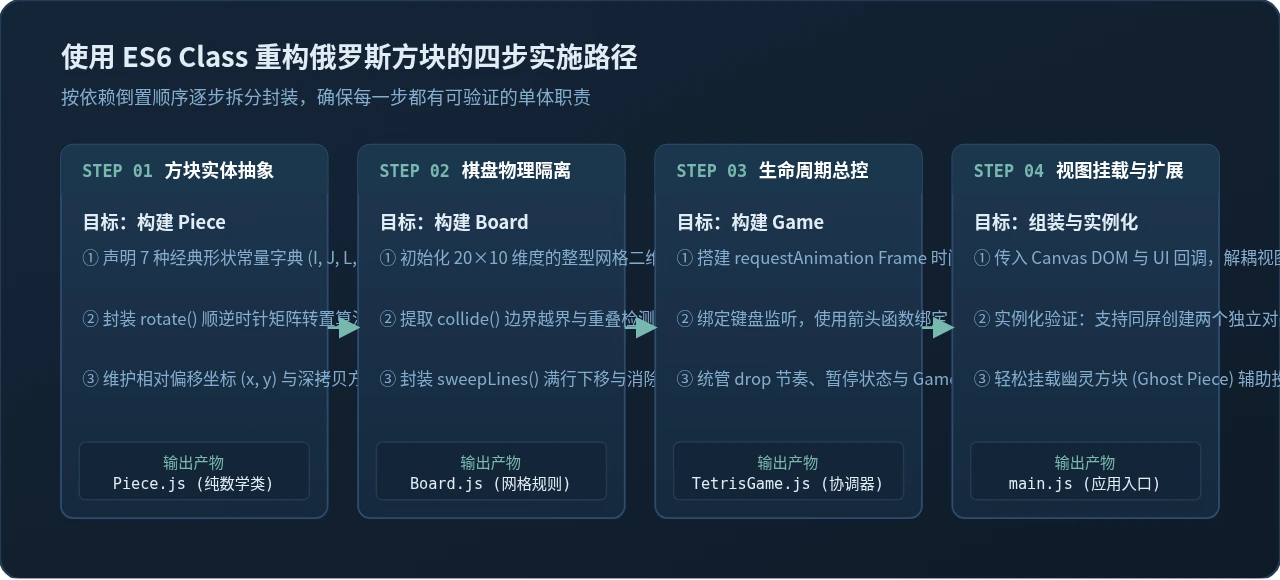
1. 使用 requestAnimationFrame 替代 setInterval
面向过程实现中常见的 setInterval(drop, 1000) 容易受到浏览器性能抖动影响,在页面切换标签或掉帧时可能导致方块连续下落多格。在 TetrisGame 中,我们采用 requestAnimationFrame 配合 deltaTime = currentTime - lastTime 计算下落累计时间:
重点注意:避免 this 作用域丢失
在类方法中将函数作为 requestAnimationFrame(this.update) 或 window.addEventListener('keydown', this.handleInput) 传入时,回调执行环境中的 this 会变为全局对象或 undefined。重构时必须在构造函数中通过箭头函数包装,或使用 this.update = this.update.bind(this) 进行显式绑定。
// TetrisGame.js: 核心协调控制器
import { Piece } from './Piece.js';
import { Board } from './Board.js';

export class TetrisGame {
  constructor(canvas, scoreElement) {
    this.canvas = canvas;
    this.ctx = canvas.getContext('2d');
    this.scoreElement = scoreElement;

    this.gridSize = 24; // 每个格子的像素尺寸
    this.board = new Board(20, 10);
    this.piece = null;
    this.score = 0;

    // 下落与时间控制
    this.dropCounter = 0;
    this.dropInterval = 800; // 默认下落间隔 (毫秒)
    this.lastTime = 0;
    this.isPaused = false;
    this.isGameOver = false;

    // 绑定事件与循环,确保 this 正确指向当前游戏实例
    this.update = this.update.bind(this);
    this.handleInput = this.handleInput.bind(this);

    this.init();
  }

  init() {
    window.addEventListener('keydown', this.handleInput);
    this.reset();
  }

  reset() {
    this.board.reset();
    this.score = 0;
    this.dropInterval = 800;
    this.isGameOver = false;
    this.isPaused = false;
    this.spawnPiece();
    this.updateScore();
  }

  spawnPiece() {
    const pieceTypes = ['I', 'J', 'L', 'O', 'S', 'T', 'Z'];
    const colors = ['#4A90E2', '#3B82F6', '#F59E0B', '#EAB308', '#10B981', '#8B5CF6', '#EF4444'];
    const randomIndex = Math.floor(Math.random() * pieceTypes.length);
    const type = pieceTypes[randomIndex];

    // 此处简化引入形状,实际可通过工厂方法或常量映射
    const matrixMap = {
      I: [[0,1,0,0],[0,1,0,0],[0,1,0,0],[0,1,0,0]],
      T: [[0,1,0],[1,1,1],[0,0,0]],
      O: [[1,1],[1,1]],
      L: [[0,1,0],[0,1,0],[0,1,1]],
      J: [[0,1,0],[0,1,0],[1,1,0]],
      S: [[0,1,1],[1,1,0],[0,0,0]],
      Z: [[1,1,0],[0,1,1],[0,0,0]]
    };

    this.piece = new Piece(type, matrixMap[type], colors[randomIndex]);
    this.piece.x = Math.floor((this.board.cols - this.piece.matrix[0].length) / 2);
    this.piece.y = 0;

    // 出生时即发生碰撞,判定游戏结束
    if (this.board.collide(this.piece)) {
      this.isGameOver = true;
    }
  }

  // 主循环帧调度
  update(time = 0) {
    if (this.isPaused || this.isGameOver) {
      this.render();
      return;
    }

    const deltaTime = time - this.lastTime;
    this.lastTime = time;

    this.dropCounter += deltaTime;
    if (this.dropCounter > this.dropInterval) {
      this.drop();
    }

    this.render();
    requestAnimationFrame(this.update);
  }

  // 方块下落一格
  drop() {
    this.piece.y++;
    this.dropCounter = 0;

    if (this.board.collide(this.piece)) {
      this.piece.y--; // 回退到触底前一格
      this.board.merge(this.piece);
      const lines = this.board.sweepLines();
      if (lines > 0) {
        this.score += lines * 100 * lines; // 连消倍数奖励
        this.dropInterval = Math.max(120, 800 - Math.floor(this.score / 500) * 50); // 难度升级
        this.updateScore();
      }
      this.spawnPiece();
    }
  }

  // 移动方块 (带边界碰撞保护)
  playerMove(dx) {
    this.piece.x += dx;
    if (this.board.collide(this.piece)) {
      this.piece.x -= dx; // 撞墙回退
    }
  }

  // 旋转方块 (带踢墙补偿与逆向回滚)
  playerRotate(dir = 1) {
    const originalX = this.piece.x;
    this.piece.rotate(dir);

    // 简单的 Wall-Kick: 尝试左右偏移 1 格
    let offset = 1;
    while (this.board.collide(this.piece)) {
      this.piece.x += offset;
      offset = -(offset + (offset > 0 ? 1 : -1));
      if (Math.abs(offset) > this.piece.matrix[0].length) {
        // 补偿失败,彻底回滚
        this.piece.rotate(-dir);
        this.piece.x = originalX;
        return;
      }
    }
  }

  handleInput(event) {
    if (this.isGameOver) return;

    if (event.code === 'KeyP') {
      this.isPaused = !this.isPaused;
      if (!this.isPaused) {
        this.lastTime = performance.now();
        requestAnimationFrame(this.update);
      }
      return;
    }

    if (this.isPaused) return;

    switch (event.code) {
      case 'ArrowLeft':
      case 'KeyA':
        this.playerMove(-1);
        break;
      case 'ArrowRight':
      case 'KeyD':
        this.playerMove(1);
        break;
      case 'ArrowDown':
      case 'KeyS':
        this.drop();
        break;
      case 'ArrowUp':
      case 'KeyW':
        this.playerRotate(1);
        break;
    }
  }

  updateScore() {
    if (this.scoreElement) {
      this.scoreElement.innerText = this.score;
    }
  }

  render() {
    const ctx = this.ctx;
    ctx.clearRect(0, 0, this.canvas.width, this.canvas.height);

    // 绘制固化网格
    for (let y = 0; y < this.board.rows; ++y) {
      for (let x = 0; x < this.board.cols; ++x) {
        const color = this.board.grid[y][x];
        if (color !== 0) {
          this.drawCell(x, y, color);
        }
      }
    }

    // 绘制活动方块
    if (this.piece) {
      this.piece.matrix.forEach((row, y) => {
        row.forEach((value, x) => {
          if (value !== 0) {
            this.drawCell(this.piece.x + x, this.piece.y + y, this.piece.color);
          }
        });
      });
    }

    // 游戏结束状态提示
    if (this.isGameOver) {
      ctx.fillStyle = 'rgba(0, 0, 0, 0.75)';
      ctx.fillRect(0, 0, this.canvas.width, this.canvas.height);
      ctx.fillStyle = '#EF4444';
      ctx.font = 'bold 20px sans-serif';
      ctx.textAlign = 'center';
      ctx.fillText('GAME OVER', this.canvas.width / 2, this.canvas.height / 2);
    }
  }

  drawCell(x, y, color) {
    this.ctx.fillStyle = color;
    this.ctx.fillRect(x * this.gridSize, y * this.gridSize, this.gridSize - 1, this.gridSize - 1);
  }
}
五、步骤四:多实例验证与状态机扩展
面向对象设计最令人信服的优势,在于能够毫不费力地创建互不干扰的独立实例。在面向过程时代,若要在同屏展示 Player 1 和 Player 2 的对战窗口,开发者往往被迫将全部变量名复制一份改写为 board1、board2、piece1、piece2,极易引发维护灾难。
而在 ES6 Class 架构下,我们只需传入不同的 Canvas 容器与按键映射配置,即可在几行代码内实例化任意多个独立游戏进程:
// main.js: 多实例挂载与对战启动
import { TetrisGame } from './TetrisGame.js';

// 获取两组 DOM 画布与计分板
const p1Canvas = document.getElementById('player1-canvas');
const p1Score = document.getElementById('player1-score');

const p2Canvas = document.getElementById('player2-canvas');
const p2Score = document.getElementById('player2-score');

// 实例化两个完全隔离的游戏实体
const gameP1 = new TetrisGame(p1Canvas, p1Score);
const gameP2 = new TetrisGame(p2Canvas, p2Score);

// 启动各自的独立渲染与帧调度
requestAnimationFrame(gameP1.update);
requestAnimationFrame(gameP2.update);
六、核心运转机制总结与高频避坑指南
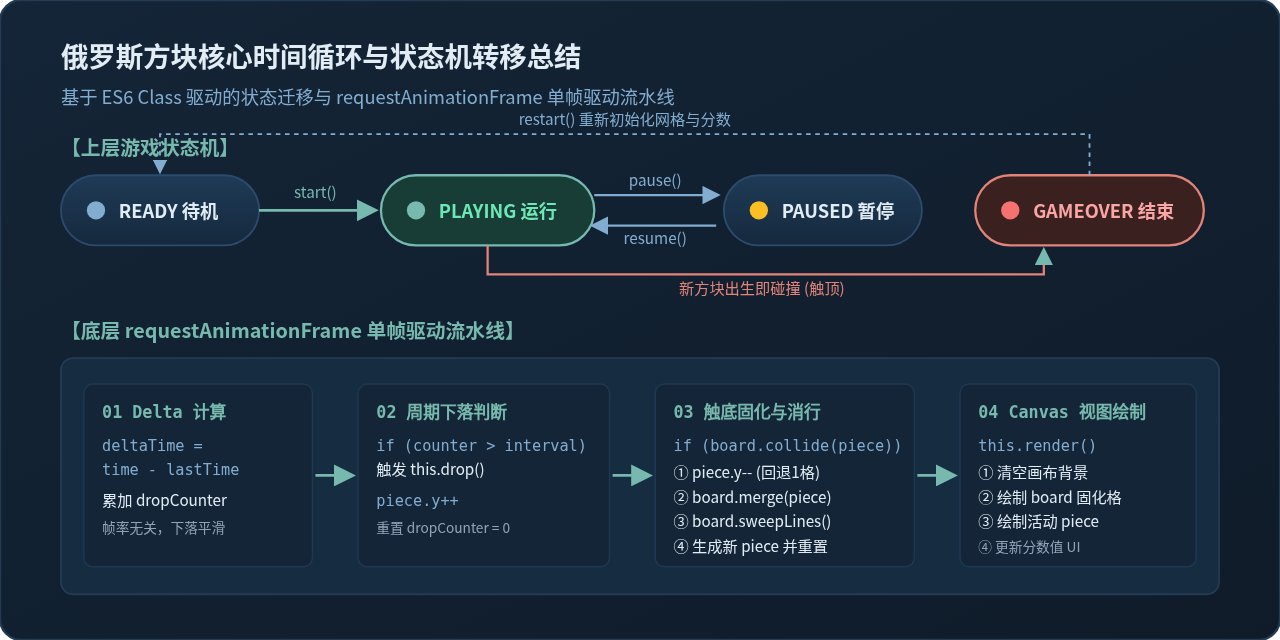
在实施 ES6 Class 重构的过程中,有以下几个高频陷阱需要特别防范:
陷阱一:二维数组填充引起的“引用联动”
在初始化棋盘二维网格时,千万不要使用 new Array(20).fill(new Array(10).fill(0))。这种写法创建出的 20 行实际上全部引用了同一份内层数组对象,修改任意一行(如 grid[0][0] = 1)会导致整列被同时赋值。必须使用 Array.from({ length: 20 }, () => new Array(10).fill(0)) 或两重循环确保每一行独立分配内存。
陷阱二:矩阵旋转后的踢墙补偿越界
贴近最右侧边界(x = cols - 1)或长条方块(I 型)在狭窄通道旋转时,如果直接执行矩阵转置而不校验边界,方块会瞬间穿透侧壁。在重构的 playerRotate 方法中,务必引入 offset 检测机制;若偏移后依然碰撞,必须执行 piece.rotate(-dir) 强制回滚,确保棋盘内部状态始终绝对合法。
陷阱三:Canvas 高清屏模糊与网格坐标统一
当将 gridSize 设置为像素倍率(例如 24px)时,建议通过 canvas.width = cols * gridSize 与 canvas.height = rows * gridSize 显式指定绘图缓冲区尺寸,避免使用 CSS 样式拉伸导致网格线失真与模糊。
总结:通过引入 ES6 Class,我们将原本面目模糊的面向过程单脚本重组为 Piece、Board 与 TetrisGame 三大正交体系。方块专注于纯粹的几何形变,棋盘专注于纯粹的空间物理,控制器专注于调度与交互。这种高内聚低耦合的结构,不仅让代码可读性与可测试性得到质的飞跃,更为后续接入音效系统、AI 自动对战以及网络联机奠定了极其稳固的工程基石。
实用工具推荐
电子包浆
使用 ›绿化、压缩、噪点和虚拟水印,自由调节做旧程度。
图片压缩
使用 ›选择画质和输出格式,预览压缩前后的大小。
作者最新文章
相关文章