
详细介绍在Node.js服务端提取真实客户端IP、清洗IPv6映射格式与过滤内网地址的方法,对比并演示使用本地离线IP数据库(geoip-lite、maxmind)与第三方HTTP接口获取地理位置的完整实现与注意事项。

当前位置:首页 > Node.js 基础 > 正文
Node.js服务端怎么根据IP地址获取地理位置
作者:岩茶
时间:2026-11-18
浏览:408
文章目录
在 Node.js 服务端根据 IP 获取地理位置,通常分成两步完成:先从 HTTP 请求中提取并清洗出真实的公网客户端 IP,再通过本地离线 IP 数据库(如 maxmind 读取 .mmdb 文件或 geoip-lite)或调用第三方 HTTP 查询接口把 IP 映射成国家、省份、城市与经纬度。
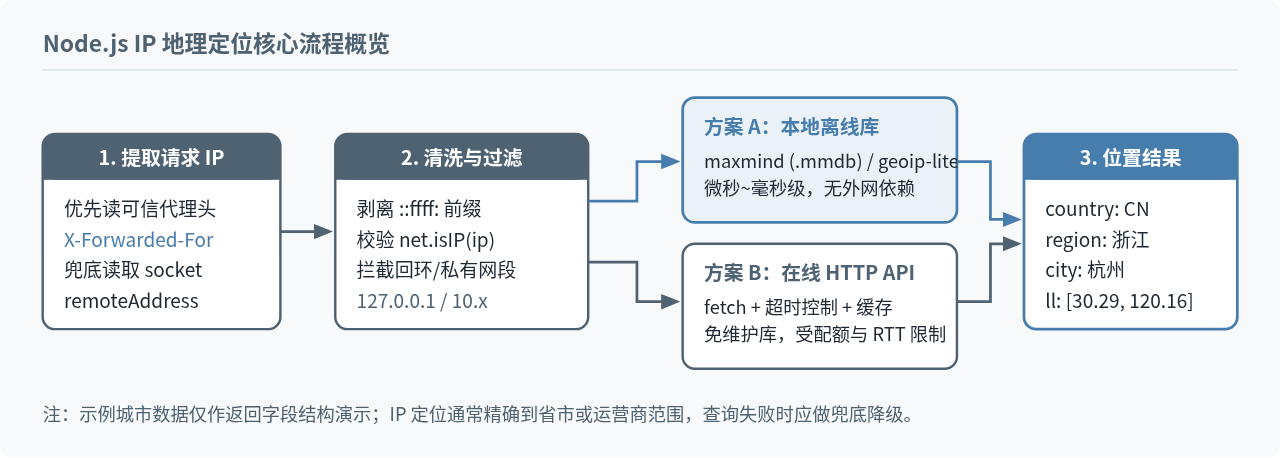
先解决第一步:如何拿到真实的客户端 IP
很多刚接触这个需求时写出的代码在本地测试正常,部署到线上却总是查不到地理位置,或者全员显示成同一个城市,问题往往不出在 IP 库,而在于拿错了 IP。
在 Node.js 原生 http 模块中,底层连接地址位于 req.socket.remoteAddress。如果服务直接暴露在公网,它就是客户端 IP;但生产环境通常会在 Node.js 前面挂一层 Nginx、CDN 或云厂商负载均衡,此时 req.socket.remoteAddress 拿到的只是代理服务器的内网地址(例如 127.0.0.1 或 10.0.1.8)。
为了拿到上游传来的客户端地址,服务端需要结合代理请求头和清洗规则处理三个细节:
- 读取转发头:反向代理通常会在转发时写入
x-forwarded-for或x-real-ip。其中x-forwarded-for的值常是逗号分隔的列表,格式为客户端IP, 代理1IP, 代理2IP。只有在确认前置代理可信的前提下,才能取最左侧的第一个非空项。 - 剥离 IPv6 映射前缀:Node.js 默认监听双栈端口(
::)时,IPv4 客户端的连接地址会被表示为::ffff:203.0.113.45这种格式。部分解析逻辑如果不去掉开头的::ffff:,会导致格式匹配异常。 - 过滤回环和私有地址:
127.0.0.1、::1以及10.0.0.0/8、172.16.0.0/12、192.168.0.0/16、fc00::/7属于内网或保留地址,不存在公网地理归属。查询前应该先识别并跳过,避免把无效查询打给接口或数据库。
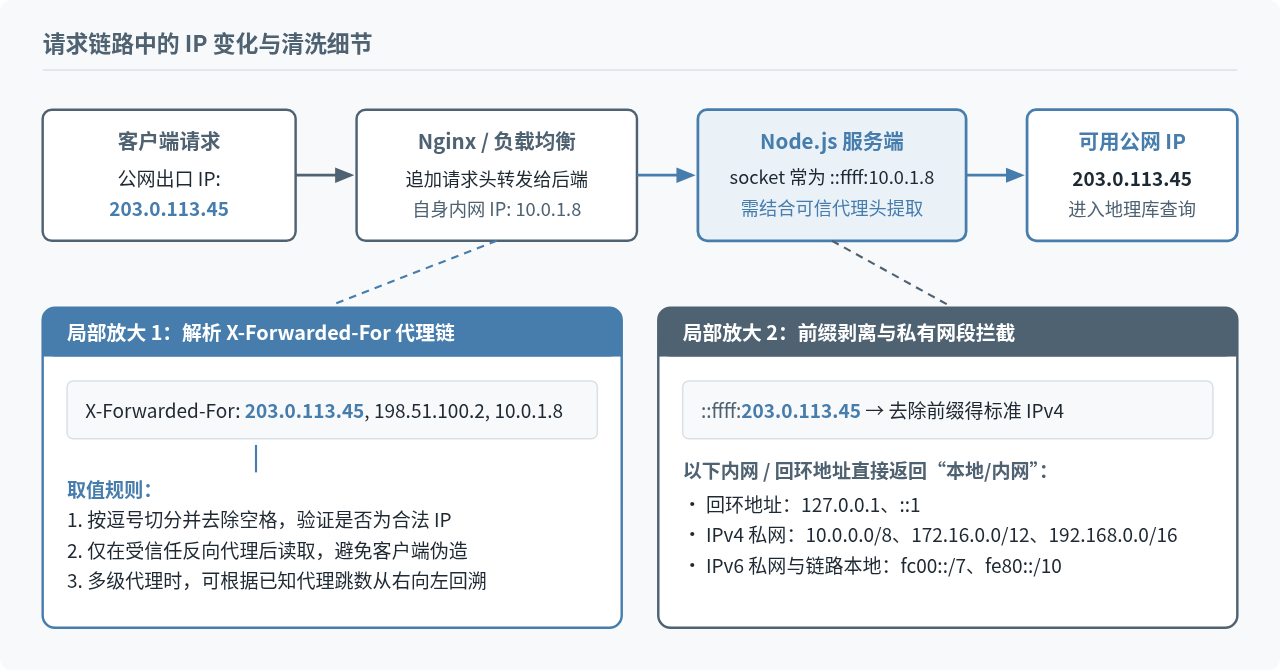
下面这组通用工具函数可以直接放在项目的 ip-utils.mjs 中,只依赖 Node.js 内置的 node:net 模块,在原生 HTTP、Express、Koa 或 Fastify 中都能复用:
ip-utils.mjs
import net from 'node:net';

/**
 * 去掉双栈监听常见的 ::ffff: 前缀和方括号/端口,还原标准 IP
 */
export function normalizeIp(rawIp) {
  if (!rawIp || typeof rawIp !== 'string') return '';
  let ip = rawIp.trim();

  // 处理带端口的 IPv6,如 [2001:db8::1]:12345
  if (ip.startsWith('[')) {
    const endBracket = ip.indexOf(']');
    if (endBracket !== -1) {
      ip = ip.slice(1, endBracket);
    }
  } else if (ip.includes('.') && ip.includes(':') && !ip.startsWith('::ffff:')) {
    // 处理带端口的 IPv4,如 203.0.113.45:54321
    ip = ip.split(':')[0];
  }

  if (ip.startsWith('::ffff:')) {
    ip = ip.slice(7);
  }

  return net.isIP(ip) ? ip : '';
}

/**
 * 判断是否为回环、私有或链路本地地址(没有公网地理位置)
 */
export function isPrivateOrReservedIp(ip) {
  const version = net.isIP(ip);
  if (version === 0) return true;

  if (version === 4) {
    const parts = ip.split('.').map(Number);
    const [a, b] = parts;
    if (a === 10) return true; // 10.0.0.0/8
    if (a === 127) return true; // 127.0.0.0/8
    if (a === 169 && b === 254) return true; // 169.254.0.0/16
    if (a === 172 && b >= 16 && b <= 31) return true; // 172.16.0.0/12
    if (a === 192 && b === 168) return true; // 192.168.0.0/16
    if (a === 0) return true;
    return false;
  }

  // IPv6 常见非公网段判断
  const lower = ip.toLowerCase();
  if (lower === '::1' || lower === '::') return true;
  if (lower.startsWith('fc') || lower.startsWith('fd')) return true; // fc00::/7
  if (lower.startsWith('fe80:')) return true; // 链路本地
  return false;
}

/**
 * 从请求对象提取客户端 IP
 * @param {import('node:http').IncomingMessage} req
 * @param {boolean} trustProxy 是否信任前置反向代理写入的转发头
 */
export function extractClientIp(req, trustProxy = false) {
  if (trustProxy) {
    const xff = req.headers['x-forwarded-for'];
    if (typeof xff === 'string' && xff.length > 0) {
      const candidates = xff.split(',').map((item) => normalizeIp(item));
      const firstValid = candidates.find((ip) => ip && !isPrivateOrReservedIp(ip));
      if (firstValid) return firstValid;
    }

    const realIp = req.headers['x-real-ip'];
    if (typeof realIp === 'string') {
      const normalized = normalizeIp(realIp);
      if (normalized) return normalized;
    }
  }

  return normalizeIp(req.socket?.remoteAddress || '');
}
安全提醒:只有在确认 Node.js 前面确实部署了 Nginx、SLB 等可控代理,且代理会覆盖或清理外部传入的伪造头时,才应把
trustProxy 设为 true。如果服务端直接暴露给公网,用户可以通过请求头伪造任意 IP。
两种主流实现方案怎么选
拿到合法的公网 IP 后,把 IP 转成地理位置有两种典型做法:一种是把 IP 段映射库放在服务端本地进程里直接查(本地离线库);另一种是由服务端发起 HTTP 请求去查第三方提供的在线 GeoIP 接口。两者在延迟、部署复杂度和运维方式上差异很大,可以按下面几个条件判断:
| 对比维度 | 本地离线 IP 数据库(maxmind / geoip-lite) | 第三方 HTTP IP 查询接口 |
|---|---|---|
| 单次查询耗时 | 通常在微秒到 1 毫秒以内,在内存或本地索引完成 | 取决于网络往返(通常数十至数百毫秒) |
| 外网与隐私限制 | 完全离线,不把用户 IP 发送到外部网络 | 服务端需能访问公网,且会将查询 IP 发给第三方 |
| 并发与稳定性 | 不依赖外部服务可用性,适合登录日志、中间件鉴权等高并发链路 | 受接口 QPS 限流和免费/付费配额约束,需要加缓存与超时降级 |
| 数据更新维护 | 需要定期更新 .mmdb 文件或重新更新依赖包 |
由接口服务商持续更新,接入方无需维护数据文件 |
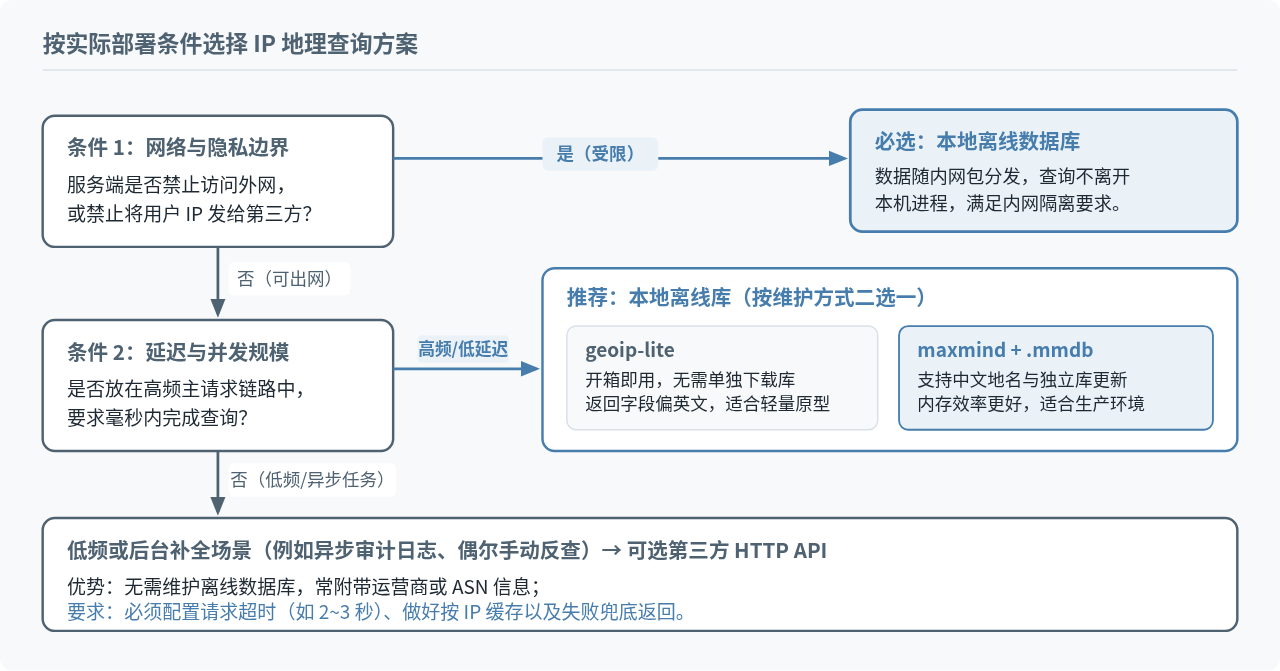
方案一:使用本地离线 IP 数据库(生产环境首选)
在 Node.js 生态里,最常用的是 geoip-lite 和 maxmind。如果你希望最快验证逻辑、不想额外下载数据文件,可以先用 geoip-lite;如果用于正式生产环境且需要中文地名、更可控的数据更新节奏,推荐使用 maxmind 配合 MaxMind 的 GeoLite2-City .mmdb 数据库文件。
1. 用 geoip-lite 快速实现
geoip-lite 在安装时自带一份转换好的本地数据,不需要额外申请账号或下载文件。在项目根目录终端执行安装命令:
npm install geoip-lite
随后创建 geo-lite-demo.mjs,导入并调用 geoip.lookup(ip) 即可。注意先用前面写好的清洗函数过滤内网地址:
geo-lite-demo.mjs
import geoip from 'geoip-lite';
import { normalizeIp, isPrivateOrReservedIp } from './ip-utils.mjs';

function lookupWithGeoipLite(rawIp) {
  const ip = normalizeIp(rawIp);
  if (!ip || isPrivateOrReservedIp(ip)) {
    return { ip: rawIp, isPrivate: true, location: null };
  }

  const record = geoip.lookup(ip);
  if (!record) {
    return { ip, isPrivate: false, location: null };
  }

  return {
    ip,
    isPrivate: false,
    location: {
      country: record.country, // 两位国家代码,如 CN、US
      region: record.region,   // 省/州代码
      city: record.city,       // 英文城市名
      ll: record.ll,           // [纬度, 经度]
      timezone: record.timezone,
    },
  };
}

console.log(lookupWithGeoipLite('::ffff:203.0.113.45'));
示例输出如下(具体字段值取决于你传入的公网 IP 与本地库版本):
{
  ip: '203.0.113.45',
  isPrivate: false,
  location: {
    country: 'CN',
    region: 'ZJ',
    city: 'Hangzhou',
    ll: [ 30.2936, 120.1614 ],
    timezone: 'Asia/Shanghai'
  }
}
geoip-lite 的局限在于数据打包在依赖内部,默认返回英文城市名和地区缩写,且加载数据时内存占用较高(如果用 Serverless 或内存紧张的容器需留意)。如果业务需要中文地名或按月独立更新数据文件,建议换用 maxmind。
2. 用 maxmind 读取 .mmdb 文件(支持中文地名)
maxmind 是用于解析 MaxMind MMDB 二进制格式数据库的 Node.js 库,查询时不把全量数据全部反序列化成 JS 对象,内存占用更稳,并且可以直接从数据库里取出 names['zh-CN'] 中文字段。
实施前需要准备两样东西:在项目根目录安装 maxmind 依赖,以及一份 GeoLite2-City.mmdb 文件(可在 MaxMind 官网注册免费账号后在后台下载,放到项目的 data/GeoLite2-City.mmdb 路径下)。
npm install maxmind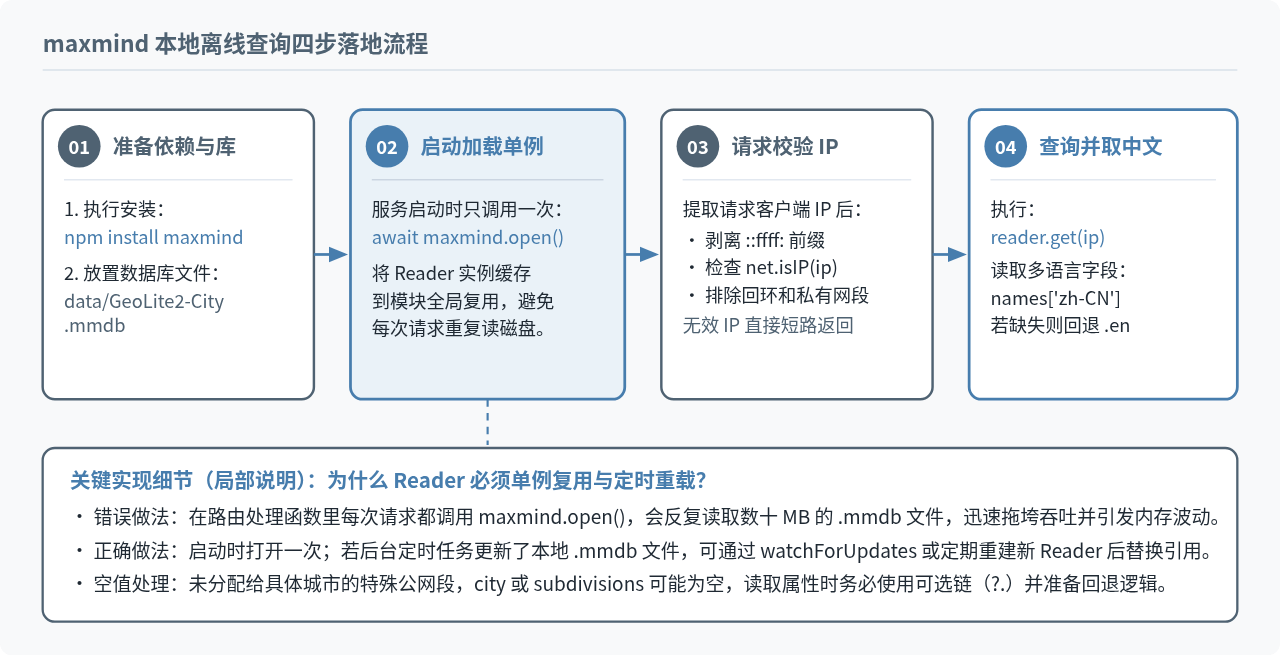
下面是完整的封装模块示例 geo-maxmind.mjs,包含启动加载、中文名称优先提取以及缺省回退:
geo-maxmind.mjs
import path from 'node:path';
import { fileURLToPath } from 'node:url';
import maxmind from 'maxmind';
import { normalizeIp, isPrivateOrReservedIp } from './ip-utils.mjs';

const __dirname = path.dirname(fileURLToPath(import.meta.url));
const DB_PATH = path.join(__dirname, 'data', 'GeoLite2-City.mmdb');

let cityLookup = null;

/**
 * 服务启动时调用一次,初始化 MMDB Reader
 */
export async function initGeoDatabase(dbPath = DB_PATH) {
  cityLookup = await maxmind.open(dbPath, {
    watchForUpdates: true, // 磁盘上的 .mmdb 文件被替换时自动重新加载
  });
}

function pickName(names) {
  if (!names) return '';
  return names['zh-CN'] || names.en || '';
}

/**
 * 根据 IP 查询地理位置
 */
export function lookupIpLocation(rawIp) {
  if (!cityLookup) {
    throw new Error('GeoIP 数据库尚未初始化,请先调用 initGeoDatabase()');
  }

  const ip = normalizeIp(rawIp);
  if (!ip || isPrivateOrReservedIp(ip)) {
    return {
      ip: rawIp,
      isPrivate: true,
      country: '',
      province: '',
      city: '',
      latitude: null,
      longitude: null,
    };
  }

  const res = cityLookup.get(ip);
  if (!res) {
    return {
      ip,
      isPrivate: false,
      country: '',
      province: '',
      city: '',
      latitude: null,
      longitude: null,
    };
  }

  return {
    ip,
    isPrivate: false,
    country: pickName(res.country?.names),
    countryCode: res.country?.iso_code || '',
    province: pickName(res.subdivisions?.[0]?.names),
    city: pickName(res.city?.names),
    latitude: res.location?.latitude ?? null,
    longitude: res.location?.longitude ?? null,
    timeZone: res.location?.time_zone || '',
  };
}
注意两点:第一,initGeoDatabase() 必须在监听 HTTP 端口之前完成 await,防止启动瞬间请求打进来报错;第二,读取 res.subdivisions?.[0]?.names 时一定要加可选链,因为对于直辖市、岛屿国家或部分只精确到国家级的 IP 段,subdivisions 或 city 字段可能不存在。
方案二:调用第三方 HTTP 接口查询(含超时与缓存)
如果你的业务只是在后台偶尔反查一下操作日志里的 IP,或者不希望在仓库与部署脚本里维护 .mmdb 数据文件,可以直接在服务端请求第三方 IP 查询 API。
直接使用原生 fetch(Node.js 18 及以上版本已内置)看似只要两行代码,但放到服务端工程里必须补上三个保护措施:
- 设置请求超时:第三方服务出现网络抖动时,如果默认死等 TCP 超时,会把整个 Node.js 接口线程占住(准确地说是把当前异步请求长期挂起)。通常使用
AbortController把超时控制在 2~3 秒内。 - 加按 IP 维度的内存缓存:同一个用户一次打开页面可能连续触发十几个接口请求。对同一 IP 的查询结果缓存数小时(并限制缓存最大条目数防内存无限增长),能大幅减少外部接口消耗。
- 失败兜底不阻塞主流程:IP 归属地绝大多数时候属于辅助信息,接口返回非 200 状态或超时后,捕获异常并返回
null,不能让登录、提交表单等主流程跟着报错。
下面给出一个包含超时控制与简单容量上限缓存的完整示例 geo-http-api.mjs(代码中的请求 URL 为示例占位地址,实际接入时请替换为你选用的具体服务商接口地址及对应的字段映射):
geo-http-api.mjs
import { normalizeIp, isPrivateOrReservedIp } from './ip-utils.mjs';

const CACHE_TTL_MS = 6 * 60 * 60 * 1000; // 缓存 6 小时
const MAX_CACHE_SIZE = 5000;
const REQUEST_TIMEOUT_MS = 2500;

const ipCache = new Map();

function getFromCache(ip) {
  const entry = ipCache.get(ip);
  if (!entry) return null;
  if (Date.now() > entry.expiresAt) {
    ipCache.delete(ip);
    return null;
  }
  return entry.data;
}

function setToCache(ip, data) {
  if (ipCache.size >= MAX_CACHE_SIZE) {
    // 超过容量上限时淘汰最早写入的一条
    const oldestKey = ipCache.keys().next().value;
    if (oldestKey) ipCache.delete(oldestKey);
  }
  ipCache.set(ip, {
    data,
    expiresAt: Date.now() + CACHE_TTL_MS,
  });
}

export async function lookupIpByHttpApi(rawIp) {
  const ip = normalizeIp(rawIp);
  if (!ip || isPrivateOrReservedIp(ip)) {
    return { ip: rawIp, isPrivate: true, location: null };
  }

  const cached = getFromCache(ip);
  if (cached) {
    return { ip, isPrivate: false, cached: true, location: cached };
  }

  const controller = new AbortController();
  const timer = setTimeout(() => controller.abort(), REQUEST_TIMEOUT_MS);

  try {
    // 实际使用时替换为所选服务商的正式接口地址(如附带 Token 或 lang 参数)
    const endpoint = `https://api.example.com/geoip/${encodeURIComponent(ip)}`;
    const response = await fetch(endpoint, {
      method: 'GET',
      signal: controller.signal,
      headers: { Accept: 'application/json' },
    });

    if (!response.ok) {
      return { ip, isPrivate: false, location: null };
    }

    const payload = await response.json();
    // 根据实际接口返回结构映射字段
    const location = {
      country: payload.country || '',
      province: payload.region || '',
      city: payload.city || '',
      latitude: payload.lat ?? null,
      longitude: payload.lon ?? null,
    };

    setToCache(ip, location);
    return { ip, isPrivate: false, cached: false, location };
  } catch (err) {
    // 超时(AbortError)或网络错误时降级返回空位置,不抛断主业务
    return { ip, isPrivate: false, location: null, error: err.name };
  } finally {
    clearTimeout(timer);
  }
}
在服务端接口中的完整集成示例
把前面的 ip-utils.mjs 和 geo-maxmind.mjs 组合起来,就可以在 Node.js 服务端直接对外提供服务,或者在中间件里给请求对象挂载地区信息。下面用 Node.js 内置 node:http 写一个可直接运行的完整服务 server.mjs:
server.mjs
import http from 'node:http';
import { extractClientIp } from './ip-utils.mjs';
import { initGeoDatabase, lookupIpLocation } from './geo-maxmind.mjs';

const PORT = 3000;
// 若服务部署在 Nginx 等受信任反向代理后面,将其设为 true
const TRUST_PROXY = process.env.TRUST_PROXY === 'true';

async function bootstrap() {
  await initGeoDatabase();

  const server = http.createServer((req, res) => {
    if (req.url === '/api/geo' && req.method === 'GET') {
      const clientIp = extractClientIp(req, TRUST_PROXY);
      const geo = lookupIpLocation(clientIp);

      res.writeHead(200, { 'Content-Type': 'application/json; charset=utf-8' });
      res.end(JSON.stringify(geo));
      return;
    }

    res.writeHead(404, { 'Content-Type': 'application/json; charset=utf-8' });
    res.end(JSON.stringify({ message: 'Not Found' }));
  });

  server.listen(PORT, () => {
    console.log(`GeoIP service listening on http://127.0.0.1:${PORT}`);
  });
}

bootstrap().catch((err) => {
  console.error('服务启动失败:', err);
  process.exit(1);
});
在终端执行 node server.mjs 启动后,如果用本地浏览器访问 http://127.0.0.1:3000/api/geo,会得到类似下面的示例返回(因为本机访问拿到的 IP 是 127.0.0.1):
{
  "ip": "127.0.0.1",
  "isPrivate": true,
  "country": "",
  "province": "",
  "city": "",
  "latitude": null,
  "longitude": null
}
如果你在开发阶段想模拟公网请求测试 Nginx 转发效果,可以临时带上环境变量启动:TRUST_PROXY=true node server.mjs,再用 curl 携带模拟请求头验证:
curl -H "X-Forwarded-For: 203.0.113.45" http://127.0.0.1:3000/api/geo
如果使用的是 Express 框架,框架本身提供了 app.set('trust proxy', 1)(数字 1 表示只信任最靠近应用的那 1 层反向代理,比直接写 true 更安全),配置后 req.ip 会自动按可信代理链取出并清洗客户端 IP,之后直接把 req.ip 传给 lookupIpLocation(req.ip) 即可。
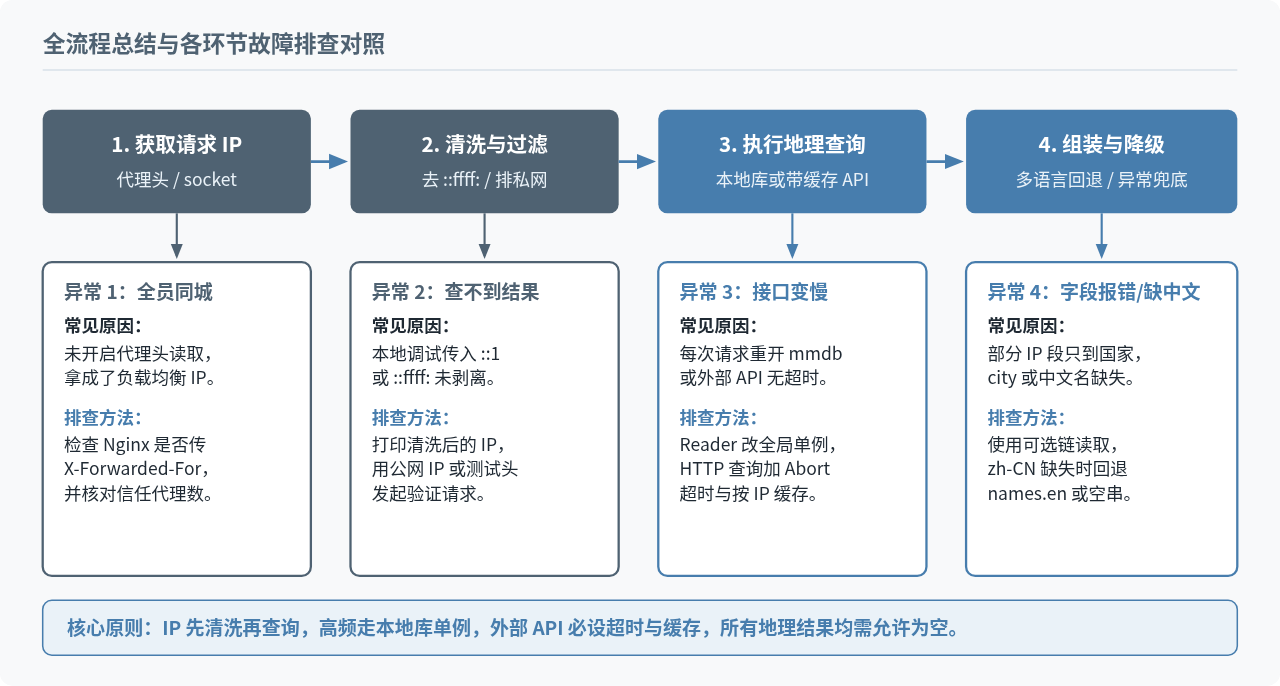
常见错误排查与流程总结
在实际接入时,绝大多数异常都可以按“取到的 IP 是否正确 → 格式是否被识别 → 数据源是否就绪”这条顺序快速定位。以下是上线前最值得核对的四件事:
- 本地测试总返回空结果:先检查取到的 IP 是不是
127.0.0.1或::1,本地环回测试时属于正常现象,可通过模拟X-Forwarded-For或在单元测试中直接传入真实公网 IP 验证查询逻辑。 - 线上所有人定位都在同一个城市:通常是前置 Nginx 覆盖或未透传客户端 IP,或者服务端没读取转发头,把代理服务器自己的公网/内网 IP 当成了所有用户的 IP。请在 Nginx 中确认配置了
proxy_set_header X-Forwarded-For $proxy_add_x_forwarded_for;。 - 把 IP 定位当成精确坐标使用:基于 IP 的定位依赖路由器与运营商分配记录,跨省骨干网调度、移动蜂窝网络出口集中以及代理 VPN 都会影响结果。它适合用于区域访问统计、默认语言切换、异常异地登录提醒,不能用于精确街道定位。
- 忽略数据陈旧问题:IP 地址段每天都有小幅调整,如果采用本地
.mmdb文件,建议通过定时任务每月更新一次数据库文件,配合watchForUpdates: true实现不重启更新。
实用工具推荐
电子包浆
使用 ›绿化、压缩、噪点和虚拟水印,自由调节做旧程度。
图片压缩
使用 ›选择画质和输出格式,预览压缩前后的大小。
作者最新文章
相关文章