

本文介绍基于jQuery实现的鼠标悬浮气泡提示功能。通过修改核心逻辑,解决了传统示例仅支持单个实例的问题,实现了在同一页面中多次调用且互不干扰的效果。内容包含完整的HTML结构、CSS样式定义及JavaScript定位算法,适用于需要轻量级交互提示的前端开发场景。
jQuery悬浮气泡提示框实现方案
本文将详细讲解如何利用jQuery实现鼠标悬浮时弹出气泡提示框的效果,供开发者参考。
(此处展示居中显示的效果示意图)
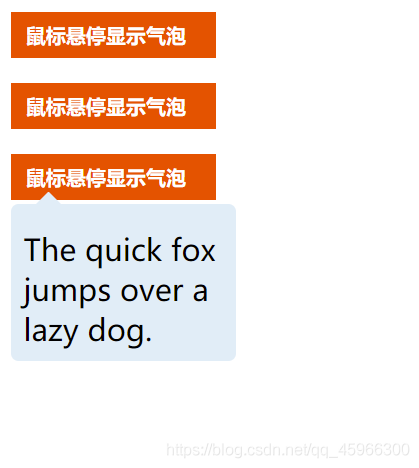
以下是实现该功能的具体代码示例。
网络上常见的示例通常仅支持单个提示框,因此我对jQuery相关逻辑进行了调整,使其能够在一个页面中多次实例化使用。虽然原始出处已不可考,但优化后的版本在复用性上表现更佳。
请注意,使用前务必确保已正确导入jQuery库文件。
核心代码与结构解析
<!DOCTYPE html>
<html>
<head>
 <meta charset="utf-8">
 <title>气泡显示</title>
 <script type="text/javascript" src="../js/jquery-1.8.3.js" ></script>
 <style type="text/css">
  .container {
   margin-top: 130px;
  }
  .tip {
   padding: 8px 12px;
   width: 140px;
   display: block;
   font-size: 16px;
   color: #fff;
   font-weight: bold;
   background: #ED5517;
   cursor: pointer;
   margin-left: 400px;
   align-content: center;
   margin-top: 20px;
   margin-bottom: 20px;
  }
  .content {
   position: absolute;
   display: none;
   padding: 10px;
   width: 160px;
   background: #e0edf7;
   border-radius: 6px;
  }

  .content::before {
   content: "";
   position: relative;
   top: -20px;
   left: 10px;
   width: 0;
   height: 0;
   display: block;
   border-left: 10px solid transparent;
   border-right: 10px solid transparent;
   border-bottom: 10px solid #e0edf7;
  }
 </style>
</head>
<body>
<div class="container">
 <span id="xsztip" class="tip">鼠标悬停显示气泡</span>
 <div class="content">
  <span>The quick fox jumps over a lazy dog.</span>
 </div>
 <span id="xsztip2" class="tip">鼠标悬停显示气泡</span>
 <div class="content">
  <span>The quick fox jumps over a lazy dog.</span>
 </div>
 <span id="xsztip3" class="tip">鼠标悬停显示气泡</span>
 <div class="content">
  <span>The quick fox jumps over a lazy dog.</span>
 </div>
</div>
<script type="text/javascript">
 $(function(){
  $("#xsztip").hover(function(){
   show_xszimg(this);
  },function(){
   hide_xszimg(this);
  });
  $("#xsztip2").hover(function(){
   show_xszimg(this);
  },function(){
   hide_xszimg(this);
  });
  $("#xsztip3").hover(function(){
   show_xszimg(this);
  },function(){
   hide_xszimg(this);
  });
  function hide_xszimg(f){
   $(f).next().hide()
  }
  function show_xszimg(f){
   var c=$(f);
   var e=c.offset();
   var a=e.left;
   var b=e.top+40;
   $(f).next().css({left:a+"px",top:b+"px"}).show();
  }
 });
</script>
</body>
</html>
以上即为本文的全部内容,希望这些代码能对您的学习有所帮助,也欢迎继续支持本站获取更多技术资源。