

本文提供了使用原生JavaScript实现自定义消息提示框的完整代码示例。通过简单的HTML、CSS和JS脚本,展示了如何创建固定定位的弹窗,并自动在指定时间后移除。包含两种不同样式的实现方案,适合前端开发者参考学习。
原生JS消息提示框实现概述
本文分享了使用原生JavaScript实现自定义消息提示框的具体代码,供读者参考学习。
效果展示如下:
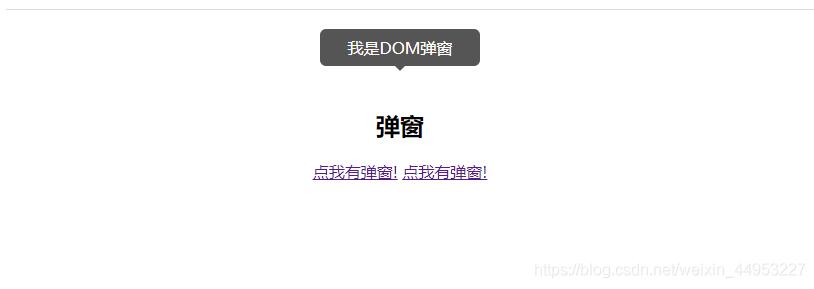
具体实现代码如下:
第一种提示框代码实现
<!DOCTYPE html>
<html lang="en">
<head>
 <meta charset="UTF-8">
 <meta name="viewport" content="width=device-width, initial-scale=1.0">
 <title>Document</title>
</head>
<style>
  .popupStyle {
  display: none;
  width: 160px;
  background-color: rgb(85, 85, 85);
  color: #fff;
  text-align: center;
  border-radius: 6px;
  padding: 8px 0;
  position: fixed;
  z-index: 1;
  top: 2%;
  left: 50%;
  margin-left: -80px;
 }

  .popupStyle::after {
  content: "";
  position: absolute;
  top: 100%;
  left: 50%;
  margin-left: -5px;
  border-width: 5px;
  border-style: solid;
  border-color: #555 transparent transparent transparent;
 }
</style>
<body style="text-align:center">

 <h2 style="margin-top: 100px;">弹窗</h2>

 <div style="text-align: center;">
  <a href="#" onclick="handleMsg(msg)">点我有弹窗!</a>
  <a href="#" onclick="handleDomMsg(domMsg)">点我有弹窗!</a>
 </div>

 <span class="popupStyle" id="popupMsg">提示信息!</span>


 <script>
  const msg = "我是样式弹窗";
  const domMsg = "我是DOM弹窗";

  // 样式弹窗
  function handleMsg(message) {
   const popup = document.getElementById("popupMsg");
   popup.innerHTML = message || "Hello, World";
   popup.style.display="block";
   setTimeout(() => {
    popup.style.display="none"
   }, 1000);
  }

  // DOM 弹窗
  function handleDomMsg(message) {
   const div = document.createElement("div");
   document.body.appendChild(div);
   div.innerHTML = message || "this is a Message";
   div.className = "popupStyle";
   div.style.display = "block";

   setTimeout(() => {
    div.remove();
   }, 1000);
  }
 </script>
</body>
</html>
此外,还提供另一种类似的原生JavaScript提示框实现方案。
第二种提示框代码实现
<!DOCTYPE html>
<html lang="en">
<head>
    <meta charset="UTF-8">
    <meta http-equiv="X-UA-Compatible" content="IE=edge">
    <meta name="viewport" content="width=device-width, initial-scale=1.0">
    <title>Document</title>
    <style>
        .popupStyle{
            width:260px;
            height:80px;
            background-color: rgb(85,85,85);
            /* display:none; */
            color:#fff;
            text-align:center;
            line-height:80px;
            border-radius:20px;
            padding:8px 0;
            position:fixed;
            z-index:1;
            top:2%;
            left:50%;
            transform:translateX(-50%);
        }
        .popupStyle::after{
            content:"after";
            color:black;
            position:absolute;
            top:100%;
            left:50%;
            transform:translateX(-50%);
            border-width:10px;
            line-height:15px;
            border-style:solid;
            border-color:rgb(1, 0, 5) transparent transparent transparent;
        }
    </style>
</head>
<body style="text-align:center;">
    <h2 style="margin-top:200px;">Pop Up</h2>
    <div style="text-align:center;">
        <a href="#" onclick="stylePopup(styleMsg)">stylePopup</a>
        <a href="#" onclick="domPopup(domMsg)">domPopup</a>
    </div>
    <span class="popupStyle" id="popup">popupStyle</span>
    <script>
        console.log(getComputedStyle(popup).display)
        const styleMsg='Popup of style'
        const domMsg='Popup of dom'
        function stylePopup(message){
            const popup=document.getElementById('popup')
            console.log(popup)
            popup.innerHTML=message || 'default messsage'
            popup.style.display='block'
            setTimeout(()=>{
                popup.style.display='none'
            },1000)
        }
        function domPopup(message){
            const span=document.createElement('span')
            span.innerHTML=message || 'default'
            span.className='popupStyle'
            span.style.display='block'
            document.body.appendChild(span)
            setTimeout(()=>{
                span.remove()
            },1000)
        }
    </script>
</body>
</html>
以上内容为本文的全部分享,希望能为读者的学习带来帮助,也欢迎大家继续支持本站。