
使用 Node.js 与 Express 框架从零开发简易博客系统,涵盖路由设计、JSON 文件持久化读写、EJS 模板渲染及表单数据处理的完整实现过程。

当前位置:首页 > Node.js Web 框架 > 正文
Node.js 实战:从零开发一个简易博客系统
作者:终端旅客
时间:2026-11-02
浏览:567
文章目录
分类:Node.js 服务端开发
技术栈:Node.js / Express / EJS / JSON持久化
阅读时长:约 15 分钟
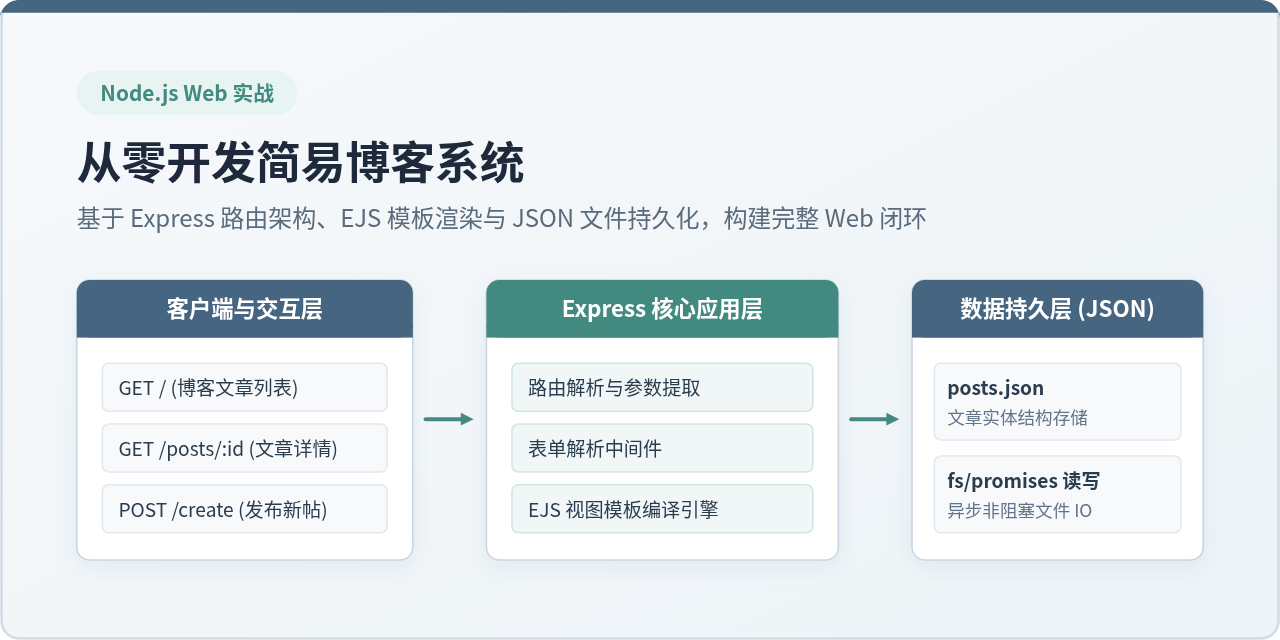
本文使用 Node.js 配合轻量级 Web 框架 Express,从零搭建一个具备文章列表展示、单篇内容阅读和发布新文章功能的简易博客系统。系统采用本地 JSON 文件进行数据持久化,结合 EJS 模板引擎输出语义化 HTML。无需安装配置外部数据库服务,即可在本地运行并完整理解 Web 服务的请求生命周期、路由调度以及服务端模板渲染机制。
一、系统规划与核心架构
在着手编写代码之前,先界定简易博客系统的核心边界。一个基础的博客应用最少需要支持三项核心操作:首页展现所有已发布的文章摘要、点击某篇文章进入阅读完整正文、以及通过表单页面提交新文章。
根据上述需求,系统划分成清晰的三层结构:
- 表现层(Views):使用 EJS 模板引擎,将服务端传递的数据与静态 HTML 骨架结合,向浏览器返回格式化好的网页内容。
- 路由与逻辑控制层(Routes & Controllers):由 Express 处理传入的 HTTP 请求,解析 URL 路径参数与 POST 请求体,协调数据存取后触发页面渲染或重定向。
- 数据持久层(Data Store):借助 Node.js 内置的
fs/promises模块,对本地posts.json文件进行异步读写,保证服务重启后数据依然保留。
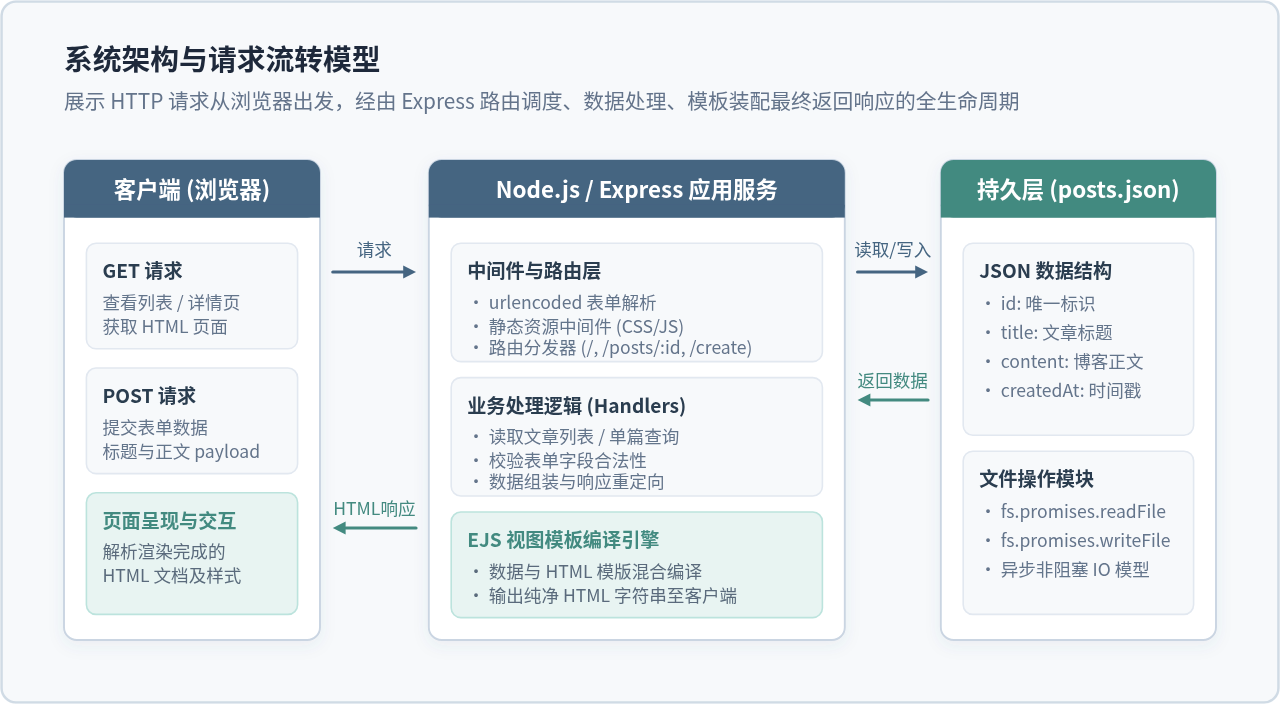
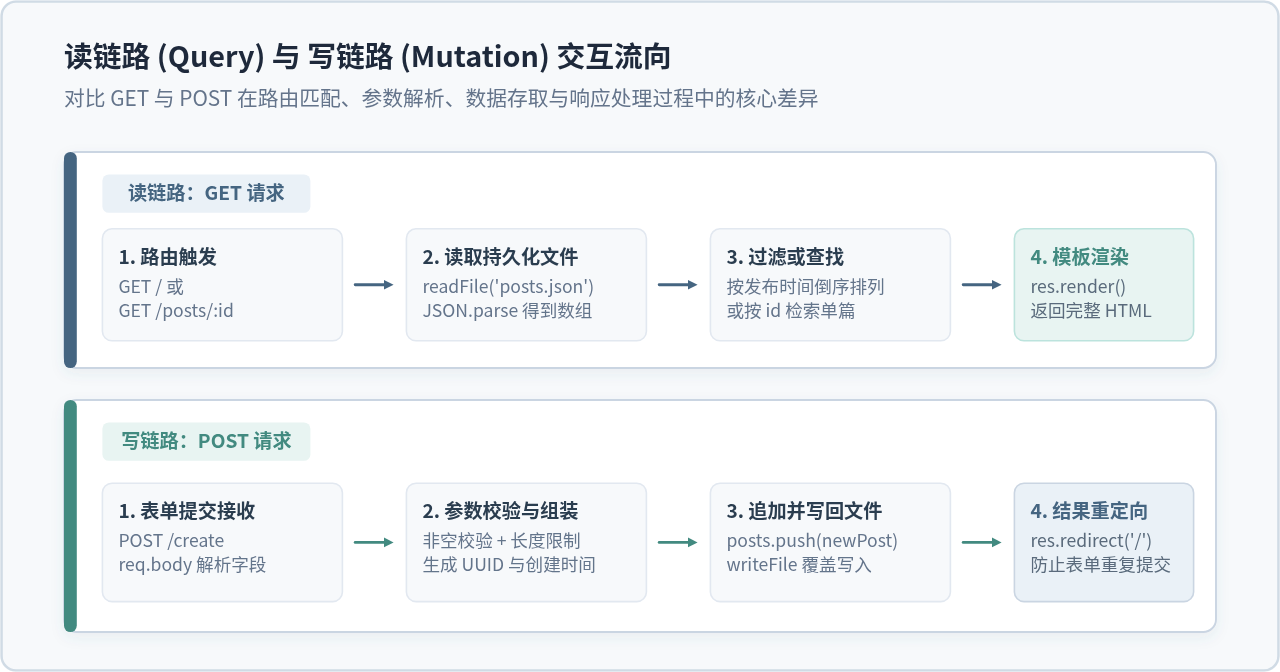
在整个交互生命周期中,客户端发出的每次请求都由 Express 路由监听器捕获。读取类请求(GET)会触发文件读取并渲染模板;写入类请求(POST)则在解析并验证表单后,将新文章以追加方式回写至 JSON 文件,并触发重定向回到首页。
二、项目初始化与目录设计
开发前需要确保计算机中已安装 Node.js(推荐使用 Node.js 18.x 或 20.x 等 LTS 稳定版本)。可以在终端输入 node -v 确认环境可用性。
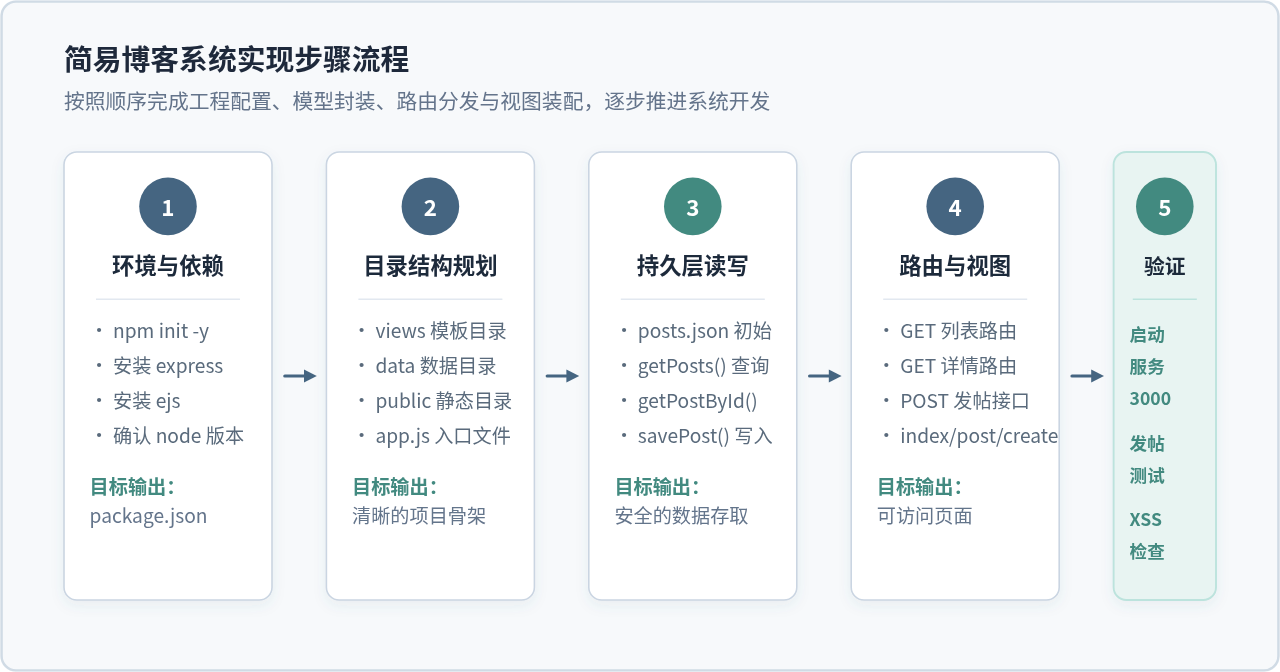
1. 初始化工程与安装依赖
新建一个空目录 simple-blog,并在该目录下运行初始化命令:
# 创建并进入工程目录
mkdir simple-blog
cd simple-blog

# 初始化 package.json
npm init -y

# 安装 Express 框架与 EJS 模板引擎
npm install express ejs
2. 建立目录规范
一个条理分明的工程目录能有效降低后续维护与逻辑查找的心智负担。在项目根目录下创建如下层级结构:
simple-blog/
├── data/
│   └── posts.json          # 存放文章数据的 JSON 文件
├── views/
│   ├── index.ejs           # 博客首页(文章列表)
│   ├── post.ejs            # 文章详情页
│   └── create.ejs          # 发表新文章表单页
├── app.js                  # 服务端主入口(路由与业务逻辑)
├── package.json            # 项目依赖与配置清单
└── package-lock.json       # 依赖锁定文件
三、数据持久层设计:基于 JSON 文件的读写封装
为了避免配置独立数据库服务器带来的复杂度,选用 JSON 文件作为数据载体。每篇文章包含四个基础字段:唯一标识 id、标题 title、正文 content 与发布时间 createdAt。
1. 准备初始数据文件
在 data/posts.json 中写入初始的空数组或一条示例记录,确保文件为合法 JSON:
[
  {
    "id": "1",
    "title": "我的第一篇博客",
    "content": "这是使用 Node.js 与 Express 搭建的简易博客系统。所有内容直接持久化在本地 JSON 文件中。",
    "createdAt": "2026-11-01 10:00"
  }
]
2. 编写数据读写辅助逻辑
对文件的操作必须采用 Node.js 原生的 fs/promises 异步 API,避免使用 readFileSync 等同步方法阻塞事件循环线程。
关键点:每次写入文件时,应将整份数组使用
JSON.stringify(posts, null, 2) 进行美化序列化,保证文件可读并采用 UTF-8 编码落盘。
四、控制层与路由设计:处理 HTTP 请求与响应
系统需要规划清晰的 URL 路由与 HTTP 动词映射。下表梳理了系统涉及的路由规则:
| HTTP 动词 | URL 路径 | 功能描述 | 响应结果 |
|---|---|---|---|
| GET | / |
获取博客文章列表 | 渲染 views/index.ejs |
| GET | /posts/:id |
获取单篇文章详细内容 | 渲染 views/post.ejs 或返回 404 |
| GET | /create |
进入发布文章页面 | 渲染 views/create.ejs |
| POST | /create |
提交新文章表单并落盘 | 数据持久化后 302 重定向至 / |
编写服务主文件 app.js
在 app.js 中集成 Express 应用实例、注册表单解析中间件、设置 EJS 模板引擎,并实现上述四个路由。完整代码如下:
const express = require('express');
const fs = require('fs/promises');
const path = require('path');

const app = express();
const PORT = 3000;
const DATA_FILE = path.join(__dirname, 'data', 'posts.json');

// 1. 设置 EJS 模板引擎
app.set('view engine', 'ejs');
app.set('views', path.join(__dirname, 'views'));

// 2. 解析表单请求体的中间件
app.use(express.urlencoded({ extended: false }));

// 辅助函数:从 JSON 文件读取全部文章
async function readPosts() {
  try {
    const data = await fs.readFile(DATA_FILE, 'utf-8');
    return JSON.parse(data);
  } catch (error) {
    // 文件不存在或为空时降级返回空数组
    return [];
  }
}

// 辅助函数:将文章列表写入 JSON 文件
async function writePosts(posts) {
  await fs.writeFile(DATA_FILE, JSON.stringify(posts, null, 2), 'utf-8');
}

// 路由 1:博客首页 - 文章列表
app.get('/', async (req, res) => {
  try {
    const posts = await readPosts();
    // 按发布时间倒序排列,最新文章优先展示
    const sortedPosts = [...posts].reverse();
    res.render('index', { posts: sortedPosts });
  } catch (err) {
    res.status(500).send('服务器内部错误,无法读取文章列表');
  }
});

// 路由 2:发布新文章 - 展示表单页面
app.get('/create', (req, res) => {
  res.render('create', { errorMessage: null });
});

// 路由 3:提交新文章 - 写入数据
app.post('/create', async (req, res) => {
  const { title, content } = req.body;

  // 基础校验:标题和内容均不能为空
  if (!title || !title.trim() || !content || !content.trim()) {
    return res.status(400).render('create', {
      errorMessage: '标题和正文均不能为空,请填写完整后重新提交。'
    });
  }

  try {
    const posts = await readPosts();
    const newPost = {
      id: Date.now().toString(),
      title: title.trim(),
      content: content.trim(),
      createdAt: new Date().toLocaleString('zh-CN', { hour12: false })
    };

    posts.push(newPost);
    await writePosts(posts);

    // 采用 Post-Redirect-Get 模式,避免用户刷新页面导致重复提交
    res.redirect('/');
  } catch (err) {
    res.status(500).send('保存文章失败,请稍后重试');
  }
});

// 路由 4:文章详情页
app.get('/posts/:id', async (req, res) => {
  try {
    const posts = await readPosts();
    const targetPost = posts.find(p => p.id === req.params.id);

    if (!targetPost) {
      return res.status(404).send('未找到该文章,可能已被删除。');
    }

    res.render('post', { post: targetPost });
  } catch (err) {
    res.status(500).send('读取文章详情失败');
  }
});

// 启动 HTTP 服务
app.listen(PORT, () => {
  console.log(`博客服务已启动:http://localhost:${PORT}`);
});
五、视图层实现:使用 EJS 模板引擎渲染页面
EJS 允许我们在 HTML 中内嵌 JavaScript 逻辑。在输出变量时,务必使用 <%= %> 标签,该标签会对 HTML 特殊字符(如 <、>、&、")自动进行转义,从而阻断跨站脚本攻击(XSS)。
1. 首页视图 views/index.ejs
views/index.ejs<!DOCTYPE html>
<html lang="zh-CN">
<head>
<meta charset="UTF-8">
<title>简易博客系统 - 首页</title>
<style>
body { font-family: sans-serif; max-width: 720px; margin: 40px auto; padding: 0 16px; line-height: 1.6; color: #333; }
header { display: flex; justify-content: space-between; align-items: center; border-bottom: 2px solid #EEE; padding-bottom: 12px; margin-bottom: 24px; }
.btn { background: #438A80; color: #FFF; text-decoration: none; padding: 8px 16px; border-radius: 4px; font-size: 14px; }
.post-item { border-bottom: 1px solid #EEE; padding: 16px 0; }
.post-item h2 { margin: 0 0 6px 0; font-size: 20px; }
.post-item a { color: #456581; text-decoration: none; }
.post-item a:hover { text-decoration: underline; }
.post-time { font-size: 13px; color: #888; }
.empty-tip { color: #777; font-style: italic; margin-top: 30px; }
</style>
</head>
<body>
<header>
<h1 style="margin:0; font-size: 24px;">简易博客系统</h1>
<a class="btn" href="/create">+ 发布新文章</a>
</header>
<main>
<% if (posts.length === 0) { %>
<p class="empty-tip">当前暂无文章,点击右上角发布你的第一篇博客吧。</p>
<% } else { %>
<% posts.forEach(post => { %>
<article class="post-item">
<h2><a href="/posts/<%= post.id %>"><%= post.title %></a></h2>
<div class="post-time">发布时间:<%= post.createdAt %></div>
</article>
<% }) %>
<% } %>
</main>
</body>
</html>2. 文章详情视图 views/post.ejs
views/post.ejs<!DOCTYPE html>
<html lang="zh-CN">
<head>
<meta charset="UTF-8">
<title><%= post.title %> - 博客详情</title>
<style>
body { font-family: sans-serif; max-width: 720px; margin: 40px auto; padding: 0 16px; line-height: 1.8; color: #333; }
.nav-back { margin-bottom: 20px; display: inline-block; color: #456581; text-decoration: none; font-size: 14px; }
h1 { font-size: 26px; margin-bottom: 8px; color: #222; }
.meta { font-size: 13px; color: #888; border-bottom: 1px solid #EEE; padding-bottom: 12px; margin-bottom: 24px; }
.content { white-space: pre-wrap; word-break: break-word; font-size: 16px; color: #444; }
</style>
</head>
<body>
<a class="nav-back" href="/">← 返回文章列表</a>
<article>
<h1><%= post.title %></h1>
<div class="meta">发布时间:<%= post.createdAt %></div>
<div class="content"><%= post.content %></div>
</article>
</body>
</html>3. 发布新文章视图 views/create.ejs
views/create.ejs<!DOCTYPE html>
<html lang="zh-CN">
<head>
<meta charset="UTF-8">
<title>发布新文章 - 简易博客系统</title>
<style>
body { font-family: sans-serif; max-width: 720px; margin: 40px auto; padding: 0 16px; line-height: 1.6; color: #333; }
.nav-back { margin-bottom: 20px; display: inline-block; color: #456581; text-decoration: none; font-size: 14px; }
.form-group { margin-bottom: 20px; }
label { display: block; font-weight: 600; margin-bottom: 6px; font-size: 14px; }
input[type="text"], textarea { width: 100%; box-sizing: border-box; padding: 10px; border: 1px solid #CCC; border-radius: 4px; font-size: 15px; font-family: inherit; }
input[type="text"]:focus, textarea:focus { border-color: #438A80; outline: none; }
.btn-submit { background: #438A80; color: #FFF; border: none; padding: 10px 24px; font-size: 15px; border-radius: 4px; cursor: pointer; }
.btn-submit:hover { background: #356E66; }
.error-msg { background: #FDE8E8; color: #C81E1E; padding: 10px 14px; border-radius: 4px; margin-bottom: 20px; font-size: 14px; }
</style>
</head>
<body>
<a class="nav-back" href="/">← 取消并返回</a>
<h1 style="font-size: 24px; margin-bottom: 20px;">发布新文章</h1>
<% if (errorMessage) { %>
<div class="error-msg"><%= errorMessage %></div>
<% } %>
<form action="/create" method="POST">
<div class="form-group">
<label for="title">文章标题</label>
<input type="text" id="title" name="title" placeholder="请输入文章标题..." required>
</div>
<div class="form-group">
<label for="content">文章正文</label>
<textarea id="content" name="content" rows="10" placeholder="请输入文章详细正文..." required></textarea>
</div>
<button type="submit" class="btn-submit">确认发布</button>
</form>
</body>
</html>六、系统联调与运行验证
完成上述文件的编写后,即可在终端启动服务端程序进行完整功能验证:
# 在 simple-blog 根目录运行启动命令
node app.js
当终端输出 博客服务已启动:http://localhost:3000 时,打开浏览器访问该地址,按照以下三步验证闭环:
- 查看首页列表:页面正常展现
data/posts.json中预设的文章标题及发布时间。 - 测试发表新帖:点击右上角“+ 发布新文章”,填写新标题与正文后点击“确认发布”。提交后页面应自动跳转回首页,并且最新发布的文章排在最顶部。同时打开
data/posts.json文件,可以看到新增记录已成功持久化写入。 - 验证文章阅读:点击文章标题,进入详情页,确认标题、正文换行与发布时间均完整无误展示。
边界与异常排查:
若在提交表单时输入纯空格,系统将返回 HTTP 400 状态码并保留在发帖页面,显示“标题和正文均不能为空”提示;若直接在地址栏输入不存在的 ID(如
/posts/999999),服务端将准确返回 HTTP 404 状态码,避免空引用异常导致进程崩溃。
七、系统全景总结与生产演进方向
本项目以精炼的代码结构构建了完整的 Web 交互闭环。通过这个简易博客,我们掌握了 Node.js 的模块引入、Express 路由捕获与中间件机制、异步文件 I/O 以及服务端模板渲染的核心逻辑。
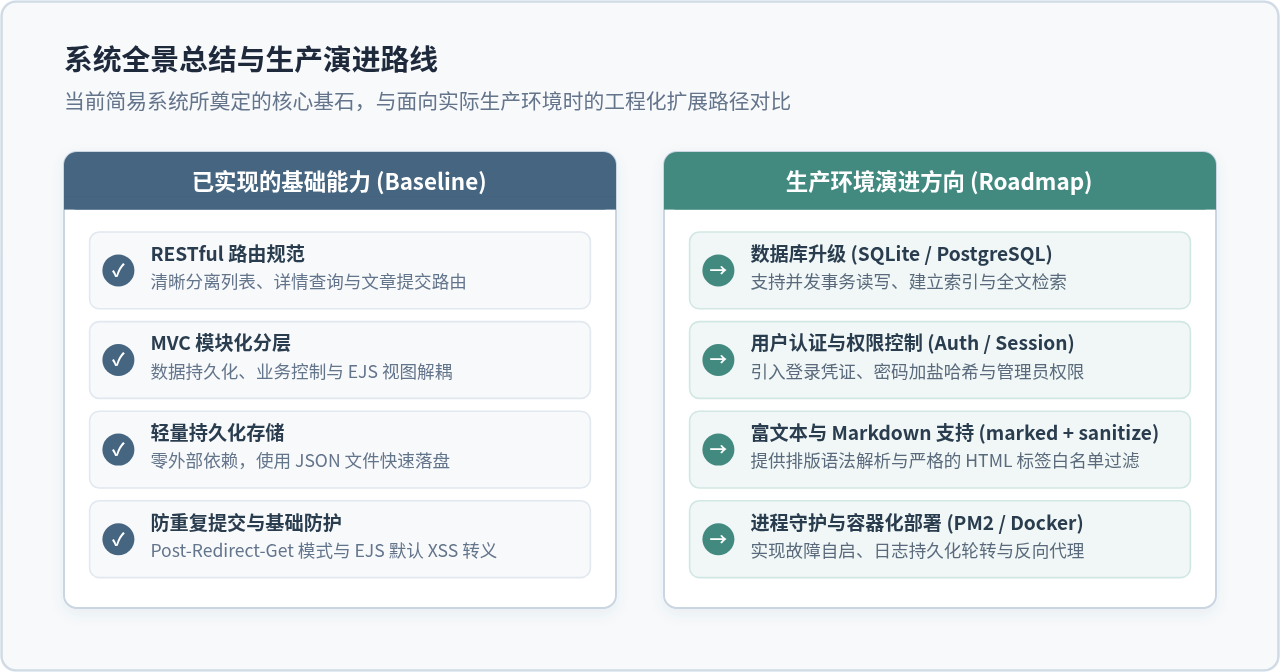
在将此类入门项目推广至真实生产场景时,需要有针对性地对以下维度进行演进与加固:
- 持久层由文件切换为关系型或文档数据库:随着并发访问量增加,多请求同时调用
fs.writeFile可能产生文件覆盖或竞争冲突(Race Condition)。生产环境应替换为 SQLite(轻量单文件)或 PostgreSQL/MySQL,借助事务锁保障数据一致性。 - 支持 Markdown 解析与格式白名单过滤:当前正文采用纯文本换行输出。若需支持标题、粗体、代码块等排版,可引入
marked库解析 Markdown,同时务必搭配sanitize-html清理潜在恶意标签。 - 增加用户身份认证与操作权限管理:当前任何访问者均可调用
POST /create发布文章。应引入基于 Cookie-Session 或 JWT 的登录凭证机制,仅允许具备管理员权限的用户提交或编辑文章。 - 守护进程与反向代理部署:使用 PM2 管理 Node.js 进程,实现异常崩溃自动拉起,并在前端挂载 Nginx 负责 SSL 证书卸载与静态文件高效缓存。
实用工具推荐
电子包浆
使用 ›绿化、压缩、噪点和虚拟水印,自由调节做旧程度。
图片压缩
使用 ›选择画质和输出格式,预览压缩前后的大小。
作者最新文章
相关文章