

本文介绍如何使用 oclif 框架开发 Node.js 命令行工具,实现目录文件的批量重命名功能。通过定义自定义命令与参数(如递归深度、时间戳、索引等),结合模板字符串替换逻辑,快速构建高效的文件处理脚本,提升前端开发中的重复操作效率。
前言
在前端开发日常工作中,各类命令行界面(CLI)工具已十分普及。它们操作便捷且实用性强,能够协助开发者迅速搭建项目架构,或自动化执行各类重复性任务,显著提升工作效率。
oclif
我们将采用 github.com/oclif/oclif 库作为构建 CLI 应用的基础框架。该框架官方文档详尽,此处仅作简要扩展说明,并通过一个实际案例进行演示。
设计一个批量修改文件名的小工具
本案例旨在设计一款批量重命名文件的实用工具。该工具允许用户指定目标目录,并依据自定义规则对目录下所有文件进行批量重命名操作。
设计我们的命令用法
我们期望通过简洁的命令格式,即可实现对指定目录下所有文件的批量重命名操作。
./cl rename ./test -R -N test_{{index}}_{{time}}_{{st}}
其中 ./cl 是 ln -s /bin/dev
我们想设计的参数
{{name}}代表原始文件名{{index}}代表递归指数:1,2,3,4{{time}}代表时间:2022-8-23_11-39{{st}}代表时间戳:1661226082464-R代表是否开启目录深层递归-N XXXX批量重命名后的名字格式
列如我们可以这样用:
./cl rename ./test  -R -N test_{{index}}_{{time}}_{{st}}

正在执行批量重命名命令,参数:{ path: './test' },{ deep: true, name: 'test_{{index}}_{{time}}_{{st}}' }
读取目录: ./test
读取目录: test/sub
读取目录: test/sub/commands
读取目录: test/sub/commands/hello
重命名文件: test/sub/commands/hello/test_4_2022-8-18_19-47_1661225596495.ts --> test_0_2022-8-18_19-47_1661225679878.ts
重命名文件: test/sub/commands/hello/test_5_2022-8-18_19-47_1661225596495.js --> test_1_2022-8-18_19-47_1661225679879.js
重命名文件: test/sub/commands/hello/test_6_2022-8-18_19-47_1661225596496.ts --> test_2_2022-8-18_19-47_1661225679879.ts
重命名文件: test/sub/commands/hello/test_7_2022-8-18_19-47_1661225596496.js --> test_3_2022-8-18_19-47_1661225679879.js
重命名文件: test/sub/commands/hello/test_8_2022-8-18_19-47_1661225596496.ts --> test_4_2022-8-18_19-47_1661225679879.ts
重命名文件: test/sub/commands/hello/test_9_2022-8-18_19-47_1661225596496.js --> test_5_2022-8-18_19-47_1661225679879.js
读取目录: test/sub/commands/setup
重命名文件: test/sub/commands/setup/index.d.ts --> test_6_2022-8-18_19-47_1661225679879.ts
重命名文件: test/sub/commands/setup/index.js --> test_7_2022-8-18_19-47_1661225679879.js
重命名文件: test/sub/index.d.ts --> test_8_2022-8-18_19-47_1661225679879.ts
重命名文件: test/sub/index.js --> test_9_2022-8-18_19-47_1661225679880.js
重命名文件: test/sub/test_3_2022-8-23_10-52_1661225596495 --> test_10_2022-8-23_10-52_1661225679880
重命名文件: test/test_0_2022-8-23_10-52_1661225596494 --> test_11_2022-8-23_10-52_1661225679880
重命名文件: test/test_1_2022-8-16_18-1_1661225596495.png --> test_12_2022-8-16_18-1_1661225679880.png
重命名文件: test/test_2_2022-7-18_14-32_1661225596495.json --> test_13_2022-7-18_14-32_1661225679880.json
重命名文件: test/图片2.jpg --> test_15_2022-6-24_15-12_1661225679880.jpg
重命名文件: test/矩阵点背景图 2.png --> test_17_2022-8-12_17-23_1661225679881.png
重命名文件: test/矩阵点背景图.png --> test_18_2022-8-12_17-23_1661225679881.png
自动的递归所有文件,并且全部以某个格式进行命名
源码实现
目录结构
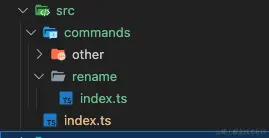
首先遵循官方文档指引,安装并生成基础的 Hello world 程序,随后在此基础上编写我们自定义的命令。接下来,我们将创建一个新的命令模块。
- src/commands/rename/index.ts
- 在 rename 目录下创建 index.ts 文件后,框架将自动注册该 rename 命令。
代码中我写了注释,通过配合代码阅读相信会更有用。
import { Command, Flags, CliUx } from "@oclif/core";
import * as fs from "fs-extra";
import * as path from "path";

// 执行命令:
// ./cl rename ./test  -R -N test_{{index}}_{{time}}_{{st}}
export class Rename extends Command {
  static description = "description of this example command";

  // 注册标识参数:--name 和 --deep,并且设置简称
  static flags = {
    name: Flags.string({ char: "N" }),
    deep: Flags.boolean({ char: "R" }),
  };

  // 注册参数,即 rename 空格后的第一段文字,这里是 ./test
  static args = [{ name: "path" }];

  private index = 0;

  // 命令解析完毕后,执行此方法
  async run() {
    const { args } = await this.parse(Rename);
    const { flags } = await this.parse(Rename);

    this.log("正在执行批量重命名命令,参数:%s,%s", args, flags);

    // 遍历目录并给每一个文件执行规则程序
    this.wake(args.path, flags.deep, (path: string) => {
      this.rule(path, flags.name);
    });
  }

  // 递归遍历目录
  wake(root: string, recursive = false, callback = (path: string) => {}): void {
    console.log("读取目录:", root);
    for (const filename of fs.readdirSync(root)) {
      const absPath = path.normalize(path.join(root, filename));
      const file = fs.statSync(absPath);
      if (file.isDirectory() && recursive) {
        this.wake(absPath, recursive, callback);
        continue;
      }
      try {
        callback(absPath);
      } catch (error) {
        console.log(error);
      }
    }
  }

  // 文件名规则注册
  rule(filePath: string, nameRules?: string) {
    const fileName = path.basename(filePath);

    // 规则程序执行,替换关键字
    // 目前只做这么几个规则,以后看情况加,扩展性也不错,可以单独分到 services 层做一层分离,可读性更高
    // 这里注册了 {{index}} {{time}} 等关键字
    let newFileName = this.keyword(
      String(nameRules),
      "index",
      () => this.index++
    );
    newFileName = this.keyword(newFileName, "name", () => fileName);
    newFileName = this.keyword(newFileName, "st", () => new Date().getTime());
    newFileName = this.keyword(newFileName, "time", () => {
      const date = new Date(fs.statSync(filePath).mtime);
      return `${date.getFullYear()}-${
        date.getMonth() + 1
      }-${date.getDate()}_${date.getHours()}-${date.getMinutes()}`;
    });

    newFileName += path.extname(filePath);
    const absNewPath = path.normalize(
      path.join(path.dirname(filePath), newFileName)
    );

    this.log(`重命名文件: ${filePath} --> ${newFileName}`);
    fs.renameSync(filePath, absNewPath);
  }

  // 文件名关键字替换
  keyword(
    fileName: string,
    rule: string,
    variableFn: () => string | number
  ): string {
    const key = "{{" + rule + "}}";
    const variable = variableFn();
    while (fileName.includes(key)) {
      fileName = fileName.replace(key, String(variable));
    }
    return fileName;
  }
}
执行命令之后的结果都在上面的【命令用法】章节了,可以返回到上面看看输出。
总结
总体而言,脚手架工具在未来的开发中将占据重要地位。因为许多工作无需从零开始,编写脚手架整合常用功能,可以方便地生成辅助日常工作的脚本。
当然,我这篇文章演示的只是冰山一角,还有更多的花样,比如它还能输出表格,选择框,特效,动画,进度条之类的,有很大的探索价值。
到此这篇关于js使用oclif开发命令行工具实现批量修改文件名的文章就介绍到这了,更多相关js批量修改文件名内容请搜索本站以前的文章或继续浏览下面的相关文章希望大家以后多多支持本站!