

本文介绍如何在 JavaScript 中利用数组模拟实现静态链表。通过定义 Node 类与 StaticLinkedList 类,详细演示了 append 追加、insertAt 指定位置插入以及 removeAt 移除节点的具体代码逻辑,重点解析了指针指向变更的步骤与注意事项。
JavaScript 静态链表基础与 Node 类定义
最近重读《大话数据结构》时,注意到书中关于静态链表的章节,其中提到 C 语言通过数组来模拟链表结构,这种实现方式颇具趣味。在 JavaScript 中,同样可以采用类似的思路来实现静态链表:定义包含数据域和节点域的结构,并实现链表的基础操作。由于弱类型语言缺乏指针概念,我们需要手动模拟这一机制。算法的魅力正在于解决思路层面的问题,直击问题本质。首先,我们需要定义 Node 类,具体实现如下:
class Node {
    constructor(value) {
        this.data = value;
        this.next = null;
    }
}
StaticLinkedList 类实现:追加与显示
接下来实现 StaticLinkedList 类,先定义基础的 append(追加)和 display(显示)方法:
class StaticLinkedList {
    constructor() {
        this.head = null;
        this.length = 0;
    }
    append(value) {
        const newNode = new Node(value);
        this.length++;
        if (this.head === null) {
            this.head = newNode;
            return;
        }
        let current = this.head;
        while (current.next != null) {
            current = current.next;
        }
        current.next = newNode;
    }
    display() {
        console.log('the static linked list is:\r\n');
        let current = this.head;
        if (current === null) {
            console.log('empty!');
            return;
        }
        while (current !== null) {
            console.log(JSON.stringify(current));
            console.log(`its value is ${current.data}\r\n`);
            current = current.next;
        }
    }
}
其中,append 方法用于在链表尾部添加新的 Node 对象,而 display 方法则用于打印 Node 对象及其包含的数据。使用这个静态链表类非常简单,例如向链表中添加 4 个节点:
const staticLinkedList = new StaticLinkedList();
staticLinkedList.append(3);
staticLinkedList.append(7);
staticLinkedList.append(16);
staticLinkedList.append(24);
指定位置插入节点算法解析
此外,我们还需要提供更灵活的节点插入方法。例如,若想在第 3 个节点位置插入一个新节点,数值为 11,现有的 append 方法便不再适用,因此需要定义一个新的插入节点方法,代码如下:
    /**
     * Method to insert an new element at the specific location
     *
     * @param {*} elementValue the value of the element that to be inserted
     * @param {*} index the position of the element, from 1 to maximum of the list
     * @returns true/false
     */
    insertAt(elementValue, index) {
        if (index < 1 || index > this.length + 1) {
            console.log('index is out of the range!');
            return false;
        }
        const newNode = new Node(elementValue);
        let startPos = 1;
        let current = this.head;
        while (startPos < index - 1) {
            current = current.next;
            startPos++;
        }
        newNode.next = current.next;
        current.next = newNode;
        this.length++;
        return true;
    }
理解这段代码的关键在于新节点如何被添加到链表中的那两行代码。首先是 `newNode.next = current.next`,这行代码的作用是将新节点的 next 指向原插入位置节点的下一个节点。接着执行 `current.next = nextNode`,将新节点替换掉原来该位置的节点。
为了更直观地理解这一过程,我绘制了一张示意图:
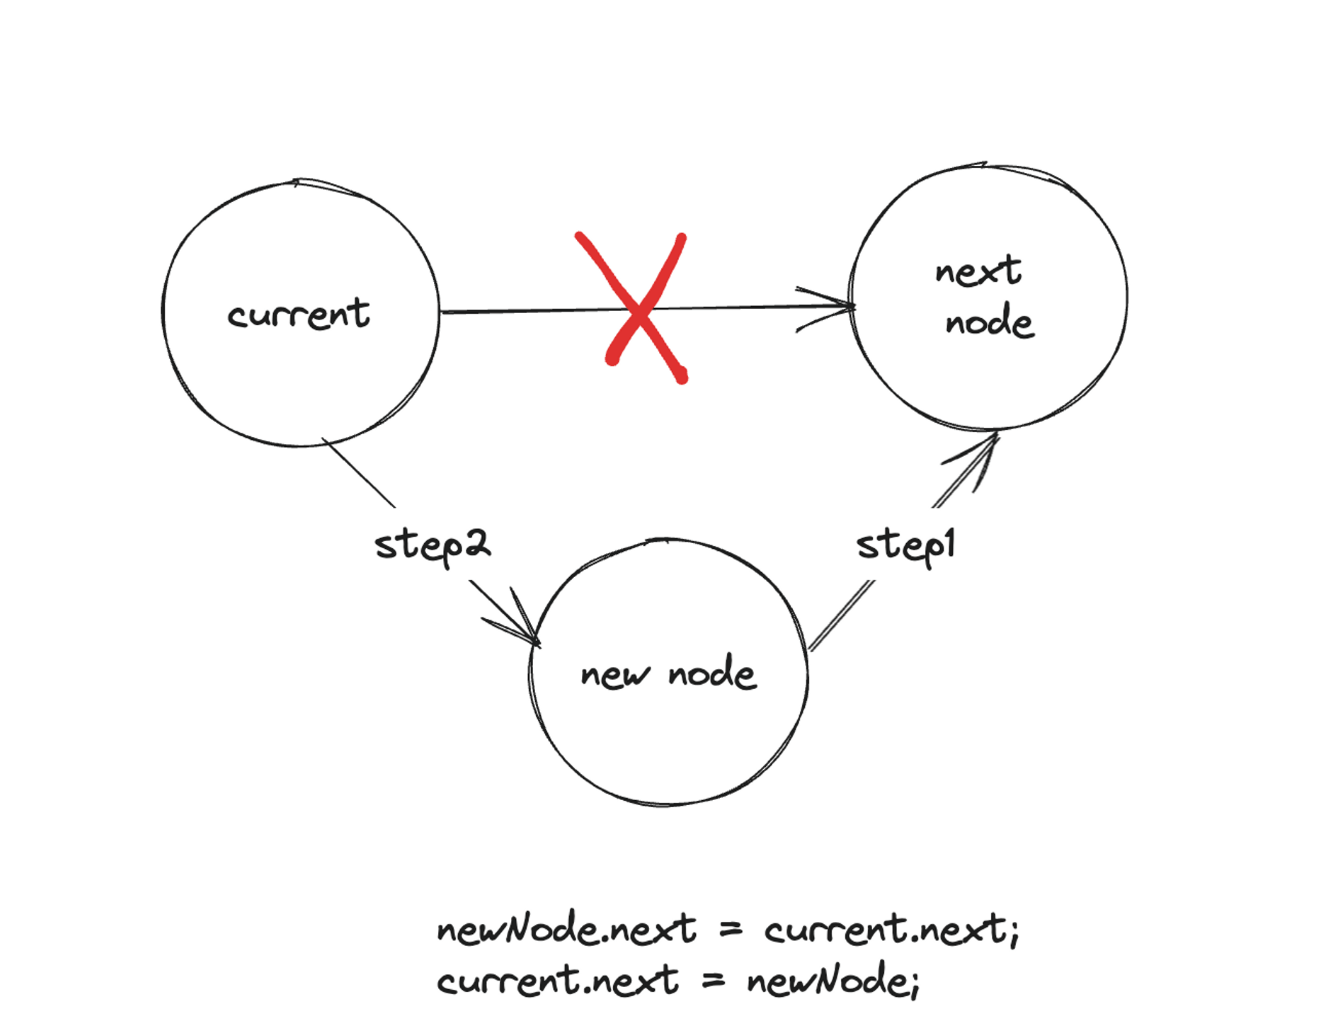
需要特别注意的是,step1 和 step2 的执行顺序绝对不能颠倒,否则会导致代码运行错误。
移除指定位置节点的方法实现
随后,我们还需要定义一个移除指定位置节点的方法,具体实现如下:
removeAt(index) {
        if (index < 1 || index > this.length + 1) {
            console.log('index is out of the range!');
            return;
        }
        let current = this.head;
        let startPos = 1;
        let previous = null;
        while (startPos < index) {
            previous = current;
            current = current.next;
            startPos++;
        }
        previous.next = current.next;
        this.length--;
    }
我对 `previous.next = current.next` 这一操作也绘制了示意图。删除原节点时,需要将其前一个节点的 next 指向该节点的 next,从而完成链接的断开与重连。
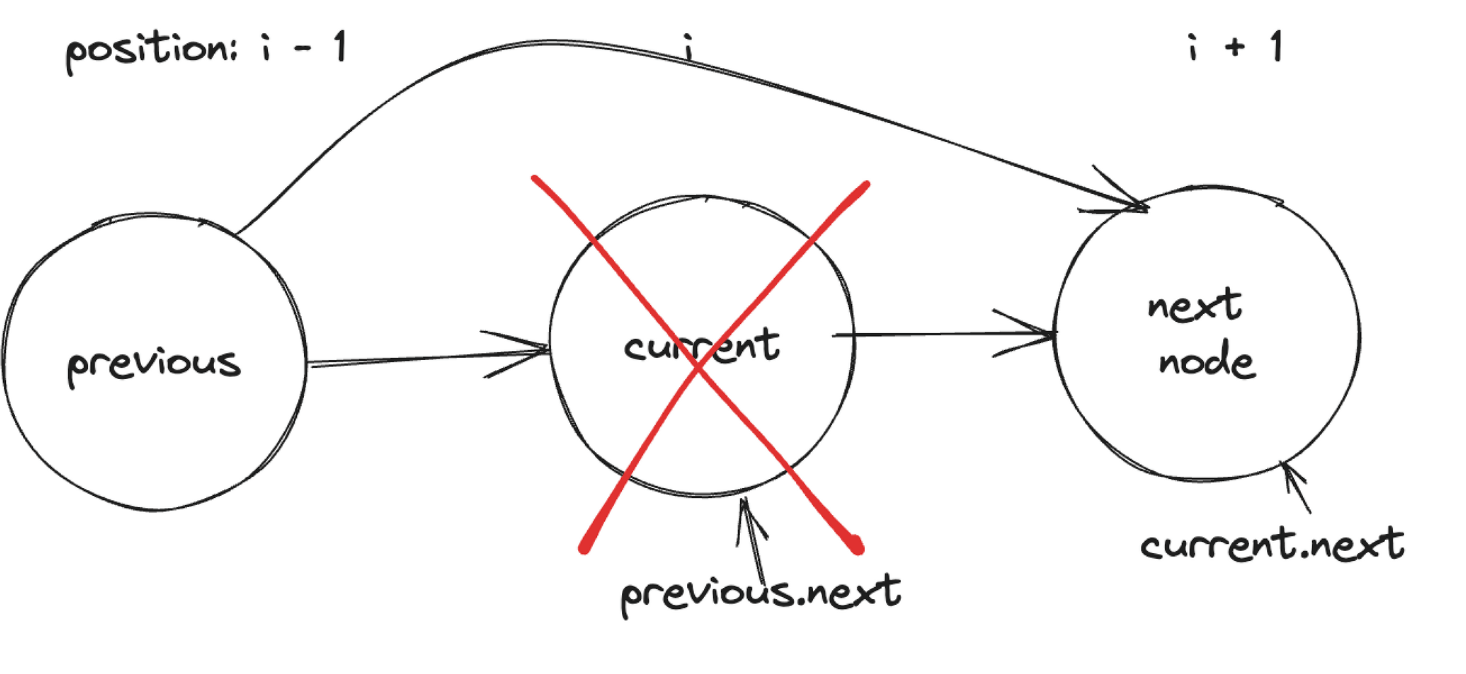
总结:静态链表的添加和移除略有不同,需要利用 Node
到此这篇关于使用 JavaScript 实现一个静态链表的文章就介绍到这了,更多相关 JavaScript 静态链表内容请搜索本站以前的文章或继续浏览下面的相关文章,希望大家以后多多支持本站!