

本文详细解析Vue项目打包发布后接口报405 Not Allowed错误的成因及解决方法。通过对比开发环境与生产环境的代理配置差异,重点介绍了如何在nginx中正确配置location重写规则,并利用.env.development和.env.production文件区分前后端地址,从而彻底解决生产环境接口调用失败的问题。
在Vue项目完成打包并部署到服务器后,前端发起的接口请求有时会返回405 Method Not Allowed错误。
这是因为前端在开发阶段配置了代理服务器,而打包后的静态资源直接由Nginx等Web服务器托管,后端服务无法识别或拒绝某些HTTP请求方法,导致405错误。
解决该问题需要检查并调整vue.config.js中的开发代理配置以及服务器端的default.conf配置文件。
  devServer: {
    // host: "0.0.0.0", //项目运行时的本地地址
    // port: 8880, // 端口号
    //proxy:{'/api':{}},代理器中设置/api,项目中请求路径为/api的替换为target
    proxy: {
      '/api': {
        // target: "http://192.168.0.249:19029",//代理地址,这里设置的地址会代替axios中设置的baseURL
        target: process.env.VUE_APP_BASEURL_API,//代理地址,这里设置的地址会代替axios中设置的baseURL
        changeOrigin: true,// 如果接口跨域,需要进行这个参数配置
        //ws: true, // proxy websockets
        //pathRewrite方法重写url
        pathRewrite: {
          '^/api': "/"
          //pathRewrite: {'^/api': '/'} 重写之后url为 http://192.168.1.16:8085/xxxx
          //pathRewrite: {'^/api': '/api'} 重写之后url为 http://192.168.1.16:8085/api/xxxx
        },
    },
    https: false, // https:{type:Boolean}
    disableHostCheck: true,
    open: true, //配置自动启动浏览器
  },
具体涉及Nginx配置文件中的location块设置,特别是针对/api路径的重写与代理转发规则。
server {
    listen       9000;
    server_name  localhost;
    #charset koi8-r;
    #access_log  /var/log/nginx/log/host.access.log  main;
    location / {
        root   /usr/share/nginx/html;
        index  index.html index.htm;
        try_files  $uri $uri/  @router;
    }
    location /api {
       rewrite ^/api/$  permanent;
       proxy_pass http://192.168.0.253:30001/warehouse/;
       proxy_redirect default;
       proxy_set_header Host $host;
       proxy_set_header X-Real-IP $remote_addr;
       proxy_set_header REMOTE-HOST $remote_addr;
       proxy_set_header X-Forwarded-For $proxy_add_x_forwarded_for;
    }
    #error_page  404              /404.html;
    # redirect server error pages to the static page /50x.html
    #
    error_page   500 502 503 504  /50x.html;
    location = /50x.html {
        root   html;
    }
    # proxy the PHP scripts to Apache listening on 127.0.0.1:80
    #

    #location ~ \.php$ {
    #    proxy_pass   http://127.0.0.1;
    #}
 # pass the PHP scripts to FastCGI server listening on 127.0.0.1:9000
    #
    #location ~ \.php$ {
    #    root           html;
    #    fastcgi_pass   127.0.0.1:9000;
    #    fastcgi_index  index.php;
    #    fastcgi_param  SCRIPT_FILENAME  /scripts$fastcgi_script_name;
    #    include        fastcgi_params;
    #}
    location @router {
        rewrite ^.*$ /index.html last;
    }
    # deny access to .htaccess files, if Apache's document root
    # concurs with nginx's one
    #
    #location ~ /\.ht {
    #    deny  all;
    #}
}
当Vue项目打包后,原本在开发环境下通过代理解决的跨域问题,在生产环境中可能因配置不当引发接口报错。
浏览器控制台或网络面板中显示的HTTP状态码为405,提示方法不允许。

为了还原并排查该问题,可以新建一个Vue项目,并使用Node.js编写一个简单的后端服务来返回测试数据。
排查过程中涉及的关键代码包括后端Express服务、前端axios请求封装以及Vue组件中的调用逻辑。
const express = require('express')
const app = express();
// 解决跨域问题
app.use(function(req, res, next) {
    res.header("Access-Control-Allow-Origin", "*");
    res.header('Access-Control-Allow-Methods', 'PUT, GET, POST, DELETE, OPTIONS');
    res.header("Access-Control-Allow-Headers", "X-Requested-With");
    res.header('Access-Control-Allow-Headers', 'Content-Type');
    next();
})
// 调用接口直接返回一个数组
app.get('/getData', (req, res) => {
    res.send([
    	{
            id: 1,
            name: 'GAI'
        },
        {
            id: 2,
            name: 'keyNg'
        },
        {
            id: 3,
            name: '闪火'
        }
    ])
})
// api/index.js
import axios from 'axios'
export function getData() {
return axios({
url: 'api/getData',
method: 'get'
})
}
// home.vue
mounted() {
   getData().then(res => {
     console.log(res);
   })
},
在打包前的开发环境中,通过vue.config.js配置的代理服务器可以正常转发请求,接口调用无误。
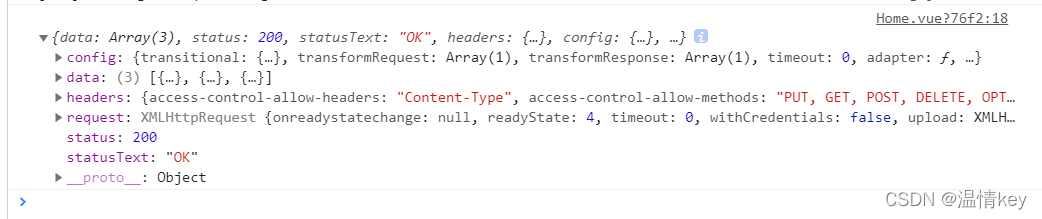
打包发布后,若Nginx配置不当,直接访问后端接口可能会遇到405错误,导致数据无法加载。
解决这一问题的核心方式是通过环境变量区分开发模式与生产模式的请求地址。
具体操作是设置不同的环境变量,以便在代码中动态获取对应的后端接口地址。
根据Vue官方文档说明,环境变量需要遵循特定命名规范才能被正确注入。
请注意,只有 NODE_ENV,BASE_URL 和以 VUE_APP_ 开头的变量将通过 webpack.DefinePlugin 静态地嵌入到客户端侧的代码中。这是为了避免意外公开机器上可能具有相同名称的私钥。
首先,在Vue项目根目录下新增.env.development文件,该文件会在开发环境启动时被自动载入。
// .env.development
VUE_APP_TITLE = '温情dev'
VUE_APP_ENV = 'dev'
VUE_APP_BASE_URL = 'http://localhost:3000'
其次,在根目录下新增.env.production文件,该文件会在执行npm run build打包生产环境时被载入。
// .env.production
VUE_APP_TITLE = '温情pro'
VUE_APP_ENV = 'pro'
VUE_APP_BASE_URL = 'http://localhost:3000'
接着,修改axios请求方法中的baseURL配置,使其读取对应环境下的环境变量值。
// api/index
// 这里只是简单解决一下问题
// 重点就是把开发环境和生产环境请求地址区分开来就可以了, 根据实际情况自行改动
import axios from 'axios'
let baseURL = '';
// process.env.VUE_APP_ENV拿到我们在前面设置的模式,
// 如果现在是开发环境会使用`.env.development`里面设置的环境变量等于`dev`
// 如果现在是生产环境会使用`.env.production`里面设置的环境变量等于`pro`
if(process.env.VUE_APP_ENV === 'dev') {
    baseURL = '/api';
} else {
    baseURL = process.env.VUE_APP_BASE_URL
}
export function getData() {
    return axios({
        url: `${baseURL}/getData`,
        method: 'get'
    })
}
小提示:在修改.env.development和.env.production文件后,必须重新启动开发服务器(npm run serve)才能使更改生效。
总结:关键在于区分开发模式与生产模式,通过环境变量动态管理接口地址,避免硬编码导致的部署问题。
以上为个人经验总结,希望能给大家一个参考,也希望大家多多支持本站。