

本文介绍在Layui框架中动态修改表格表头的实现方式。由于table.reload方法暂不支持直接变更配置基础函数,通过删除原表格DOM并重建元素后重新加载的方式实现。文章提供了完整的HTML结构、JavaScript代码示例及点击前后的效果对比,帮助开发者解决动态表头需求。
Layui Table动态修改表头与刷新实现
实现表头动态更新的核心思路是:先移除现有的表格实例,随后重新构建对应的DOM元素,最后执行表格的重新加载操作,从而完成表头的变更。
理解上述原理后,实现过程便相对直观。目前Layui的table.reload(ID, options)方法似乎尚不支持直接修改配置中的基础函数,因此需要采用这种直接操作DOM并结合重新加载的替代方案。虽然方法看似简单直接,但能有效解决问题。
以下是具体的代码实现示例:
<!DOCTYPE html>
<html>
<head>
  <meta charset="UTF-8">
  <title>Title</title>
  <link rel="stylesheet" href="static/layui/css/layui.css" rel="external nofollow" >
</head>
<body>
<div id="myTable">
  <table id="demo" lay-filter="test"></table>
</div>
<button id="buttonChangeTitle" class="layui-btn ">点击改变表头</button>

<script type="text/javascript" src="static/layui/layui.js" charset="utf-8"></script>
<script>
  layui.use(['element', 'jquery', 'table'], function () {
    var $ = layui.jquery
      , table = layui.table
      , element = layui.element; //Tab的切换功能,切换事件监听等,需要依赖element模块

    var data = [
      {
        "id": 10000,
        "username": "user-0",
        "sex": "女",
        "city": "城市-0",
        "sign": "签名-0",
        "experience": 255,
        "logins": 24,
        "wealth": 82830700,
        "classify": "作家",
        "score": 57
      }, {
        "id": 10001,
        "username": "user-1",
        "sex": "男",
        "city": "城市-1",
        "sign": "签名-1",
        "experience": 884,
        "logins": 58,
        "wealth": 64928690,
        "classify": "词人",
        "score": 27
      }, {
        "id": 10002,
        "username": "user-2",
        "sex": "女",
        "city": "城市-2",
        "sign": "签名-2",
        "experience": 650,
        "logins": 77,
        "wealth": 6298078,
        "classify": "酱油",
        "score": 31
      }, {
        "id": 10003,
        "username": "user-3",
        "sex": "女",
        "city": "城市-3",
        "sign": "签名-3",
        "experience": 362,
        "logins": 157,
        "wealth": 37117017,
        "classify": "诗人",
        "score": 68
      }, {
        "id": 10004,
        "username": "user-4",
        "sex": "男",
        "city": "城市-4",
        "sign": "签名-4",
        "experience": 807,
        "logins": 51,
        "wealth": 76263262,
        "classify": "作家",
        "score": 6
      }, {
        "id": 10005,
        "username": "user-5",
        "sex": "女",
        "city": "城市-5",
        "sign": "签名-5",
        "experience": 173,
        "logins": 68,
        "wealth": 60344147,
        "classify": "作家",
        "score": 87
      }, {
        "id": 10006,
        "username": "user-6",
        "sex": "女",
        "city": "城市-6",
        "sign": "签名-6",
        "experience": 982,
        "logins": 37,
        "wealth": 57768166,
        "classify": "作家",
        "score": 34
      }, {
        "id": 10007,
        "username": "user-7",
        "sex": "男",
        "city": "城市-7",
        "sign": "签名-7",
        "experience": 727,
        "logins": 150,
        "wealth": 82030578,
        "classify": "作家",
        "score": 28
      }, {
        "id": 10008,
        "username": "user-8",
        "sex": "男",
        "city": "城市-8",
        "sign": "签名-8",
        "experience": 951,
        "logins": 133,
        "wealth": 16503371,
        "classify": "词人",
        "score": 14
      }, {
        "id": 10009,
        "username": "user-9",
        "sex": "女",
        "city": "城市-9",
        "sign": "签名-9",
        "experience": 484,
        "logins": 25,
        "wealth": 86801934,
        "classify": "词人",
        "score": 75
      }]
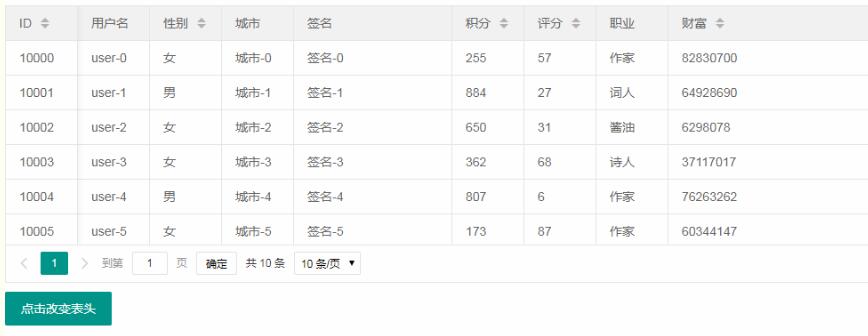
    var title =
      [ //表头
        {field: 'id', title: 'ID', width: 80, sort: true, fixed: 'left'}
        , {field: 'username', title: '用户名', width: 80}
        , {field: 'sex', title: '性别', width: 80, sort: true}
        , {field: 'city', title: '城市', width: 80}
        , {field: 'sign', title: '签名', width: 177}
        , {field: 'experience', title: '积分', width: 80, sort: true}
        , {field: 'score', title: '评分', width: 80, sort: true}
        , {field: 'classify', title: '职业', width: 80}
        , {field: 'wealth', title: '财富', sort: true}
      ]
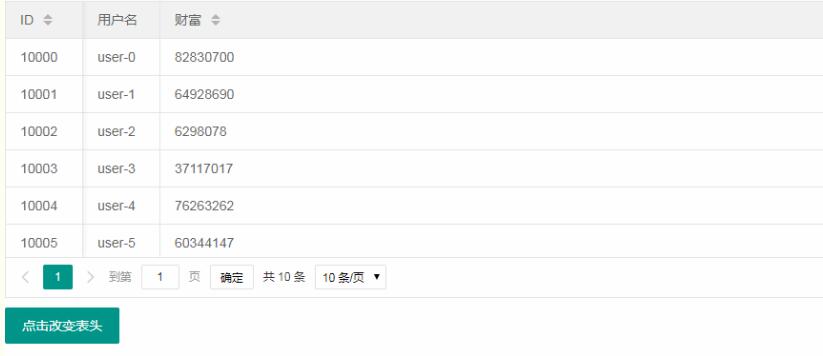
    var title2 =
      [ //表头
        {field: 'id', title: 'ID', width: 80, sort: true, fixed: 'left'}
        , {field: 'username', title: '用户名', width: 80}
        , {field: 'wealth', title: '财富', sort: true}
      ]

    //第一个实例
    var tableIns = table.render({
      elem: '#demo'
      , id: 'demoTest'
      , height: 312
      // ,url: '/demo/table/user/' //数据接口
      , data: data
      , page: true //开启分页
      , cols: [title]
    });

    $("#buttonChangeTitle").on("click", function () {
      $("#myTable").empty();
      $("#myTable").append('<table id="demo"></table>');

      //第一个实例
      var tableIns2 = table.render({
        elem: '#demo'
        , id: 'demoTest'
        , height: 312
        // ,url: '/demo/table/user/' //数据接口
        , data: data
        , page: true //开启分页
        , cols: [title2]
      });
    })


  })
</script>

</body>
</html>
点击按钮前的表格显示效果如下:
点击按钮后的表格显示效果如下:
以上关于Layui Table动态修改表头及重新加载表格的方法分享完毕,希望能为遇到类似问题的开发者提供参考。