

本文详细介绍在PHPStorm中配置Node.js单元测试环境的完整步骤。涵盖Mocha框架及assert、should等常用断言库的安装,深入解析PHPStorm运行配置参数设置,并对比BDD与TDD风格的代码实现,帮助开发者快速搭建高效的测试工作流。
安装必要的依赖包
安装必要的依赖包
Node.js项目中最常用的单元测试框架是Mocha。首先需确保本地已安装Node.js环境,随后通过命令行安装Mocha包。
npm install mocha -g此外,还需安装配套的断言工具。Node.js生态中常见的断言库包括以下几种:
- assert:采用TDD(测试驱动开发)风格
- should:采用BDD(行为驱动开发)风格
- expect:采用BDD风格
- chai:支持BDD与TDD混合风格
通过npm install命令安装上述任意一个断言库即可完成基础依赖配置。
在PHPStorm中配置Node.js单元测试环境
在PHPStorm中配置Node.js单元测试环境
打开PHPStorm,依次点击菜单:Run -> Edit Configurations,在右上角点击添加按钮并选择Mocha。
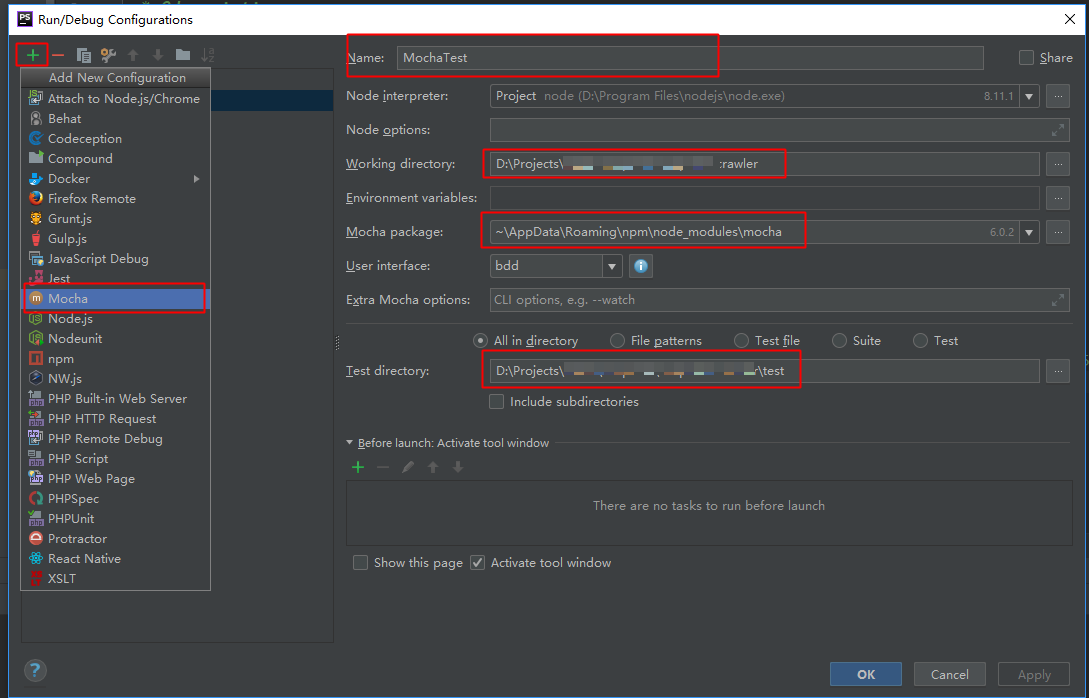
在弹出的配置窗口中填写以下关键参数,关于Mocha单元测试的更多细节可参考官网:https://mochajs.org/
- Name:自定义运行配置的名称,例如MochaTest
- Working directory:设置为当前项目的根目录
- Mocha package:指定Mocha包的安装路径,通常为node_modules\mocha
- User interface:选择测试接口风格,若使用assert库则选择TDD
- Test directory:此项允许选择测试目录或特定文件
- All in directory:勾选此项表示对指定目录下的所有文件执行测试
- File patterns:通过正则表达式指定需要测试的文件模式
- Test file:指定特定的单个测试文件
确认所有参数填写无误且无报错后,点击OK保存配置。
执行Node.js单元测试
执行Node.js单元测试
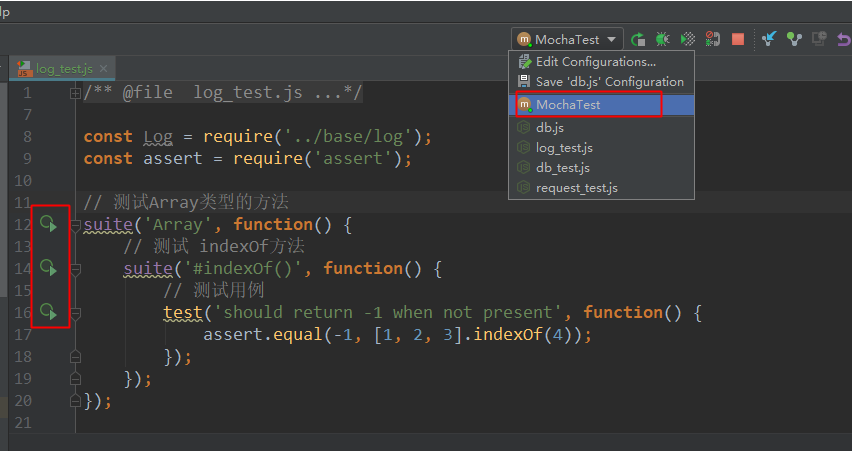
此处以assert库配合TDD模式为例进行单元测试。在之前选定的Test directory目录下新建一个名为test.js的测试文件。
const assert = require('assert');

// 测试Array类型的方法
suite('Array', function() {
 // 测试 indexOf方法
 suite('#indexOf()', function() {
  // 测试用例
  test('should return -1 when not present', function() {
   assert.equal(-1, [1, 2, 3].indexOf(4));
  });
 });
});
点击运行Mocha配置,在PHPStorm底部的输出窗口查看测试结果。绿色标识表示测试通过,红色标识表示测试失败。
断言库的具体使用
断言库的具体使用
在使用Mocha进行单元测试时,除了可以使用assert断言库外,只要断言代码中抛出Error对象,Mocha即可正常捕获并报告结果。
assert库:TDD风格详解
assert库:TDD风格详解
以下列举assert库中常用的断言函数,更多详情可参考官网:https://www.npmjs.com/package/assert
- assert.fail(actual, expected, message, operator)
- assert(value, message), assert.ok(value, [message])
- assert.equal(actual, expected, [message])
- assert.notEqual(actual, expected, [message])
- assert.deepEqual(actual, expected, [message])
- assert.notDeepEqual(actual, expected, [message])
- assert.strictEqual(actual, expected, [message])
- assert.notStrictEqual(actual, expected, [message])
- assert.throws(block, [error], [message])
- assert.doesNotThrow(block, [message])
- assert.ifError(value)
上述函数中的参数含义如下:
- value:实际传入的值
- actual:实际计算结果
- expected:期望得到的结果
- block:执行的代码块
- message:附加的错误提示信息
BDD风格should.js断言库
BDD风格should.js断言库
安装命令为:npm install should --save-dev,官网地址:https://github.com/shouldjs/should.js
const should = require('should');

const user = {
 name: 'tj'
 , pets: ['tobi', 'loki', 'jane', 'bandit']
};

user.should.have.property('name', 'tj');
user.should.have.property('pets').with.lengthOf(4);

// If the object was created with Object.create(null)
// then it doesn't inherit `Object.prototype`, so it will not have `.should` getter
// so you can do:
should(user).have.property('name', 'tj');

// also you can test in that way for null's
should(null).not.be.ok();

someAsyncTask(foo, function(err, result){
 should.not.exist(err);
 should.exist(result);
 result.bar.should.equal(foo);
});
should库支持链式调用,功能强大。相关文档参考:http://shouldjs.github.io/
user.should.be.an.instanceOf(Object).and.have.property('name', 'tj');
user.pets.should.be.instanceof(Array).and.have.lengthOf(4);
常用的should断言方法包括:
无实际逻辑作用的谓词,仅用于增强代码可读性:.an, .of, .a, .and, .be, .have, .with, .is, .which
- should.equal(actual, expected, [message]):判断两个值是否相等
- should.notEqual(actual, expected, [message]):判断两个值是否不相等
- should.strictEqual(actual, expected, [message]):判断是否严格相等(类型与值均相同)
- should.notStrictEqual(actual, expected, [message]):判断是否严格不相等
- should.deepEqual(actual, expected, [message]):判断是否递归深相等
- should.notDeepEqual(actual, expected, [message]):判断是否递归深不相等
- should.throws(block, [error], [message]):判断代码块是否抛出异常
- should.doesNotThrow(block, [message]):判断代码块是否不抛出异常
- should.fail(actual, expected, message, operator):判断是否不相等(通常用于显式失败)
- should.ifError(err):判断传入值是否为错误对象
- should.exist(actual, [message]):判断对象是否存在
- should.not.exist(actual, [message]):判断对象是否不存在
此外,should还提供了一系列用于类型判断的断言方法。
// bool类型判断
(true).should.be.true();
false.should.not.be.true();

// 数组是否包含
[ 1, 2, 3].should.containDeep([2, 1]);
[ 1, 2, [ 1, 2, 3 ]].should.containDeep([ 1, [ 3, 1 ]]);

// 数字比较
(10).should.not.be.NaN();
NaN.should.be.NaN();
(0).should.be.belowOrEqual(10);
(0).should.be.belowOrEqual(0);
(10).should.be.aboveOrEqual(0);
(10).should.be.aboveOrEqual(10);

// Promise状态判断
// don't forget to handle async nature
(new Promise(function(resolve, reject) { resolve(10); })).should.be.fulfilled();

// test example with mocha it is possible to return promise
it('is async', () => {
 return new Promise(resolve => resolve(10))
  .should.be.fulfilled();
});

// 对象的属性判断
({ a: 10 }).should.have.property('a');
({ a: 10, b: 20 }).should.have.properties({ b: 20 });
[1, 2].should.have.length(2);
({}).should.be.empty();

// 类型检查
[1, 2, 3].should.is.Array();
({}).should.is.Object();
几种常见的测试风格代码示例
几种常见的测试风格代码示例
BDD(行为驱动开发)风格
BDD(行为驱动开发)风格
BDD提供的接口包括:describe(), context(), it(), specify(), before(), after(), beforeEach(), 以及 afterEach()。
describe('Array', function() {
 before(function() {
  // ...
 });

 describe('#indexOf()', function() {
  context('when not present', function() {
   it('should not throw an error', function() {
    (function() {
     [1, 2, 3].indexOf(4);
    }.should.not.throw());
   });
   it('should return -1', function() {
    [1, 2, 3].indexOf(4).should.equal(-1);
   });
  });
  context('when present', function() {
   it('should return the index where the element first appears in the array', function() {
    [1, 2, 3].indexOf(3).should.equal(2);
   });
  });
 });
});
TDD(测试驱动开发)风格
TDD(测试驱动开发)风格
TDD提供的接口包括:suite(), test(), suiteSetup(), suiteTeardown(), setup(), 以及 teardown()。
suite('Array', function() {
 setup(function() {
  // ...
 });

 suite('#indexOf()', function() {
  test('should return -1 when not present', function() {
   assert.equal(-1, [1, 2, 3].indexOf(4));
  });
 });
});
QUNIT风格
QUNIT风格
QUNIT与TDD类似,使用suite()和test()标记测试用例,其包含的接口有:before(), after(), beforeEach(), 以及 afterEach()。
function ok(expr, msg) {
 if (!expr) throw new Error(msg);
}

suite('Array');

test('#length', function() {
 var arr = [1, 2, 3];
 ok(arr.length == 3);
});

test('#indexOf()', function() {
 var arr = [1, 2, 3];
 ok(arr.indexOf(1) == 0);
 ok(arr.indexOf(2) == 1);
 ok(arr.indexOf(3) == 2);
});

suite('String');

test('#length', function() {
 ok('foo'.length == 3);
});
总结
总结
以上就是本文的全部内容,希望本文的内容对大家的学习或者工作具有一定的参考学习价值,如果有疑问大家可以留言交流,谢谢大家对本站的支持。