
深入讲解如何使用 ammo.js(Bullet物理引擎WebAssembly移植版)实现高质量的3D角色控制器。涵盖动态胶囊刚体构建、自由度锁定、水平线速度驱动、向下射线检测地面判定以及常见物理坑点的解决策略。

当前位置:首页 > JavaScript 项目实战 > 正文
使用 ammo.js 实现角色控制器:刚体移动与地面检测
作者:半夏
时间:2026-11-03
浏览:119
文章目录
Web3D 物理引擎
ammo.js / Bullet
Three.js 实战
阅读时长:约 12 分钟
在 Web3D 游戏与交互应用中,直接使用位移累加(Translate)操作角色模型会导致穿墙、悬空等异常,而 Bullet 内置的运动学角色控制器(
btKinematicCharacterController)在 WebAssembly 编译的 ammo.js 中经常伴随台阶卡顿、地面穿透和斜坡下滑抖动等缺陷。在工程实践中,更稳健的方案是采用动态胶囊刚体(Dynamic btRigidBody)配合自由度锁定,结合每帧向下射线检测(RayTest)进行地面状态判定。本文将完整拆解该控制器的物理建模、水平线速度驱动、精确地面检测以及渲染同步全流程,提供可直接落地的完整代码实现与避坑准则。
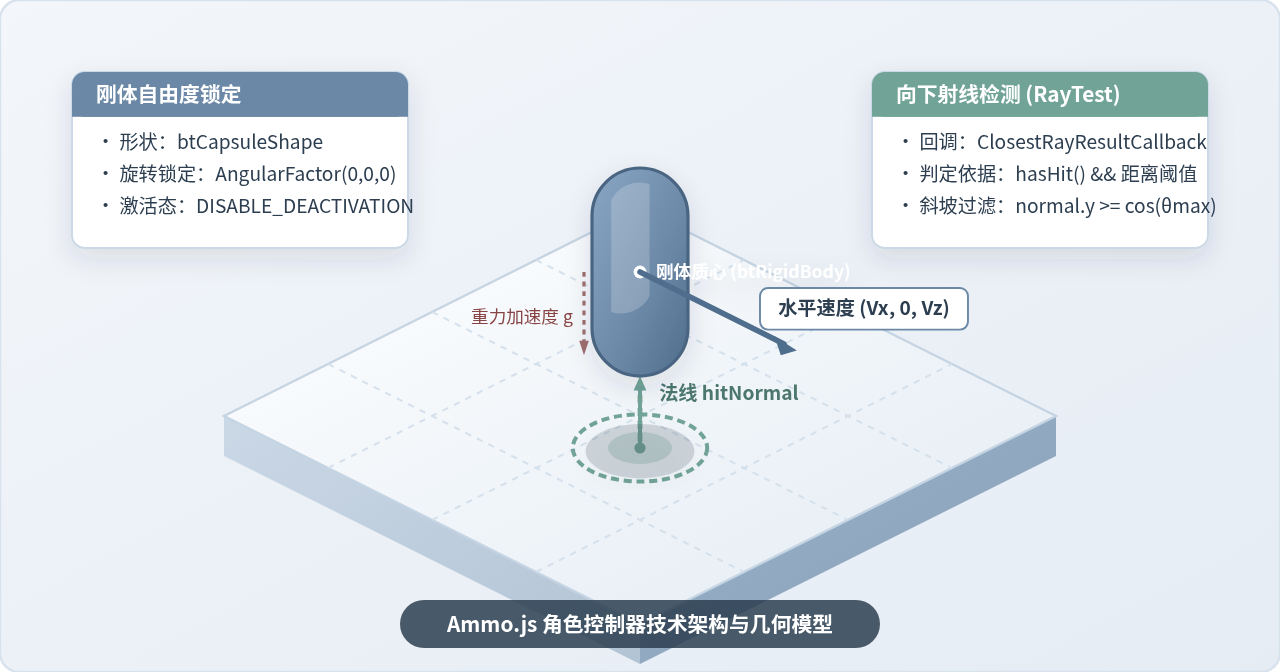
图 0:ammo.js 动态胶囊角色控制器核心物理模型与空间受力关系
一、为什么选用“动态刚体 + 射线检测”方案
在 ammo.js(由 Bullet 物理引擎通过 Emscripten 移植而来)中构建角色控制器,通常有两种技术选型:
| 对比维度 | 运动学幽灵控制器 (btKinematicCharacterController) | 动态刚体 + 射线检测 (Dynamic btRigidBody + RayTest) |
|---|---|---|
| 物理参与度 | 仅做碰撞几何排斥,无真实质量、惯性与动量传递 | 完全接入动力学世界,自然支持质量、推物交互与斜面阻尼 |
| 重力与着地表现 | 需手工模拟跳跃曲线与下落,易出现台阶弹跳和浮空 | 引擎原生计算重力加速度;射线精确探测微小高度与坡度 |
| ammo.js 兼容性 | 接口繁琐,内存指针管理复杂,存在已知物理渗透 Bug | API 简洁直观,生命周期与常规刚体一致,内存管理更可控 |
| 控制手感 | 硬编码位移容易导致物理世界与其他碰撞体“对撞穿帮” | 控制线速度既保证停走灵敏度,又绝不破坏碰撞消解管线 |
综合稳定度与开发成本,锁定角速度的动态胶囊刚体是三维 Web 应用的黄金解法。它将水平方向的主动移动与垂直方向的被动物理重力完美结合。
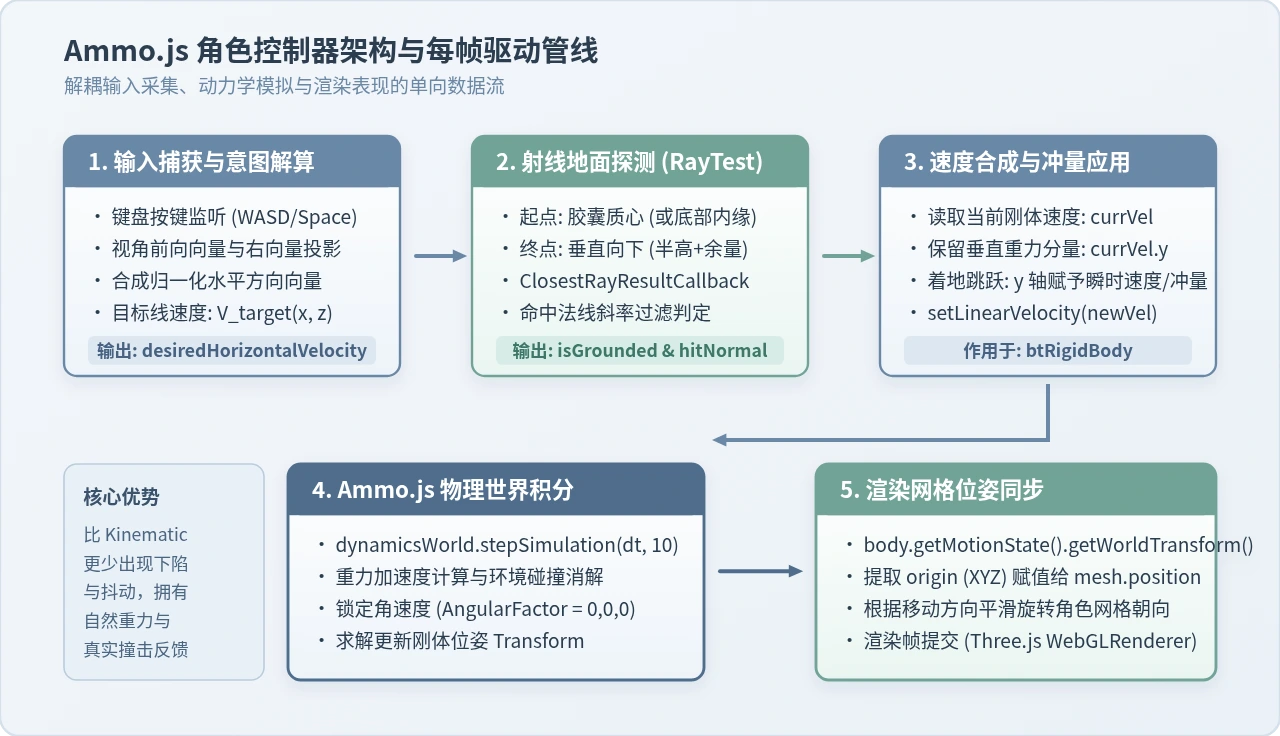
图 1:ammo.js 角色控制器系统架构与单帧物理管线数据流
二、构建角色胶囊刚体:形状、自由度与抗休眠
角色通常呈现上下瘦高的外形,若使用立方体(BoxShape),棱角在撞到地面拼接处或台阶时极易卡死;球体(SphereShape)则接触点过小,容易在边缘滑动。胶囊体(btCapsuleShape)拥有圆弧形上下底和垂直圆柱面,既能顺滑滑过轻微凹凸,又能提供稳定的支撑面。
1. 胶囊体尺寸定义
在 ammo.js 中,btCapsuleShape(radius, height) 的第二个参数 height 代表中间圆柱段的高度,而非胶囊总高度。
总高度 H = height + 2 * radius。例如,若需要一个高 1.8 米、宽 0.6 米的角色碰撞体,参数应设定为:半径 radius = 0.3,圆柱高 height = 1.2。
2. 锁定刚体旋转自由度 (Angular Factor)
这是实现角色刚体最关键的一步。普通的动态刚体在受到边缘推力时会发生倾斜翻滚。为了让角色永远笔直站立,必须将刚体的角速度缩放系数(Angular Factor)设置为三轴皆为 0:
// 锁定角速度自由度,使刚体永远不发生滚动与倾倒
const angularFactor = new Ammo.btVector3(0, 0, 0);
rigidBody.setAngularFactor(angularFactor);
3. 禁用物理休眠 (DISABLE_DEACTIVATION)
Bullet 物理引擎拥有自动休眠机制:当刚体在若干帧内动能低于阈值时,引擎会将其标记为“休眠态”(Sleeping)以节省计算开销。对于角色而言,玩家只要停下数秒,刚体便会休眠,后续键盘输入将无法驱动刚体位移。因此必须强制禁用休眠:
// 4 对应 Bullet 内部宏 DISABLE_DEACTIVATION
rigidBody.setActivationState(4);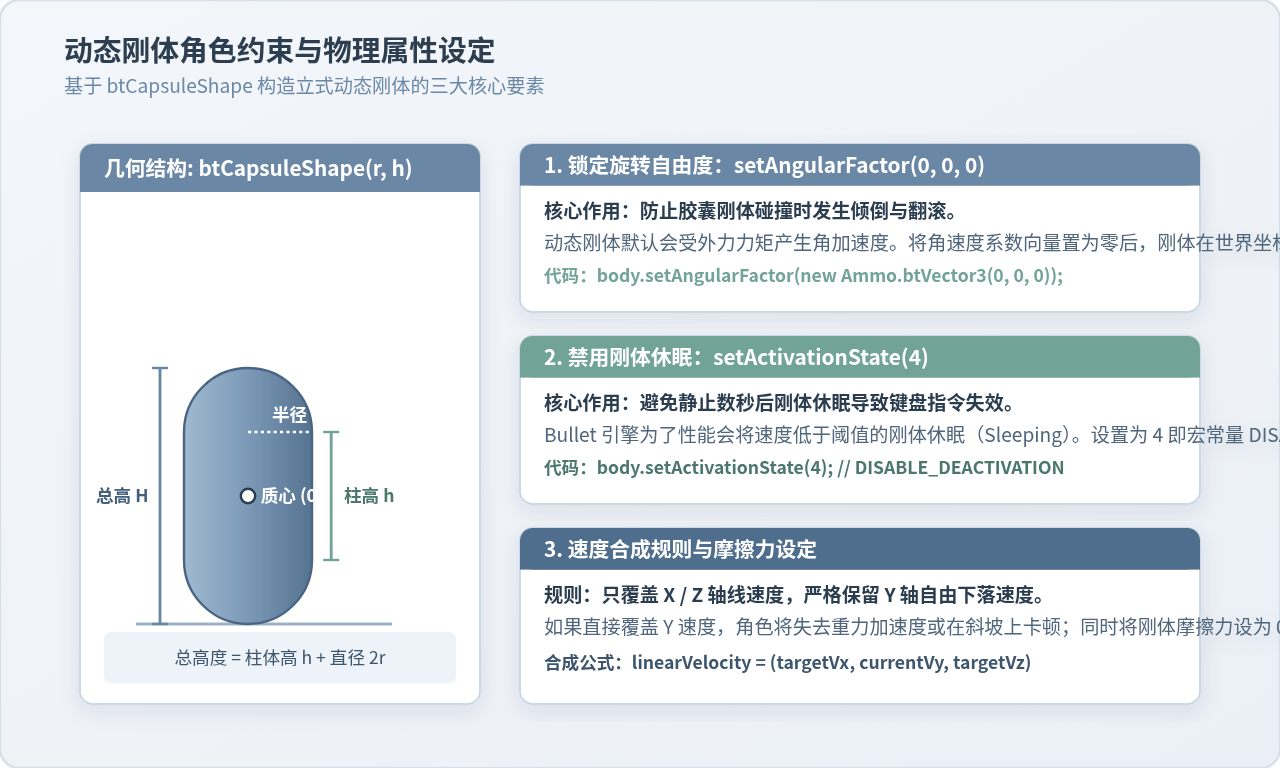
图 2:动态胶囊刚体几何参数与三项核心物理属性约束
4. 刚体创建完整代码封装
以下代码展示了如何创建该角色胶囊刚体并将其加入 ammo.js 的 btDiscreteDynamicsWorld 物理世界中:
/**
 * 创建角色控制器刚体
 * @param {Ammo} Ammo - ammo.js 实例
 * @param {btDiscreteDynamicsWorld} physicsWorld - 物理世界
 * @param {{ x: number, y: number, z: number }} initialPos - 初始世界坐标
 * @param {{ radius?: number, height?: number, mass?: number }} options - 胶囊几何与质量
 * @returns {btRigidBody} 创建完成的刚体实例
 */
function createCharacterRigidBody(Ammo, physicsWorld, initialPos, options = {}) {
  const radius = options.radius || 0.4;
  const cylinderHeight = options.height || 1.2;
  const mass = options.mass || 70; // 70kg 标准质量

  // 1. 创建胶囊碰撞体形状 (Y 轴朝上)
  const shape = new Ammo.btCapsuleShape(radius, cylinderHeight);

  // 2. 初始化变换与质心位置
  const transform = new Ammo.btTransform();
  transform.setIdentity();
  transform.setOrigin(new Ammo.btVector3(initialPos.x, initialPos.y, initialPos.z));

  // 3. 计算惯性张量
  const localInertia = new Ammo.btVector3(0, 0, 0);
  if (mass > 0) {
    shape.calculateLocalInertia(mass, localInertia);
  }

  // 4. 构建刚体信息
  const motionState = new Ammo.btDefaultMotionState(transform);
  const rbInfo = new Ammo.btRigidBodyConstructionInfo(mass, motionState, shape, localInertia);
  const body = new Ammo.btRigidBody(rbInfo);

  // 5. 关键物理属性设定
  body.setFriction(0); // 侧面摩擦力置零,避免贴墙移动时发生粘滞阻力
  body.setRestitution(0); // 弹性置零,着地不发生回弹
  body.setAngularFactor(new Ammo.btVector3(0, 0, 0)); // 严禁旋转
  body.setActivationState(4); // 禁用休眠 (DISABLE_DEACTIVATION)

  // 6. 添加进物理世界,配置碰撞过滤组
  physicsWorld.addRigidBody(body);

  // 清理临时向量,避免 WASM 内存滞留
  Ammo.destroy(localInertia);
  Ammo.destroy(transform);
  Ammo.destroy(rbInfo);

  return body;
}
三、键盘驱动与水平速度合成
驱动刚体移动常见两种手段:施加外力(applyCentralForce / applyImpulse)与直接设置线速度(setLinearVelocity)。
外力驱动由于存在惯性滑行,在角色控制中手感偏“滑”,刹车难以做到即停;而直接设定水平线速度,能够达到精准响应的操作手感。
核心要点:绝不能粗暴覆盖 Y 轴竖直速度
许多初学者常写出 body.setLinearVelocity(new Ammo.btVector3(vx, 0, vz)) 的代码,这会强行将 Y 轴速度归零,导致重力加速度无法累积,角色在半空中如履平地或在斜坡上发生诡异卡顿。正确的做法是:先读取当前刚体线速度,仅修改 X 和 Z 轴分量,将 Y 轴原样写回。
/**
 * 更新角色线速度(在渲染循环每帧调用)
 * @param {Ammo.btRigidBody} body - 角色刚体
 * @param {{ x: number, z: number }} moveDir - 归一化的水平移动输入 (基于摄像机视线)
 * @param {number} speed - 移动速度 (m/s)
 */
function updateCharacterVelocity(body, moveDir, speed) {
  // 获取当前刚体的线速度
  const currentVel = body.getLinearVelocity();
  const currentY = currentVel.y(); // 保留自然重力下落速度

  // 目标水平速度
  const targetX = moveDir.x * speed;
  const targetZ = moveDir.z * speed;

  // 构造新的速度向量
  const newVel = new Ammo.btVector3(targetX, currentY, targetZ);
  body.setLinearVelocity(newVel);

  Ammo.destroy(newVel);
}
四、基于向下射线检测(RayTest)的精准地面判定
仅仅根据碰撞流(Contact Testing)来判断角色是否“着地”极其脆弱:胶囊体轻微蹭到身旁的箱子、墙壁或树干就会触发着地判定,从而允许玩家在空中“踩墙二段跳”。 工业级标准解决方案是:每帧从角色质心向下发射一条射线,探测正下方的支撑面距离与表面法线。
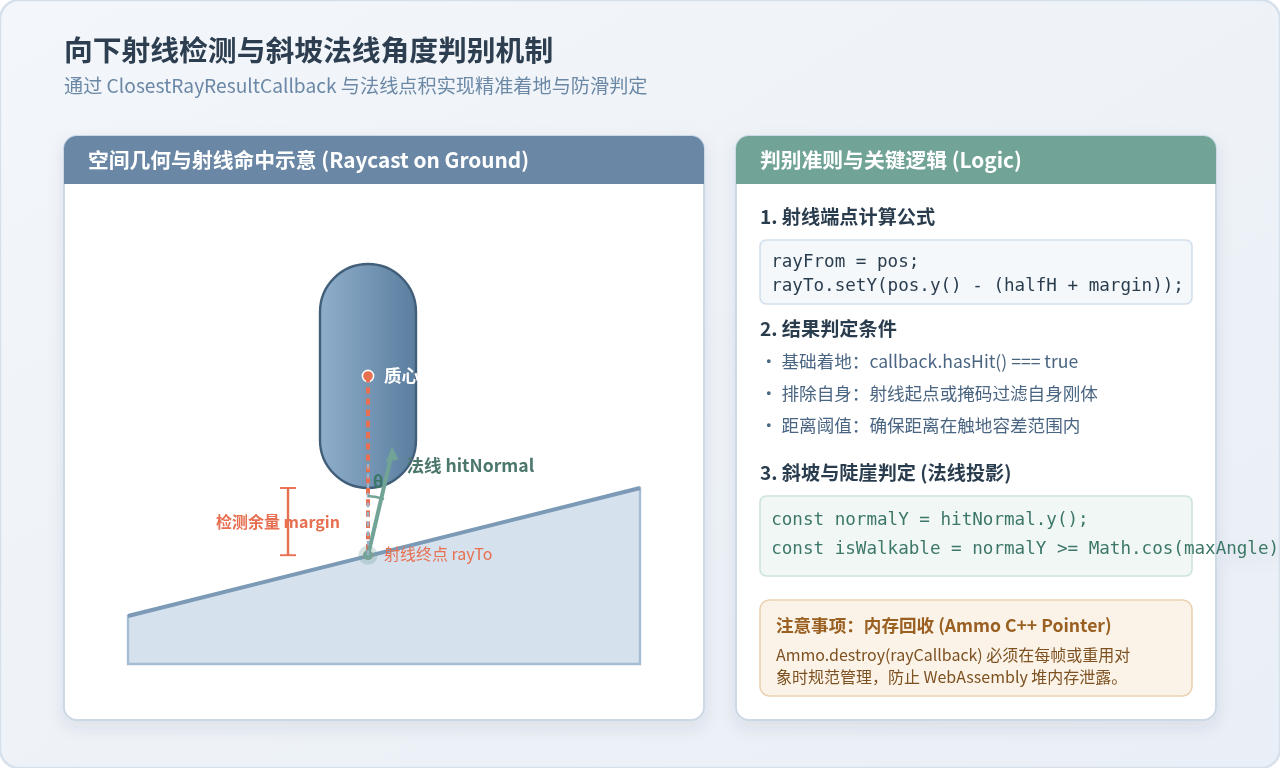
图 3:向下射线地面检测的几何端点计算、接触距离与法线斜率过滤
1. 射线的起点、终点与余量计算
胶囊体质心位于正中心。设胶囊半径为 r,柱体高度为 h,则从质心到胶囊最底部的距离为:
halfHeight = h / 2 + r。
若射线长度恰好等于半高,当下落发生微小数值浮点误差或经过微小斜坡缝隙时,射线可能落空。因此必须增加一个检测余量(groundMargin,通常取 0.1m ~ 0.15m):
- 射线起点 (rayFrom): 刚体当前中心坐标 (X, Y, Z);
- 射线终点 (rayTo): 垂直向下延伸,Y_to = Y - (halfHeight + groundMargin)。
2. 斜坡行走极限判定 (Slope Normal Check)
当角色站在过于陡峭的悬崖或垂直墙边时,射线即便击中墙体,也不应判定为着地。可通过击中点的法线向量(hitNormalWorld)与世界向上向量 (0, 1, 0) 的点积进行判断:
cos(θ) = n · up = n_y。
若最大可攀爬坡度为 45°,则只有当 n_y >= cos(45°) ≈ 0.707 时,才判定为有效着地(isGrounded = true)。
3. 地面检测器实现代码
class GroundDetector {
  constructor(Ammo, physicsWorld, characterBody, capsuleRadius, cylinderHeight) {
    this.Ammo = Ammo;
    this.physicsWorld = physicsWorld;
    this.characterBody = characterBody;

    // 胶囊半高:柱高/2 + 半径
    this.halfHeight = (cylinderHeight / 2) + capsuleRadius;
    this.margin = 0.15; // 射线伸出底部的安全容差
    this.maxSlopeCos = Math.cos(45 * Math.PI / 180); // 最大支持 45 度斜坡

    // 复用向量与变换对象,杜绝每帧 GC 与 WASM 内存泄漏
    this.rayFrom = new Ammo.btVector3();
    this.rayTo = new Ammo.btVector3();
    this.transform = new Ammo.btTransform();
  }

  /**
   * 执行地面检测
   * @returns {{ isGrounded: boolean, hitNormal: {x:number, y:number, z:number}, groundDist: number }}
   */
  checkGround() {
    // 获取刚体当前世界位置
    this.characterBody.getMotionState().getWorldTransform(this.transform);
    const origin = this.transform.getOrigin();
    const px = origin.x();
    const py = origin.y();
    const pz = origin.z();

    // 配置射线端点
    this.rayFrom.setValue(px, py, pz);
    this.rayTo.setValue(px, py - (this.halfHeight + this.margin), pz);

    // 构造单次射线回调
    const rayCallback = new this.Ammo.ClosestRayResultCallback(this.rayFrom, this.rayTo);

    // 执行物理世界射线拾取
    this.physicsWorld.rayTest(this.rayFrom, this.rayTo, rayCallback);

    let isGrounded = false;
    let hitNormal = { x: 0, y: 1, z: 0 };
    let groundDist = Infinity;

    if (rayCallback.hasHit()) {
      const hitBody = rayCallback.get_m_collisionObject();

      // 确保射线击中的不是角色自身的刚体
      if (this.Ammo.compare(hitBody, this.characterBody) !== 0) {
        const normal = rayCallback.get_m_hitNormalWorld();
        const ny = normal.y();

        // 斜坡法线判定:只有坡度小于阈值才算有效站立
        if (ny >= this.maxSlopeCos) {
          isGrounded = true;
          hitNormal = { x: normal.x(), y: normal.y(), z: normal.z() };

          const hitPoint = rayCallback.get_m_hitPointWorld();
          groundDist = py - hitPoint.y() - this.halfHeight;
        }
      }
    }

    // 回收 C++ 回调对象指针
    this.Ammo.destroy(rayCallback);

    return { isGrounded, hitNormal, groundDist };
  }

  // 释放长期持有的 Ammo 内存
  destroy() {
    this.Ammo.destroy(this.rayFrom);
    this.Ammo.destroy(this.rayTo);
    this.Ammo.destroy(this.transform);
  }
}
五、起跳与落地状态机驱动
引入状态机(Finite State Machine)能清晰管理角色的行为转换。角色在单帧内主要处于三种基本状态:着地(Grounded)、起跳瞬间(Jumping)与滞空下落(Falling)。
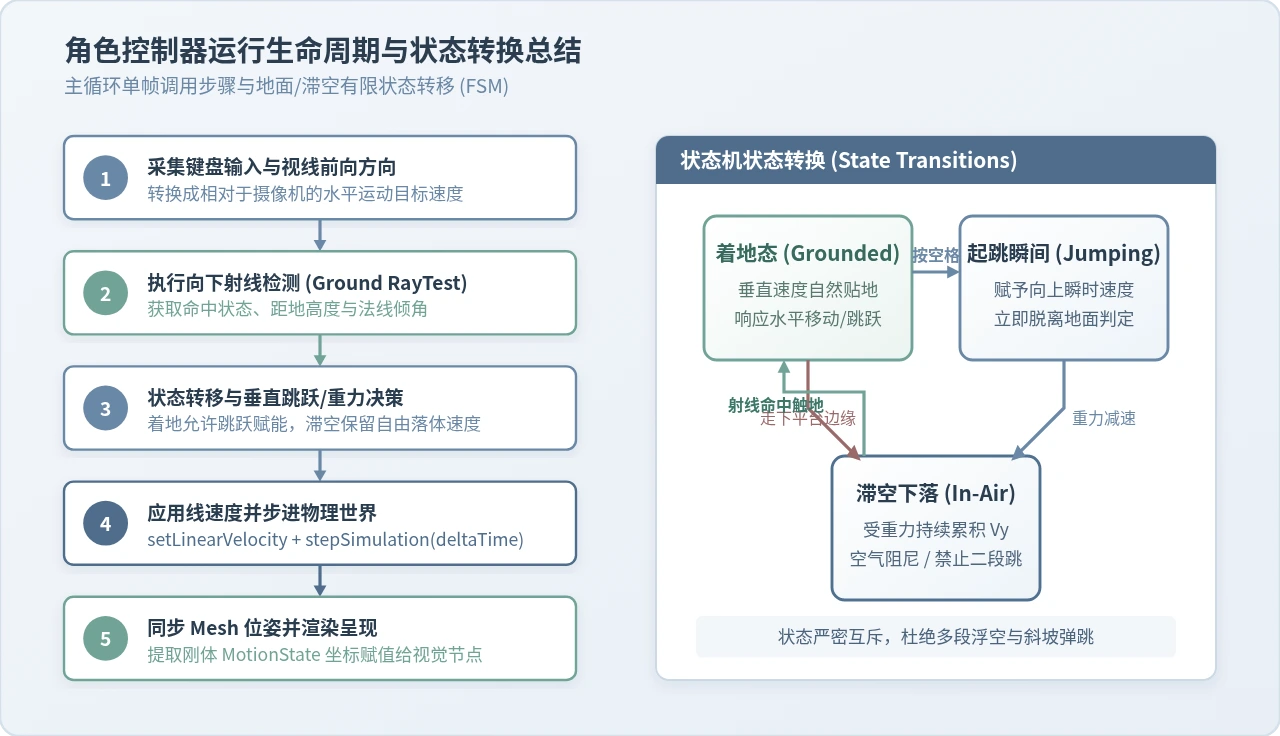
图 4:单帧控制更新流水线与起跳/落地有限状态机转换
跳跃动作的施加非常简单:在判定为着地且玩家按下空格键的瞬间,为刚体赋予一个向上的瞬时速度或者冲量:
function handleJump(body, isGrounded, jumpVelocity = 6.0) {
  if (isGrounded) {
    const currentVel = body.getLinearVelocity();
    // 保留水平速度,将垂直速度重置为起跳速度
    const newVel = new Ammo.btVector3(currentVel.x(), jumpVelocity, currentVel.z());
    body.setLinearVelocity(newVel);
    Ammo.destroy(newVel);
  }
}
六、渲染网格位姿同步与单帧更新管线
物理引擎运行在后台独立的世界坐标系中。在渲染循环(requestAnimationFrame)中,我们需要按照固定顺序串联整个流程:
- 1输入轮询:采集键盘与鼠标旋转输入,解算出水平移动方向向量;
- 2地面检测:执行
GroundDetector.checkGround(),更新isGrounded标记; - 3速度设置:根据输入和跳跃状态调用
setLinearVelocity; - 4步进物理模拟:调用
dynamicsWorld.stepSimulation(deltaTime, 10, 1/60); - 5同步位姿到渲染器:读取刚体当前的
btTransform,将坐标提取并赋值给 Three.js 的mesh.position。
// 完整的每帧更新控制器封装
class FPSCharacterController {
  constructor(Ammo, physicsWorld, camera, mesh, body, radius, height) {
    this.Ammo = Ammo;
    this.physicsWorld = physicsWorld;
    this.camera = camera;
    this.mesh = mesh;
    this.body = body;
    this.groundDetector = new GroundDetector(Ammo, physicsWorld, body, radius, height);

    this.moveSpeed = 5.0;
    this.jumpSpeed = 5.5;
    this.keys = { w: false, a: false, s: false, d: false, space: false };

    this.initKeyboard();
  }

  initKeyboard() {
    window.addEventListener('keydown', (e) => {
      if (e.code === 'KeyW') this.keys.w = true;
      if (e.code === 'KeyA') this.keys.a = true;
      if (e.code === 'KeyS') this.keys.s = true;
      if (e.code === 'KeyD') this.keys.d = true;
      if (e.code === 'Space') this.keys.space = true;
    });

    window.addEventListener('keyup', (e) => {
      if (e.code === 'KeyW') this.keys.w = false;
      if (e.code === 'KeyA') this.keys.a = false;
      if (e.code === 'KeyS') this.keys.s = false;
      if (e.code === 'KeyD') this.keys.d = false;
      if (e.code === 'Space') this.keys.space = false;
    });
  }

  update(deltaTime) {
    // 1. 地面检测
    const groundInfo = this.groundDetector.checkGround();

    // 2. 解算相对摄像机视角的移动向量
    const forward = new THREE.Vector3();
    this.camera.getWorldDirection(forward);
    forward.y = 0; // 投影到水平面
    forward.normalize();

    const right = new THREE.Vector3();
    right.crossVectors(forward, new THREE.Vector3(0, 1, 0)).normalize();

    const moveDirection = new THREE.Vector3(0, 0, 0);
    if (this.keys.w) moveDirection.add(forward);
    if (this.keys.s) moveDirection.sub(forward);
    if (this.keys.d) moveDirection.add(right);
    if (this.keys.a) moveDirection.sub(right);

    if (moveDirection.lengthSq() > 0.001) {
      moveDirection.normalize();
    }

    // 3. 处理跳跃与速度更新
    const currVel = this.body.getLinearVelocity();
    let vy = currVel.y();

    if (this.keys.space && groundInfo.isGrounded) {
      vy = this.jumpSpeed;
    }

    const targetVx = moveDirection.x * this.moveSpeed;
    const targetVz = moveDirection.z * this.moveSpeed;

    const newVel = new this.Ammo.btVector3(targetVx, vy, targetVz);
    this.body.setLinearVelocity(newVel);
    this.Ammo.destroy(newVel);

    // 4. 推进物理世界
    this.physicsWorld.stepSimulation(deltaTime, 10, 1 / 60);

    // 5. 将刚体物理位姿回写至渲染节点
    const trans = new this.Ammo.btTransform();
    this.body.getMotionState().getWorldTransform(trans);
    const origin = trans.getOrigin();

    this.mesh.position.set(origin.x(), origin.y(), origin.z());
    this.camera.position.set(origin.x(), origin.y() + 0.6, origin.z()); // 相机跟随头部高度

    this.Ammo.destroy(trans);
  }
}
七、高频故障与开发避坑指南
在真实项目落地 ammo.js 物理控制器时,读者可能会遇到以下偶发异常,下表总结了原因与应对方案:
常见问题排查与对策
-
问题 1:刚体偶尔“穿透”地面或在高速下落时掉出世界。
原因:默认离散碰撞检测(Discrete Collision Detection)在速度过大时发生隧道效应(Tunneling)。
解决:为刚体启用连续碰撞检测(CCD):body.setCcdMotionThreshold(1e-7); body.setCcdSweptSphereRadius(0.2);,并适当减小stepSimulation的固定步长(例如设为 1/120)。 -
问题 2:站在斜坡上不按键时,角色依然缓缓往下滑动。
原因:重力沿斜面的分力在驱动刚体,而刚体侧面摩擦为零。
解决:当检测到isGrounded === true且玩家没有任何移动输入时,可将水平线速度强制置 0,或将重力分量在着地且静止时设为极小的贴地微压值(如vy = -0.5)。 -
问题 3:运行一段时间后页面帧率暴跌、崩溃或报 WebAssembly Out of Bounds。
原因:Ammo.js 封装的是 C++ 对象,必须通过Ammo.destroy(ptr)显式释放。如果在每帧循环中new Ammo.btVector3()或new Ammo.ClosestRayResultCallback()而不销毁,会迅速撑爆 WebAssembly 线性堆内存。
解决:高频调用的临时向量建议在实例初始化阶段预分配并复用,或保证紧随使用后调用destroy。
八、总结
实现一个可靠的 3D 角色控制器,关键在于权衡程序主动意图控制与物理引擎自洽模拟的边界:
- 利用
btCapsuleShape获得光滑自然的碰撞外轮廓; - 通过
setAngularFactor(0, 0, 0)锁定角速度自由度,使立柱体绝对防倒; - 采用“只设水平分量、保留重力垂直分量”的线速度更新策略,获得灵敏的操作反馈;
- 利用垂直向下的
ClosestRayResultCallback射线探测,过滤自身与陡坡,得到确定性的地面站立状态。
掌握这一架构后,读者可以在此基石之上轻松扩展更复杂的玩法功能,如冲刺加速、空中阻尼衰减、台阶平滑踏步(Step-climbing)以及平台移动惯性跟随。
实用工具推荐
电子包浆
使用 ›绿化、压缩、噪点和虚拟水印,自由调节做旧程度。
图片压缩
使用 ›选择画质和输出格式,预览压缩前后的大小。
作者最新文章
相关文章