

本文介绍在 uni-app 2.8.9+ 版本中,如何利用 uni.navigateTo 的 eventChannel 实现页面间数据通信。涵盖向被打开页面发送数据,以及通过监听事件获取返回数据的两种核心场景,提供基于 Vue3 和 Options API 的代码示例。
uni-app 实现页面通信 EventChannel
此前曾介绍过通过 EventBus 实现不同页面组件间的通信。在 uni-app 中,还可以使用其提供的 API —— uni.navigateTo 来完成页面间的通信。需要注意的是,uni-app 自 2.8.9 版本起开始支持页面间事件通信通道。
1. 向被打开页面传送数据
// index.vue
<script setup>
	uni.navigateTo({
		url: '/pages/tender/detail', // 跳转详情页面
	    success:function(res){
	      // 通过eventChannel向被打开页面传送数据
	      res.eventChannel.emit('toDetailEmits', { data: 'index to detail' })
	    }
	});
</script>
// detail.vue
import { onLoad } from '@dcloudio/uni-app';
import { ref, getCurrentInstance} from 'vue';
const instance = getCurrentInstance().proxy
<script setup>
onLoad(()=>{
const eventChannel = instance.getOpenerEventChannel();
eventChannel.on('toDetailEmits',(data)=>{
console.log(data,'data') // 输出结果如下
})
})
</script>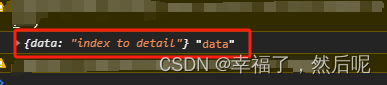
2. 如果需要获取被打开页面传送到当前页面的数据
// index.vue
<script setup>
	uni.navigateTo({
		url: '/pages/tender/detail', // 跳转详情页面
	    events:{
	      // 为指定事件添加一个监听器,获取被打开页面传送到当前页面的数据
	      updataEmits:function(data){
	        console.log(data,'data index')  // 输出结果如下
	        // 可以在当前页做一些操作....
	      }
	    },
	    success:function(res){
	      // 通过eventChannel向被打开页面传送数据
	      res.eventChannel.emit('toDetailEmits', { data: 'index to detail' })
	    }
	});
</script>
// detail.vue
import { onLoad } from '@dcloudio/uni-app';
import { ref, getCurrentInstance} from 'vue';
const instance = getCurrentInstance().proxy
<script setup>
// 如点击某一按钮
const cancle = () => {
const eventChannel = instance.getOpenerEventChannel();
eventChannel.emit('updataEmits',{data:'detail to index'})
uni.navigateBack()
}
onLoad(()=>{
const eventChannel = instance.getOpenerEventChannel();
eventChannel.on('toDetailEmits',(data)=>{
console.log(data,'data')
})
})
</script>
到此这篇关于 uni-app 实现页面通信 EventChannel 的操作方法的文章就介绍到这了,更多相关 uni-app 页面通信 EventChannel 内容请搜索本站以前的文章或继续浏览下面的相关文章,希望大家以后多多支持本站!