

本文介绍一种逻辑清晰的JavaScript轮播图实现方法,涵盖HTML布局、CSS样式控制及JS交互逻辑。通过封装清除和添加active类的方法,结合定时器实现自动播放、按钮切换、小圆点导航及鼠标悬停暂停等功能,提供完整可运行代码。
实现轮播图有多种方式,本文展示其中一种逻辑较为直观的实现方案。整体思路明确,代码结构简洁,欢迎交流指正。
效果展示
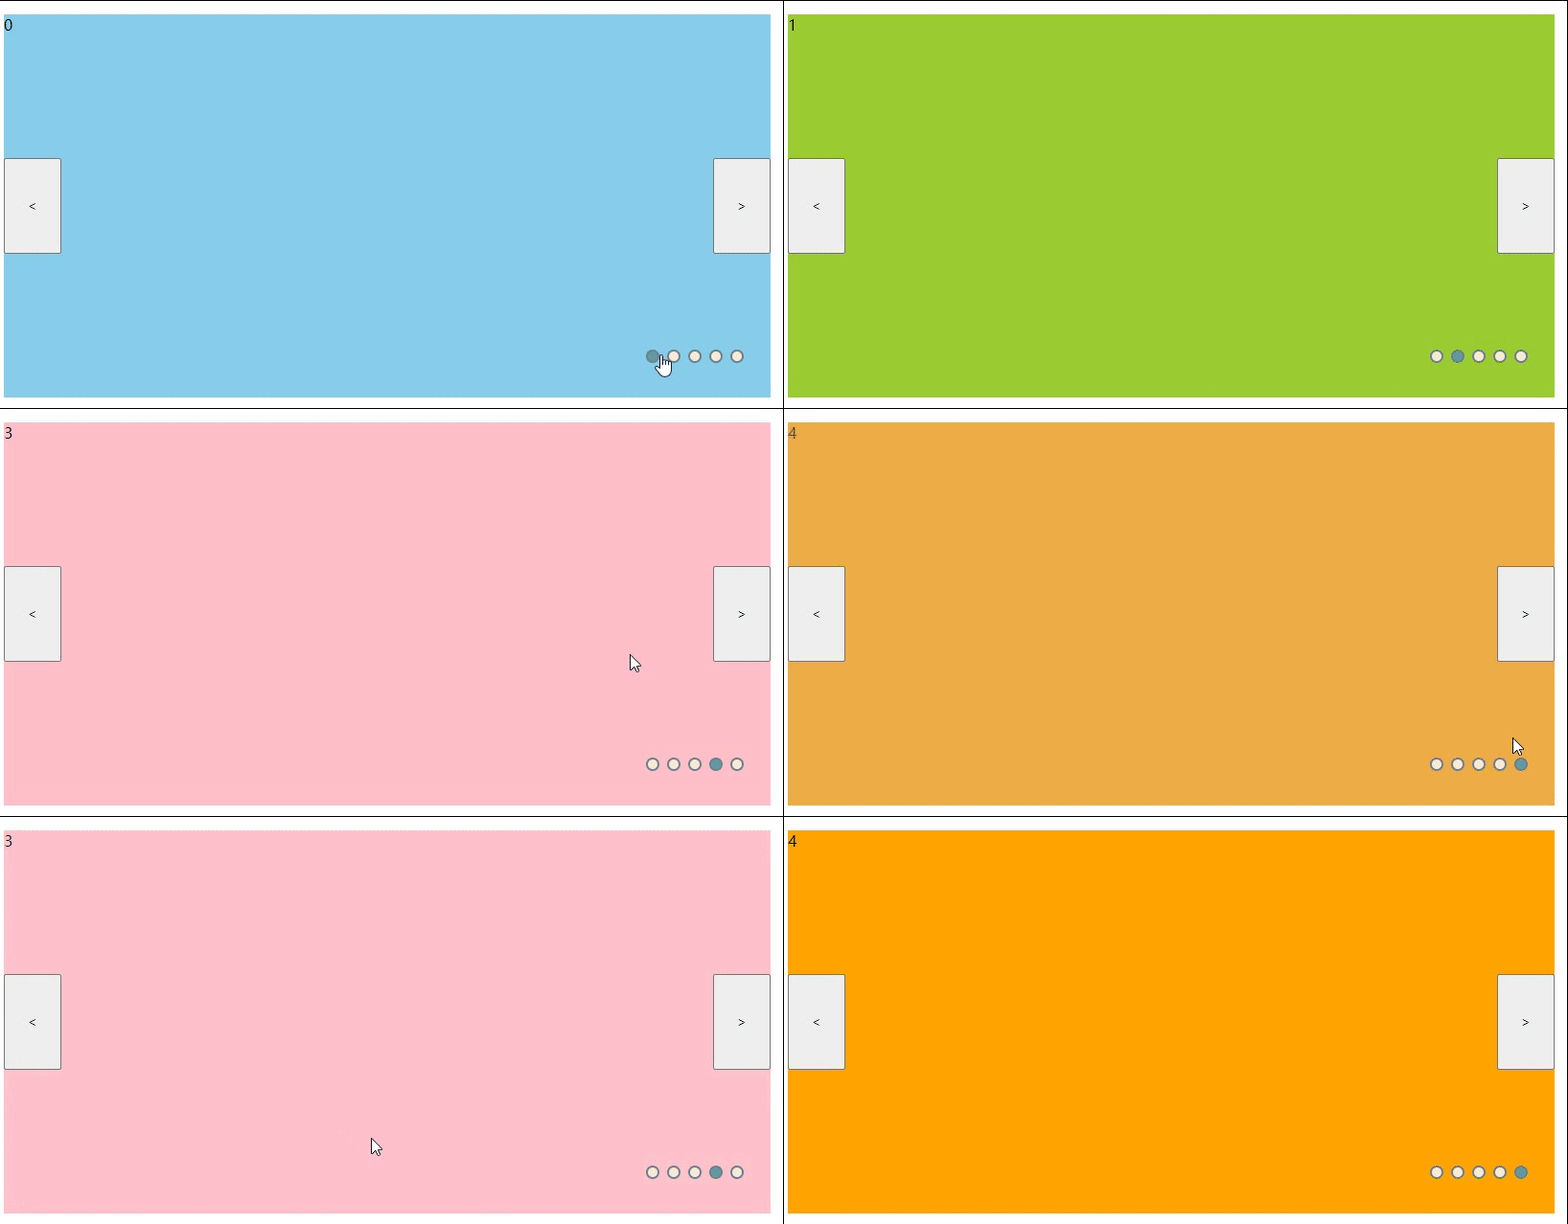
首先查看最终效果。为简化说明,此处不依赖具体图片资源,重点在于梳理实现逻辑。该方案支持自动轮播、左右按钮切换、小圆点导航、鼠标移入暂停及移出继续等功能。
HTML结构
HTML部分布局简洁,包含图片列表、小圆点列表以及左右切换按钮。注意利用HTML5的data-xx属性存储自定义数据(后续JS代码将使用)。需为默认显示的图片及其对应的小圆点添加active类。
 <div class="wrap">
        <ul class="list">
            <li class="item active">0</li>
            <li class="item">1</li>
            <li class="item">2</li>
            <li class="item">3</li>
            <li class="item">4</li>
        </ul>
        <ul class="pointList">
            <li class="point active" data-index = 0></li>
            <li class="point" data-index = 1></li>
            <li class="point" data-index = 2></li>
            <li class="point" data-index = 3></li>
            <li class="point" data-index = 4></li>
        </ul>
        <button class="btn" id="leftBtn"> < </button>
        <button class="btn" id="rightBtn"> > </button>

    </div>
CSS样式
CSS思路:父容器list采用相对定位,子项item采用绝对定位,使所有图片在父容器内重叠。通过z-index控制层级,图片最高者显示在最上层。为保证左右切换按钮和小圆点始终可见且不被图片遮挡,需设置其z-index高于图片。active类用于控制显示状态,绑定该类的图片将显示在最上层。图片切换采用透明度渐变(opacity从完全不透明到透明)配合transition动画实现平滑过渡。此外,为小圆点设置cursor为pointer以显示手型光标,其余无特殊要求。
<style>
        .wrap {
            width: 800px;
            height: 400px;
            position: relative;
        }

        .list {
            width: 800px;
            height: 400px;
            position: relative;
            padding-left: 0px;
        }

        .item {
            width: 100%;
            height: 100%;
            list-style: none;
            position: absolute;
            left: 0;
            opacity: 0;
            transition: all .8s;
        }

        .item:nth-child(1) {
            background-color: skyblue;
        }

        .item:nth-child(2) {
            background-color: yellowgreen;
        }

        .item:nth-child(3) {
            background-color: rebeccapurple;
        }

        .item:nth-child(4) {
            background-color: pink;
        }

        .item:nth-child(5) {
            background-color: orange;
        }

        .item.active {
            z-index: 10;
            opacity: 1;
        }

        .btn {
            width: 60px;
            height: 100px;
            z-index: 100;
            top: 150px;
            position: absolute;
        }

        #leftBtn {
            left: 0px;
        }

        #rightBtn {
            right: 0px;
        }

        .pointList {
            list-style: none;
            padding-left: 0px;
            position: absolute;
            right: 20px;
            bottom: 20px;
            z-index: 200;
        }

        .point {
            width: 10px;
            height: 10px;
            background-color: antiquewhite;
            border-radius: 100%;
            float: left;
            margin-right: 8px;
            border-style: solid;
            border-width: 2px;
            border-color: slategray;
            cursor: pointer;
        }

        .point.active{
            background-color: cadetblue;
        }
    </style>
JavaScript逻辑
index变量是代码的核心。首先封装清除active状态的方法,该方法需移除图片的active类(使上一张图退出顶层)及对应小圆点的active类。goIndex方法负责为当前图片和对应小圆点同时添加active类,左右按钮绑定的逻辑类似。
通过getAttribute获取li标签绑定的data-index属性,将图片index与pointindex绑定,即可实现点击小圆点切换图片。由于goIndex方法已预先绑定逻辑,在添加图片active样式的同时也会更新小圆点样式,从而实现图片切换时小圆点同步变化。
<script>
        var items = document.querySelectorAll(".item");//图片节点
        var points = document.querySelectorAll(".point")//点
        var left = document.getElementById("leftBtn");
        var right = document.getElementById("rightBtn");
        var all = document.querySelector(".wrap")
        var index = 0;
        var time = 0;//定时器跳转参数初始化


        //封装一个清除active方法
        var clearActive = function () {
            for (i = 0; i < items.length; i++) {
                items[i].className = 'item';
            }
            for (j = 0; j < points.length; j++) {
                points[j].className = 'point';
            }
        }

        //改变active方法
        var goIndex = function () {
            clearActive();
            items[index].className = 'item active';
            points[index].className = 'point active'
        }
        //左按钮事件
        var goLeft = function () {
            if (index == 0) {
                index = 4;
            } else {
                index--;
            }
            goIndex();
        }

        //右按钮事件
        var goRight = function () {
            if (index < 4) {
                index++;
            } else {
                index = 0;
            }
            goIndex();
        }


        //绑定点击事件监听
        left.addEventListener('click', function () {
            goLeft();
            time = 0;//计时器跳转清零
        })

        right.addEventListener('click', function () {
            goRight();
            time = 0;//计时器跳转清零
        })

        for(i = 0;i < points.length;i++){
            points[i].addEventListener('click',function(){
                var pointIndex = this.getAttribute('data-index')
                index = pointIndex;
                goIndex();
                time = 0;//计时器跳转清零
            })
        }
        //计时器轮播效果
        var timer;
        function play(){
         timer = setInterval(() => {
            time ++;
            if(time == 20 ){
                goRight();
                time = 0;
            }
        },100)
    }
        play();
        //移入清除计时器
        all.onmousemove = function(){
            clearInterval(timer)
        }
       //移出启动计时器
        all.onmouseleave = function(){
            play();
        }
    </script>
总结:此简单轮播图示例是初次编写时逻辑最清晰、最易理解的一种。下方提供完整代码,可直接复制运行。
<!DOCTYPE html>
<html>

<head>
    <style>
        .wrap {
            width: 800px;
            height: 400px;
            position: relative;
        }

        .list {
            width: 800px;
            height: 400px;
            position: relative;
            padding-left: 0px;
        }

        .item {
            width: 100%;
            height: 100%;
            list-style: none;
            position: absolute;
            left: 0;
            opacity: 0;
            transition: all .8s;
        }

        .item:nth-child(1) {
            background-color: skyblue;
        }

        .item:nth-child(2) {
            background-color: yellowgreen;
        }

        .item:nth-child(3) {
            background-color: rebeccapurple;
        }

        .item:nth-child(4) {
            background-color: pink;
        }

        .item:nth-child(5) {
            background-color: orange;
        }

        .item.active {
            z-index: 10;
            opacity: 1;
        }

        .btn {
            width: 60px;
            height: 100px;
            z-index: 100;
            top: 150px;
            position: absolute;
        }

        #leftBtn {
            left: 0px;
        }

        #rightBtn {
            right: 0px;
        }

        .pointList {
            list-style: none;
            padding-left: 0px;
            position: absolute;
            right: 20px;
            bottom: 20px;
            z-index: 200;
        }

        .point {
            width: 10px;
            height: 10px;
            background-color: antiquewhite;
            border-radius: 100%;
            float: left;
            margin-right: 8px;
            border-style: solid;
            border-width: 2px;
            border-color: slategray;
            cursor: pointer;
        }

        .point.active{
            background-color: cadetblue;
        }
    </style>
</head>

<body>
    <div class="wrap">
        <ul class="list">
            <li class="item active">0</li>
            <li class="item">1</li>
            <li class="item">2</li>
            <li class="item">3</li>
            <li class="item">4</li>
        </ul>
        <ul class="pointList">
            <li class="point active" data-index = 0></li>
            <li class="point" data-index = 1></li>
            <li class="point" data-index = 2></li>
            <li class="point" data-index = 3></li>
            <li class="point" data-index = 4></li>
        </ul>
        <button class="btn" id="leftBtn"> < </button>
        <button class="btn" id="rightBtn"> > </button>

    </div>
    <script>
        var items = document.querySelectorAll(".item");//图片
        var points = document.querySelectorAll(".point")//点
        var left = document.getElementById("leftBtn");
        var right = document.getElementById("rightBtn");
        var all = document.querySelector(".wrap")
        var index = 0;
        var time = 0;//定时器跳转参数初始化


        //清除active方法
        var clearActive = function () {
            for (i = 0; i < items.length; i++) {
                items[i].className = 'item';
            }
            for (j = 0; j < points.length; j++) {
                points[j].className = 'point';
            }
        }

        //改变active方法
        var goIndex = function () {
            clearActive();
            items[index].className = 'item active';
            points[index].className = 'point active'
        }
        //左按钮事件
        var goLeft = function () {
            if (index == 0) {
                index = 4;
            } else {
                index--;
            }
            goIndex();
        }

        //右按钮事件
        var goRight = function () {
            if (index < 4) {
                index++;
            } else {
                index = 0;
            }
            goIndex();
        }


        //绑定点击事件监听
        left.addEventListener('click', function () {
            goLeft();
            time = 0;//计时器跳转清零
        })

        right.addEventListener('click', function () {
            goRight();
            time = 0;//计时器跳转清零
        })

        for(i = 0;i < points.length;i++){
            points[i].addEventListener('click',function(){
                var pointIndex = this.getAttribute('data-index')
                index = pointIndex;
                goIndex();
                time = 0;//计时器跳转清零
            })
        }
        //计时器
        var timer;
        function play(){
         timer = setInterval(() => {
            time ++;
            if(time == 20 ){
                goRight();
                time = 0;
            }
        },100)
    }
        play();
        //移入清除计时器
        all.onmousemove = function(){
            clearInterval(timer)
        }
       //移出启动计时器
        all.onmouseleave = function(){
            play();
        }
    </script>
</body>

</html>
总结
本文关于JavaScript实现轮播图方法的介绍到此结束。如需了解更多JS实现轮播图相关内容,请搜索本站过往文章或继续阅读下方相关文章,希望大家今后多多支持本站!