

本文针对微信小程序中使用Vant组件库开发底部评论输入框时遇到的常见问题,如van-popup渲染错位、van-overlay加载延迟、IOS自动推屏内容丢失以及键盘唤醒卡顿等,提供了具体的优化方案。通过自定义遮罩层结合display属性控制显示,利用wx:if强制重置van-field状态以触发自动聚焦,并参考微博小程序做法记录滚动位置,有效提升了低端机型及IOS系统的用户体验。
微信小程序Vant输入框底部弹窗问题背景
在开发过程中,我们需要实现一个点击评论按钮后从底部弹起的输入框功能,具体效果如下图所示。
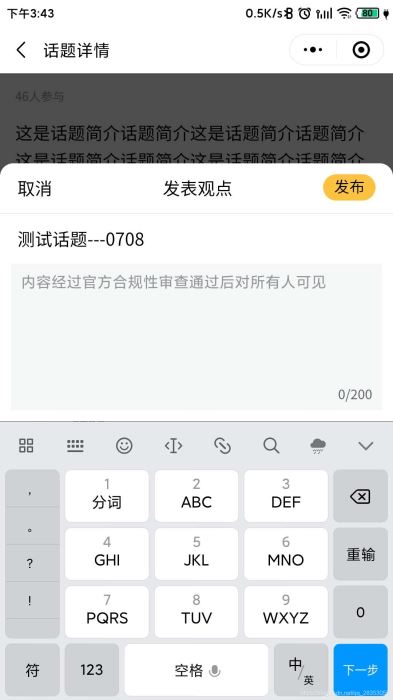
开发中遇到的常见问题
在开发过程中,我们遇到了以下几个主要问题:
1. 使用van-field搭配van-popup时,部分手机在弹窗弹出后会出现输入框位置乱跳的现象,这主要是因为van-popup在多次弹出和数据渲染时存在兼容性问题。2. 使用van-field搭配van-overlay(遮罩层)时,遮罩层的弹出速度较慢,导致手机性能较差的设备体验不佳。3. 在IOS系统中,键盘自动弹出时会导致页面内容向上推挤,进而造成内容错位或丢失。
自定义遮罩与van-field优化方案
针对上述问题,我们制定了以下处理方案:
首先,我们自定义了遮罩层,并通过CSS的display属性来控制其显示与隐藏。这种方式即使在手机性能较差的设备上,也能基本避免卡顿现象。具体的实现思路参考了网上的一位开发者提供的代码:https://www.jb51.net/javascript/2976631fc.htm
// wxml代码
// catchtouchmove="true" 对遮罩的穿透处理
<view class="overlayInput" style='display:{{showInput ? "block" : "none"}}' catchtouchmove="true" bindtap="onCancel"></view>
// wxss代码
// 这边代码是之前百度网上一个哥们的代码,
.overlayInput {
display: none;
position: fixed;
top: 0%;
left: 0%;
width: 100%;
height: 100%;
background-color: black;
z-index: 2;
-moz-opacity: 0.7;
opacity: 0.70;
filter: alpha(opacity=70);
}以下是van-field组件的核心代码。由于每次点击评论按钮都需要自动唤起键盘,我们在代码中加入了wx:if判断。这样做的目的是确保每次showInput状态变为true时,van-field组件都会重新渲染,从而使autofocus属性能够生效。我们将此功能封装为一个组件,父级组件通过传递showInput参数来控制输入框的显示。
<view class="comInput" style="bottom: {{isBlur ? blurBottom : bottom}}px" wx:if="{{showInput}}">
  <view class="top hairline">
    <view class="cancel" bindtap="onCancel">取消</view>
    <view class="title">发表观点</view>
    <view class="release" bindtap="onRelease">发布</view>
  </view>
  <view class="comtent">{{title}}</view>
  <view style="padding:0 10px 10px 10px;">
    <van-field
      value="{{ inputValue }}"
      placeholder="内容经过官方合规性审查通过后对所有人可见"
      border="{{ false }}"
      cursor-spacing="95"
      input-class="border"
      bind:change="onChange"
      autosize="{{autoSize}}"
      bind:keyboardheightchange="keyboardheightchange"
      maxlength="200"
      adjust-position="{{false}}"
      arrow-direction="left"
      fixed="{{true}}"
      type="textarea"
      bind:focus="onFoucs"
      bind:blur="onBlur"
      bind:linechange="onLineChange"
      show-word-limit
      auto-focus
      focus
      placeholder-class="place"
      input-class="com-input-class"
      show-confirm-bar="{{ false }}"
    />
  </view>
</view>
性能优化:滚动位置记录策略
在优化处理方面:
考虑到小程序本身存在的性能瓶颈,每次键盘唤起时用户都能明显感觉到卡顿。为此,我们参考了微博小程序的做法:在第一次弹窗时记录当前的滚动位置,之后再次弹起时,直接跳转到该记录的位置,从而减少页面重绘和滚动带来的性能消耗。
组件完整代码参考
以下是组件的完整代码,如有需要可自行提取使用,但部分细节可能需要根据实际业务场景进行修改:
// 样式
.overlay {
  display: none;
  position: absolute;
  top: 0%;
  left: 0%;
  width: 100%;
  height: 100%;
  background-color: black;
  z-index: 2;
  -moz-opacity: 0.7;
  opacity: 0.70;
  filter: alpha(opacity=70);
}
.comInput {
  /* height: 200px; */
  position: fixed;
  width: 100%;
  background: #fff;
  z-index: 20;
  /* bottom: 0; */
  border-radius: 26rpx 26rpx 0 0;
}
.top {
  padding: 10px 16px;
  text-align: center;
}
.cancel {
  float: left;
  width: 50px;
  text-align: left;
}
.title {
  display: inline-block;
}
.release {
  float: right;
  width: 100rpx;
  height: 50rpx;
  background:rgba(255,194,64,1);
  border-radius: 25rpx;
  font-size: 30rpx;
}
.hairline {
  border-bottom: 1px solid #efefef;
}
.comtent {
  padding: 10px 16px;
}
.com-input-class {
  background: #efefef;
  border-radius: 3px;
  padding: 5px 5px 5px 5px;
}
.place {
  color:red;
}
// wxml代码
<view class="overlay" style='display:{{showInput ? "block" : "none"}}' catchtouchmove="true" bindtap="onCancel"></view>
<view class="comInput" style="bottom: {{isBlur ? blurBottom : bottom}}px" wx:if="{{showInput}}">
<view class="top hairline">
<view class="cancel" bindtap="onCancel">取消</view>
<view class="title">发表观点</view>
<view class="release" bindtap="onRelease">发布</view>
</view>
<view class="comtent">{{title}}</view>
<view style="padding:0 10px 10px 10px;">
<van-field
value="{{ inputValue }}"
placeholder="内容经过官方合规性审查通过后对所有人可见"
border="{{ false }}"
cursor-spacing="95"
input-class="border"
bind:change="onChange"
autosize="{{autoSize}}"
bind:keyboardheightchange="keyboardheightchange"
maxlength="200"
adjust-position="{{false}}"
arrow-direction="left"
fixed="{{true}}"
type="textarea"
bind:focus="onFoucs"
bind:blur="onBlur"
bind:linechange="onLineChange"
show-word-limit
auto-focus
focus
placeholder-class="place"
input-class="com-input-class"
show-confirm-bar="{{ false }}"
/>
</view>
</view>// js代码
Component({
/**
* 组件的属性列表
*/
properties: {
inputValue: String,
title: String,
showInput: {
value: false,
type: Boolean
}
},
/**
* 组件的初始数据
*/
data: {
autoSize: {
maxHeight: 100,
minHeight: 100
},
show: false,
value: "",
bottom: 0,
isBlur: true,
blurBottom: 0
},
/**
* 组件的方法列表
*/
methods: {
keyboardheightchange (e) {
// this.setData({
// bottom: e.detail.height
// })
},
onFoucs (e) {
this.setData({
bottom: e.detail.height,
isBlur: false
})
},
onLineChange (e) {
},
onBlur (e) {
this.setData({
isBlur: true
})
},
onShowInput () {
this.setData({
show: true
})
},
onCancel () {
console.log("点击了取消")
this.setData({
show: false
})
this.triggerEvent("close")
},
onRelease () {
if (!this.data.inputValue.trim())
return wx.showToast({
title: "请填写评论内容",
icon: 'none',
duration: 2000
})
this.triggerEvent("onOneComment", this.data.inputValue)
this.onClose()
},
onChange (e) {
this.data.inputValue = e.detail
this.triggerEvent("onInput", e.detail)
},
onClose () {
this.setData({
show: false
})
this.triggerEvent("close")
}
}
})至此,关于微信小程序Vant输入框问题的解决方案介绍完毕。如需了解更多相关微信小程序及Vant输入框的内容,请搜索本站历史文章或继续浏览下方的相关文章。希望大家以后多多支持本站!