

本文详细介绍如何使用JavaScript实现常见的图片切换效果,涵盖getElementById、getAttribute和setAttribute等核心DOM操作方法。通过淘宝、京东等电商网站的实际案例,解析鼠标悬停切换大图及底部缩略图的实现逻辑,并提供完整代码示例供参考学习。
JavaScript图片切换实现概述
本文分享一种利用JavaScript实现图片切换的具体方法,供读者参考学习。
展示最终效果:
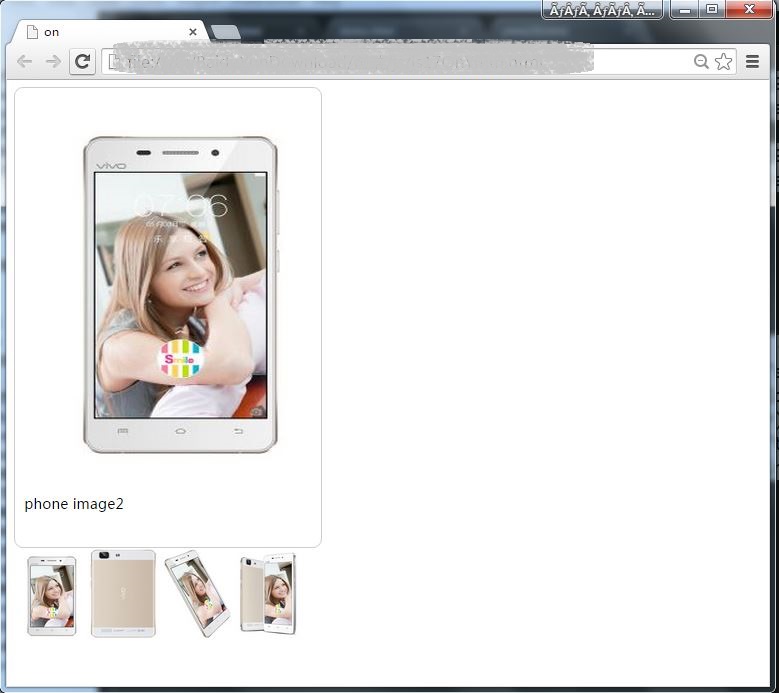
在电商网站如淘宝、京东的商品详情页中,常可见到一种典型的图片切换交互:页面主要展示一张大图,下方排列若干小缩略图。当鼠标悬停在某张小图上时,上方大图会同步切换至对应图片(例如参考vivo X5M 移动4G手机的商品展示)。下文将记录实现这一效果的具体步骤。
核心DOM操作方法:getElementById
1. getElementById()方法
getElementById()是操作DOM元素的高频方法。例如,若HTML中存在一个id属性设为“pid”的p标签,通过调用getElementById(“pid”)即可获取该元素对象并进行后续操作。
<!DOCTYPE html>
<html lang="en">
<head>
  <meta charset="UTF-8">
  <title>demo</title>
  <script type="text/javascript">
    function changeText(){
      document.getElementById("pid").innerHTML
      ="It works!";
    }
  </script>
</head>
<body>
  <p id="pid" onmouseover="changeText()">Hello word!</p>
</body>
</html>
在上述代码示例中,body内包含一个id为“pid”的p标签。当鼠标移入该p标签区域时,触发onmouseover事件,进而执行changeText()函数,修改p标签内部的文本内容。
属性操作:getAttribute与setAttribute
2. setAttribute()与getAttribute()方法
getAttribute()用于读取指定属性的当前值,而setAttribute()则用于设置或修改指定属性的值。
<!DOCTYPE html>
<html lang="en">
<head>
  <meta charset="UTF-8">
  <title>demo</title>
  <script type="text/javascript">
    function changeUrl(){
      var baiduurl=document.getElementById("aid");
      baiduurl.getAttribute("href");
      baiduurl.setAttribute("href",
      "http://www.taobao.com");
      baiduurl.innerHTML="淘宝";
    }
  </script>
</head>
<body>
  <a href="http://www.baidu.com" id="aid" onmouseover="changeUrl()">百度首页</a>
</body>
</html>
在示例代码中,body内包含一个a标签。首先通过getElementById()获取该标签对象,调用baiduurl.getAttribute(“href”)可获取其默认的href属性值;随后通过baiduurl.setAttribute(“href”, “http://www.taobao.com“)修改该属性,使链接指向新地址。完整代码如下:
<!DOCTYPE html>
<html lang="en">
<head>
  <meta charset="UTF-8">
  <title>on</title>
  <style type="text/css" media="screen">
  *{
     padding: 0;
  }
  body{
     font-family: 微软雅黑;
  }
  #imgbox{
        width: 320px;
        height: 490px;
        padding: 10px;
        box-shadow: 5px;
        border: 1px solid #ccc;
        border-radius: 10px;
      }
 #phoneimg{
       padding: 10px;
       border-color: 1px solid #cccccc;
    }

  </style>


</head>
<body>
   <div id="imgbox">
    <img src="images/phone1.jpg" height="400" width="320" alt="phone" id="phoneimg">
    <p id="decimg">phone image1</p>
   </div>

   <table>
    <tbody>
      <tr>
        <td width="50px">
          <img src="images/phone2.jpg" height="100" width="80" title="phone image2" alt="" onmouseover="changeImg(this)" ></td>
        <td width="50px">
          <img src="images/phone3.jpg" height="100" width="80" title="phone image3" alt=""onmouseover="changeImg(this)" ></td>
        <td width="50px">
          <img src="images/phone4.jpg" height="100" width="80" title="phone image4" alt=""onmouseover="changeImg(this)" ></td>
        <td width="50px">
          <img src="images/phone5.jpg" height="100" width="80" title="phone image5" alt=""onmouseover="changeImg(this)" ></td>

      </tr>
    </tbody>
   </table>

   <script type="text/javascript">
     function changeImg(whichpic){
         var imgattr=whichpic.getAttribute("src");
         var phoneimg=document.getElementById("phoneimg");
         phoneimg.setAttribute("src",imgattr);
         var dectext=whichpic.getAttribute("title");
         document.getElementById("decimg").innerHTML=dectext;
     }
   </script>
</body>
</html>
接下来学习如何实现局部放大效果,欢迎分享其他实现思路,共同交流探讨。