

本文详解Three.js中Interpolant类的实现原理,重点解析线性插值在动画中的应用。通过构造器参数、模板方法模式及evaluate接口的源码分析,阐述如何高效计算离散采样点间的函数值,涵盖线性查找与二分查找的性能优化策略。
Interpolant
该类主要用于实现数据插值,在动画制作场景中应用广泛。
可以将此类视为一种数学函数,当给定自变量时,它会返回对应的函数值。在定义函数时,我们并非直接给出解析式,而是通过一系列离散的采样点来构建模型。
以定义y = x^2曲线为例,我们需要构建两个数组,分别存储采样点坐标和对应的函数值:x = [-2, -1, 0, 1, 2],y = [4, 1 ,0, 1, 4]。基于这种定义方式,如何计算非采样点的函数值?例如,在上述示例中,如何求解x = 0.5时的值?这就是本文要讨论的“插值”概念。
最基础且常见的插值方式是线性插值。沿用上述示例,即在绘制图像时,使用直线段将各个离散点连接起来。
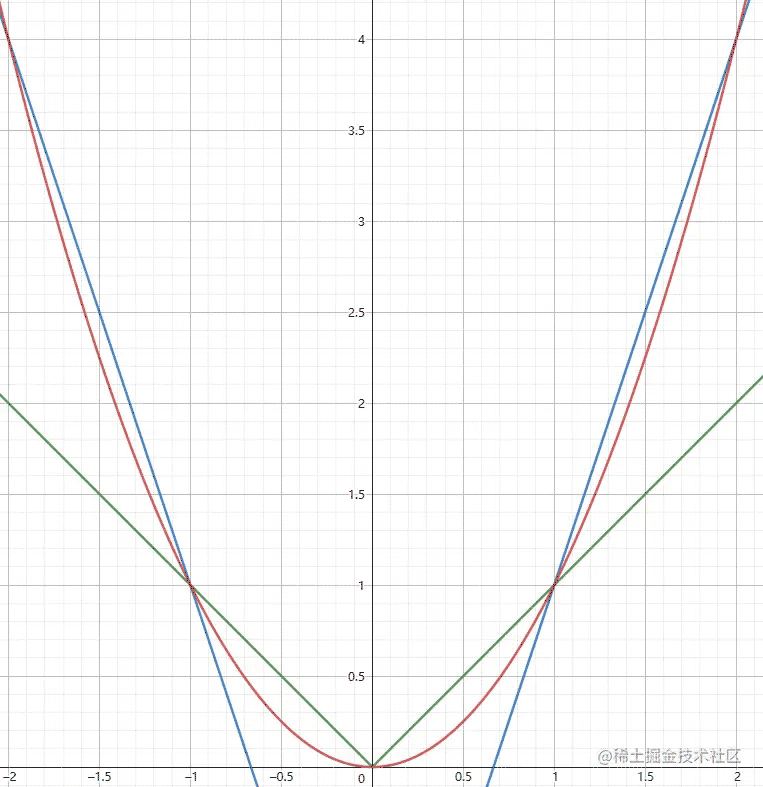
假设我们需要计算x=0.5的值,利用点(0,0)和(1,1)进行线性插值,即求出经过这两点的直线方程y=x,从而得出y=0.5;同理,当x=1.5时,通过点(1,1)和(2,4)确定的直线方程为y=3x−2,计算可得y=2.5。
我们可以使用Three.js提供的线性插值功能进行验证:
import * as THREE from 'three'
const x = [-2, -1, 0, 1, 2]
const y = [4, 1, 0, 1, 4]
const resultBuffer = new Float32Array(1)
const interpolant = new THREE.LinearInterpolant(x, y, 1, resultBuffer)
interpolant.evaluate(0.5)
// 0.5
console.log(resultBuffer[0])
interpolant.evaluate(1.5)
// 2.5
console.log(resultBuffer[0])
如果暂时看不懂这段代码无需担心,后续将逐步进行详细解释。
通过离散的采样点定义曲线
在Interpolant的构造函数中,需要传入以下参数:
parameterPositions:表示采样的位置,类比于数学函数中的自变量取值。
sampleValues:表示采样点对应的值,类比于函数中自变量对应的函数值。
sampleSize:表示每个采样点值的分量数量。例如:sampleValues可以表示一个三维空间坐标,包含x, y, z三个分量,因此sampleSize的值为三。
resultBuffer:用于存储插值结果,其长度设置为sampleSize时即可满足需求。
这些参数之间通常存在如下数量关系:

通过上述参数,我们可以大致描绘出一条函数曲线,这类似于在坐标系中标注出若干离散采样点的“描点法”。
拥有这些离散点后,我们就可以通过插值算法,计算出任意位置的函数值。
插值的步骤
1. 寻找要插值的位置
继续以上述示例为例,假设parameterPositions = [-2, -1, 0, 1, 2],现在需要求解position = 1.5处的函数值,我们就需要在parameterPositions数组中确定position介于哪两个元素之间。显然,在该示例中,该值位于元素1和2之间,对应的下标范围在3和4之间。
2. 根据找到的左右两个点进行插值计算
在上述示例中,我们定位到的两个关键点分别为(1,1)和(2,4)。插值方式有多种,具体取决于实际需求。这里仍以线性插值为例,通过这两点确定一条直线,将1.5代入即可得到结果。
Interpolant源码
Interpolant采用了一种设计模式:模板方法模式。
在插值的整个流程中,寻找插值位置的操作对于不同的插值方法而言是相同的,因此可以将这一操作封装在基类中实现。
对于不同的插值类型,均派生自Interpolant,并实现具体的插值方法,该方法的参数即为上述步骤中找到的位置信息。
1. 构造器
constructor(parameterPositions, sampleValues, sampleSize, resultBuffer) {
    this.parameterPositions = parameterPositions;
    this._cachedIndex = 0;
    this.resultBuffer = resultBuffer !== undefined ?
        resultBuffer : new sampleValues.constructor(sampleSize);
    this.sampleValues = sampleValues;
    this.valueSize = sampleSize;
    this.settings = null;
    this.DefaultSettings_ = {};
}
构造器的主要作用是将传入的参数赋值给成员变量。对于resultBuffer而言,如果在构造参数中未传递该值,则会在构造器内部自动创建。
_cachedIndex将在后续内容中详细解释。
2. copySampleValue_()
如果待插值的点恰好与某个采样点重合,则无需进行复杂计算,直接将采样点的结果复制到resultBuffer中即可。该方法正是执行此操作,其参数为采样点的下标。
copySampleValue_(index) {
    // copies a sample value to the result buffer
    const result = this.resultBuffer,
        values = this.sampleValues,
        stride = this.valueSize,
        offset = index * stride;
    for (let i = 0; i !== stride; ++i) {
        result[i] = values[offset + i];
    }
    return result;
}
3. interpolate_( /* i1, t0, t, t1 */ )
interpolate_( /* i1, t0, t, t1 */ ) {
    throw new Error( 'call to abstract method' );
    // implementations shall return this.resultBuffer
}
这是具体的插值计算方法,但在基类中并未提供具体实现。
4. evaluate()
接下来是对外暴露的主要接口,通过调用此方法来计算并返回插值结果。
这段代码使用了一种较少见的语法,类似于C语言中的goto语句,允许给代码块命名,并通过break 代码块名跳出该代码块。
这段代码实现了前述的插值过程:
寻找位置
插值(调用interpolate_()方法)
整个validate_interval代码块的主要功能是查找插值位置。其执行流程如下:
- 线性查找
- 基于上一次插值的位置,向数组尾部方向查找两个相邻位置(此处体现了构造器中
_cachedIndex的作用,即记录上一次插值的位置)。如果遍历至数组末尾仍未找到,则回到数组头部重新查找;若未到达数组尾部,则直接跳出线性查找阶段,转而使用二分查找。
- 二分查找
为何要先在上一次插值的左右位置进行线性查找?插值最常见的应用场景是动画,每次传入的时间参数通常与上一次插值的时间间隔极短,分布在上一次插值点的附近。这种设计可能是为了通过线性查找来优化性能。
evaluate(t) {
    const pp = this.parameterPositions;
    let i1 = this._cachedIndex,
        t1 = pp[i1],
        t0 = pp[i1 - 1];
    validate_interval: {
        seek: {
            let right;
            // 先进性线性查找
            linear_scan: {
                //- See http://jsperf.com/comparison-to-undefined/3
                //- slower code:
                //-
                //-                 if ( t >= t1 || t1 === undefined ) {
                forward_scan: if (!(t < t1)) {
                    // 只向后查找两次
                    for (let giveUpAt = i1 + 2; ;) {
                        // t1 === undefined,说明已经到了数组的末尾
                        if (t1 === undefined) {
                            // t0是最后一个位置
                            // 如果t < t0
                            // 则说明向数组末尾找,没有找到
                            // 因此跳出这次寻找 接着用其他方法找
                            if (t < t0) break forward_scan;
                            // after end
                            // t >= t0
                            // 查找的结果就是最后一个点 不需要进行插值
                            i1 = pp.length;
                            this._cachedIndex = i1;
                            return this.copySampleValue_(i1 - 1);
                        }
                        // 控制向尾部查找的次数 仅查找两次
                        if (i1 === giveUpAt) break; // this loop
                        // 迭代自增
                        t0 = t1;
                        t1 = pp[++i1];
                        // t >= t0 && t < t1
                        // 找到了,t介于t0和t1之间
                        // 跳出寻找的代码块
                        if (t < t1) {
                            // we have arrived at the sought interval
                            break seek;
                        }
                    }
                    // prepare binary search on the right side of the index
                    right = pp.length;
                    break linear_scan;
                }
                //- slower code:
                //-                    if ( t < t0 || t0 === undefined ) {
                if (!(t >= t0)) {
                    // looping?
                    // 上一次查找到数组末尾了
                    // 查找数组前两个元素
                    const t1global = pp[1];
                    if (t < t1global) {
                        i1 = 2; // + 1, using the scan for the details
                        t0 = t1global;
                    }
                    // linear reverse scan
                    // 如果上一次查找到数组末尾
                    // i1就被设置成了2,查找数组前2个元素
                    for (let giveUpAt = i1 - 2; ;) {
                        // 找到头了
                        // 插值的结果就是第一个采样点的结果
                        if (t0 === undefined) {
                            // before start
                            this._cachedIndex = 0;
                            return this.copySampleValue_(0);
                        }
                        if (i1 === giveUpAt) break; // this loop
                        t1 = t0;
                        t0 = pp[--i1 - 1];
                        if (t >= t0) {
                            // we have arrived at the sought interval
                            break seek;
                        }
                    }
                    // prepare binary search on the left side of the index
                    right = i1;
                    i1 = 0;
                    break linear_scan;
                }
                // the interval is valid
                break validate_interval;
            } // linear scan
            // binary search
            while (i1 < right) {
                const mid = (i1 + right) >>> 1;
                if (t < pp[mid]) {
                    right = mid;
                } else {
                    i1 = mid + 1;
                }
            }
            t1 = pp[i1];
            t0 = pp[i1 - 1];
            // check boundary cases, again
            if (t0 === undefined) {
                this._cachedIndex = 0;
                return this.copySampleValue_(0);
            }
            if (t1 === undefined) {
                i1 = pp.length;
                this._cachedIndex = i1;
                return this.copySampleValue_(i1 - 1);
            }
        } // seek
        this._cachedIndex = i1;
        this.intervalChanged_(i1, t0, t1);
    } // validate_interval
    // 调用插值方法
    return this.interpolate_(i1, t0, t, t1);
}
上述代码虽然看起来篇幅较长,但大部分代码都用于定位位置。一旦找到位置,便会调用子类实现的抽象方法。
5. LinearInterpolant实现interpolate_( /* i1, t0, t, t1 */ )方法
class LinearInterpolant extends Interpolant {
    constructor(parameterPositions, sampleValues, sampleSize, resultBuffer) {
        super(parameterPositions, sampleValues, sampleSize, resultBuffer);
    }
    interpolate_(i1, t0, t, t1) {
        const result = this.resultBuffer,
            values = this.sampleValues,
            stride = this.valueSize,
            offset1 = i1 * stride,
            offset0 = offset1 - stride,
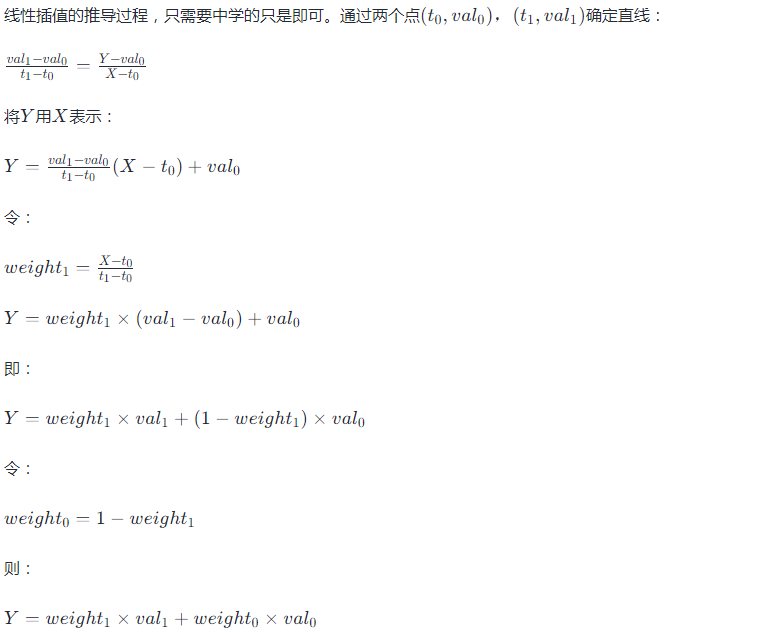
            weight1 = (t - t0) / (t1 - t0),
            weight0 = 1 - weight1;
        for (let i = 0; i !== stride; ++i) {
            result[i] =
                values[offset0 + i] * weight0 +
                values[offset1 + i] * weight1;
        }
        return result;
    }
}
总结
Three.js提供了内置的插值类Interpolant,该实现采用了模板方法的设计模式。针对不同的插值方式,通过继承基类Interpolant并实现抽象方法interpolate_来完成。
计算插值的步骤包括:首先确定插值位置,然后将插值位置两侧的采样点传递给interpolate_()方法。不同的插值方式会override该方法,从而产生不同的计算结果。
推导了线性插值的公式。
以上就是Three.js Interpolant实现动画插值的详细内容,更多关于Three.js Interpolant动画插值的资料请关注本站其它相关文章!