

本文深入解析 Mini Webpack 的核心实现,从入口文件读取、依赖关系图构建到最终打包。通过 AST 解析 import 语句,利用递归生成模块映射,并采用 CommonJS 转换优化代码。重点探讨了模块缓存机制以优化性能,以及通过提前返回未完成导出对象来解决循环依赖的经典问题,还原 Webpack 基础工作流程。
正文
本文引导你实现 webpack 最基础的打包功能,并解决包缓存与环依赖问题。
首先查看示例代码。
index.js 主入口文件
此处包含三个文件,其中 index.js 作为主入口文件:
// filename: index.js
import foo from './foo.js'
foo();
//filename: foo.js
import message from './message.js'
function foo() {
  console.log(message);
}
// filename: message.js
const message = 'hello world'
export default message;
随后,我们将创建一个 bundle.js 来打包这三个文件,生成的 JS 文件运行后输出 'hello world'。
bundle.js 体现了 webpack 的功能,示例中的 index.js 对应 webpack.config.js 中配置的 entry 入口文件。
接下来实现 bundle.js 的功能。
读取主入口文件
首要步骤是读取主入口文件:
function createAssert(filename) {
  const content = fs.readFileSync(filename, {
    encoding: 'utf-8'
  });
  return content;
}
const content = createAssert('./example/index.js');

接着需获取 import 语法引入的文件,如上图中的 foo.js,并递归查找其依赖。
现在需提取 foo.js,如何解析 import foo from './foo.js' 并取值?
将该行代码解析为 AST 后结构如下:
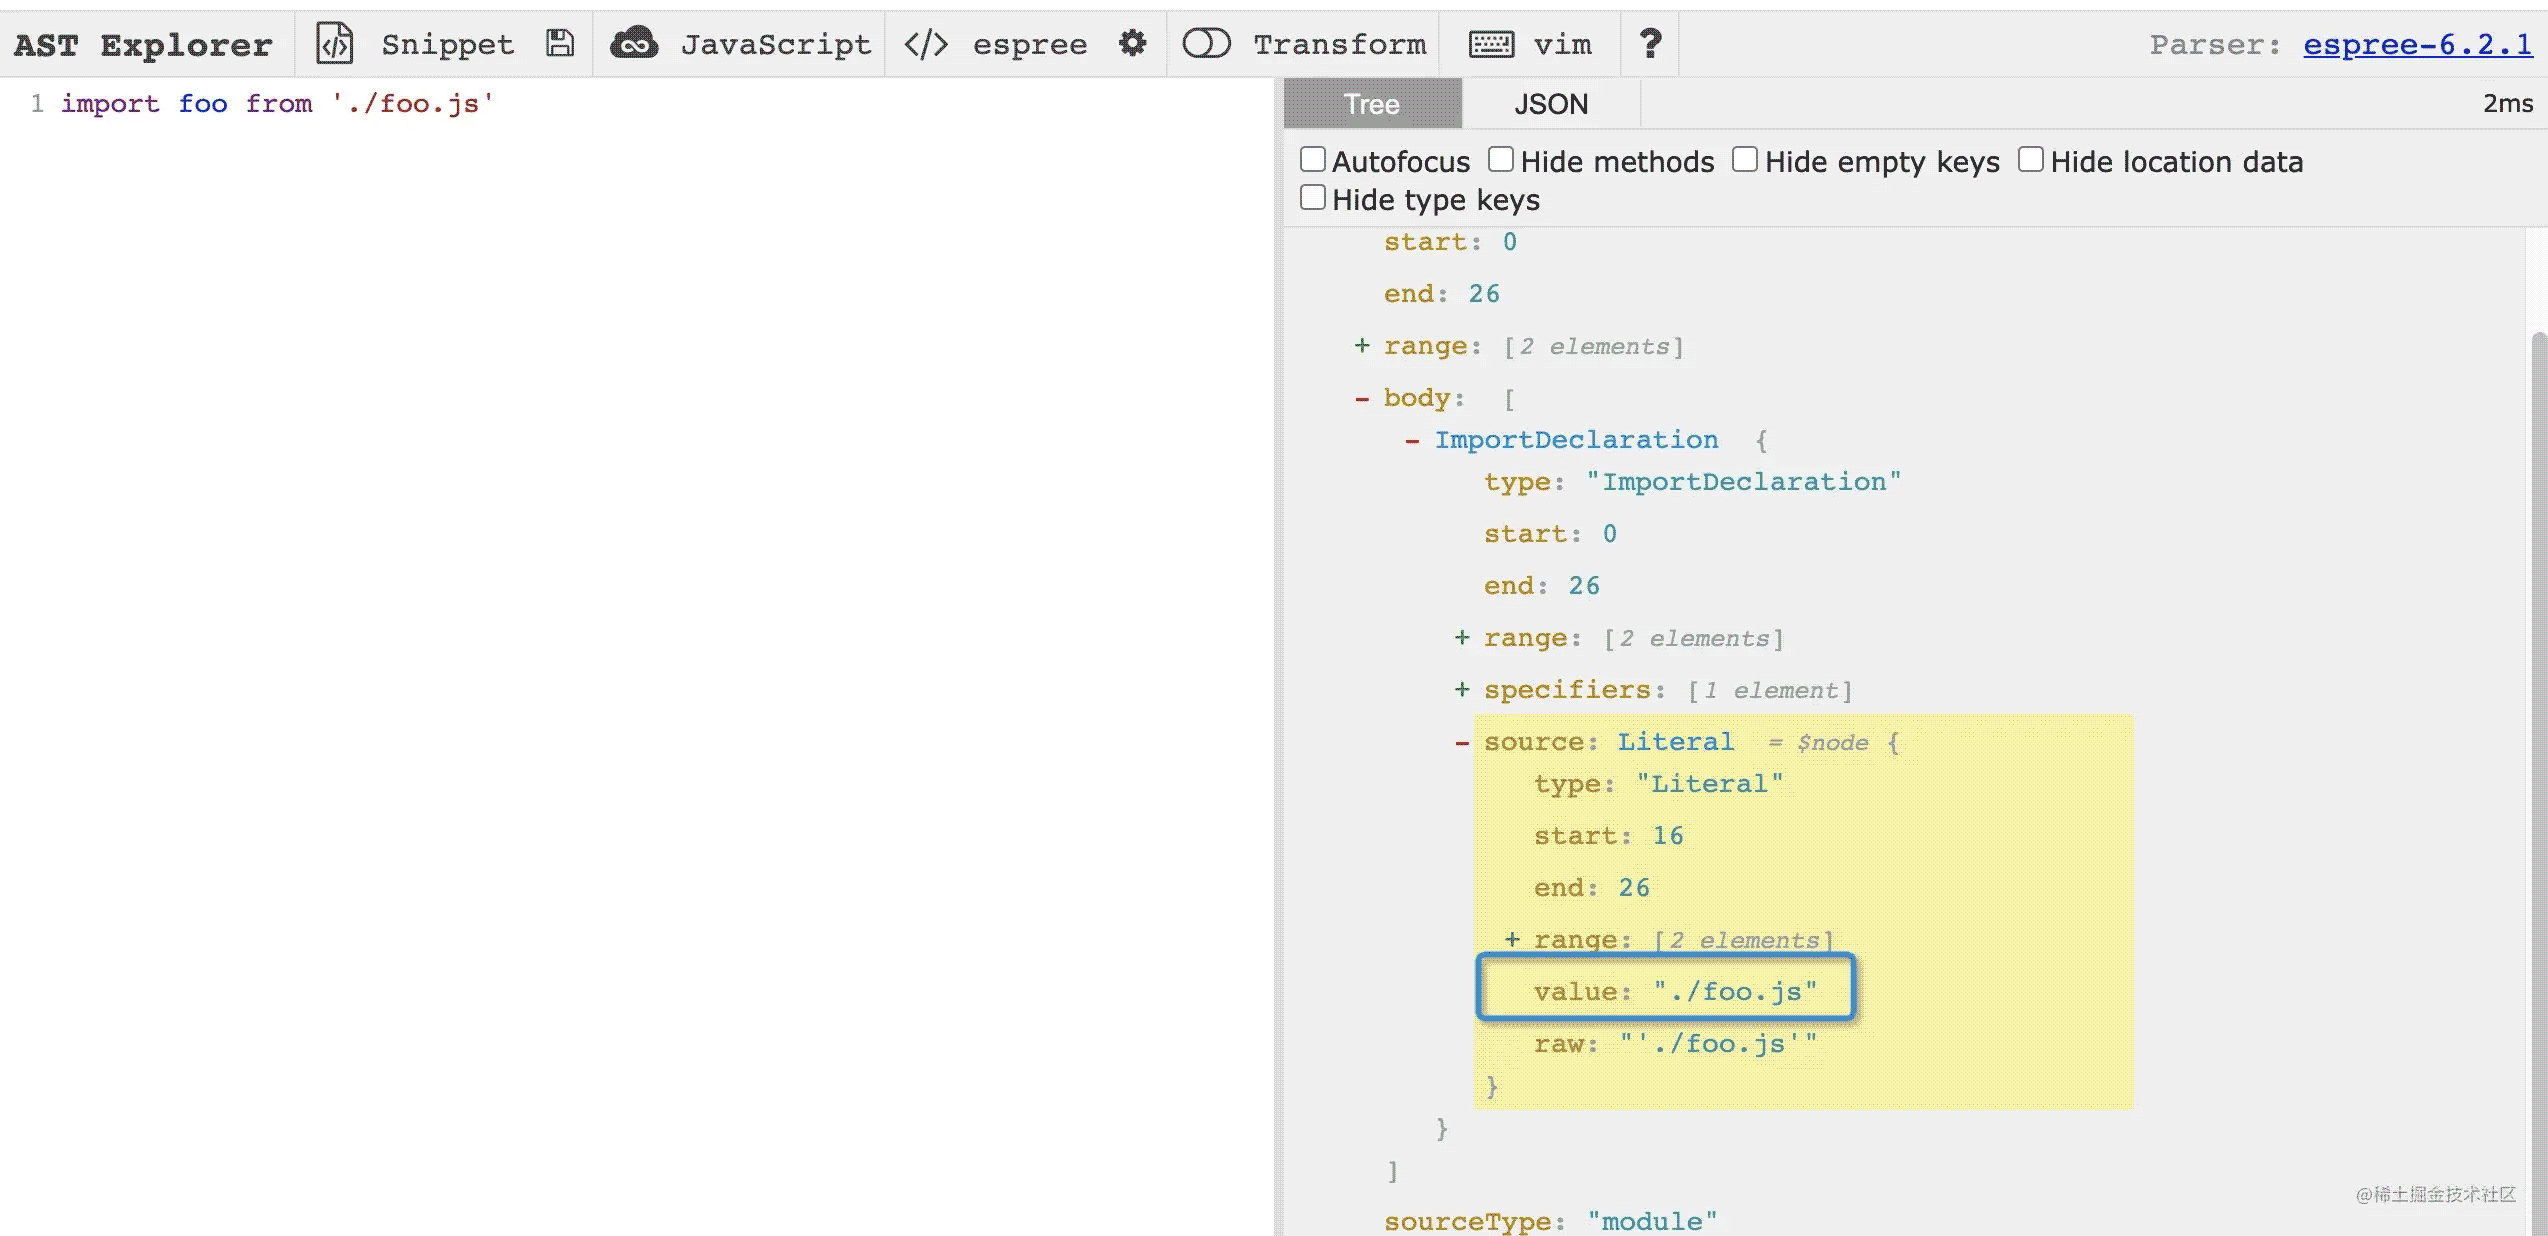
思路是将代码转化为 AST,并提取图中框选字段。
对依赖文件进行读取操作
const fs = require('fs');
const babylon = require('babylon');
const traverse = require('babel-traverse').default;
function createAssert(filename) {
  const dependencies = [];
  const content = fs.readFileSync(filename, {
    encoding: 'utf-8'
  });
  const ast = babylon.parse(content, {
    sourceType: 'module',
  });
  traverse(ast, {
    ImportDeclaration: ({node}) => {
      dependencies.push(node.source.value);
    }
  })
  console.log(dependencies); // [ './foo.js' ]
  return content;
}
上述操作将当前文件读取,并将依赖项加入名为 dependencies 的数组。
仅返回源代码的 createAssert 函数需进一步完善:
let id = 0;
function getId() { return id++; }
function createAssert(filename) {
  const dependencies = [];
  const content = fs.readFileSync(filename, {
    encoding: 'utf-8'
  });
  const ast = babylon.parse(content, {
    sourceType: 'module',
  });
  traverse(ast, {
    ImportDeclaration: ({ node }) => {
      dependencies.push(node.source.value);
    }
  })
  return {
    id: getId(),
    code: content,
    filename,
    dependencies,
    mapping: {},
  };
}
若对主入口文件 index.js 调用,结果如下(暂忽略 mapping):
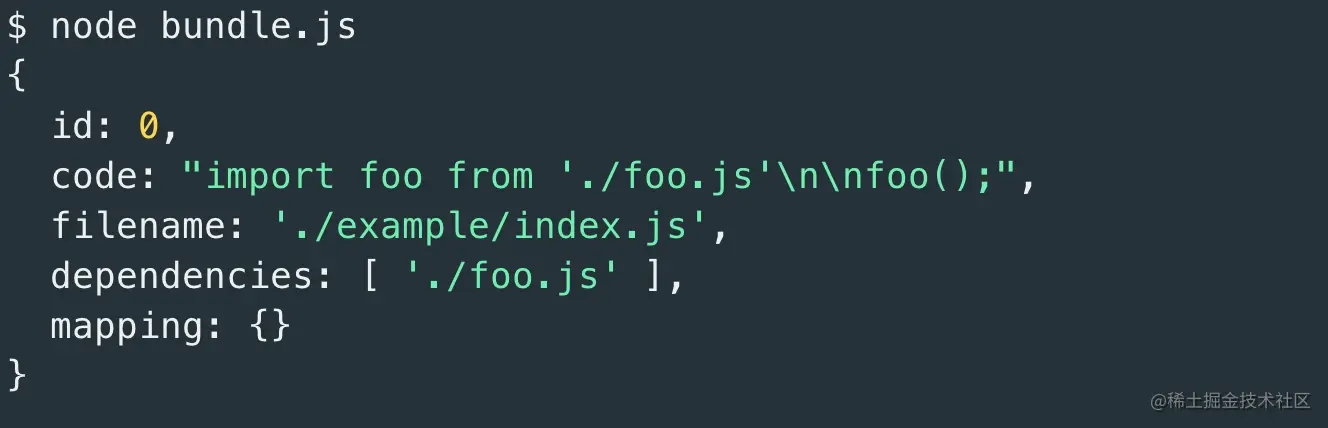
此操作需应用于入口链上的所有文件,基于 createAssert 构建名为 crateGraph 的函数进行递归调用。
先查看结果以了解该函数的作用。
运行该函数,结果如图所示:
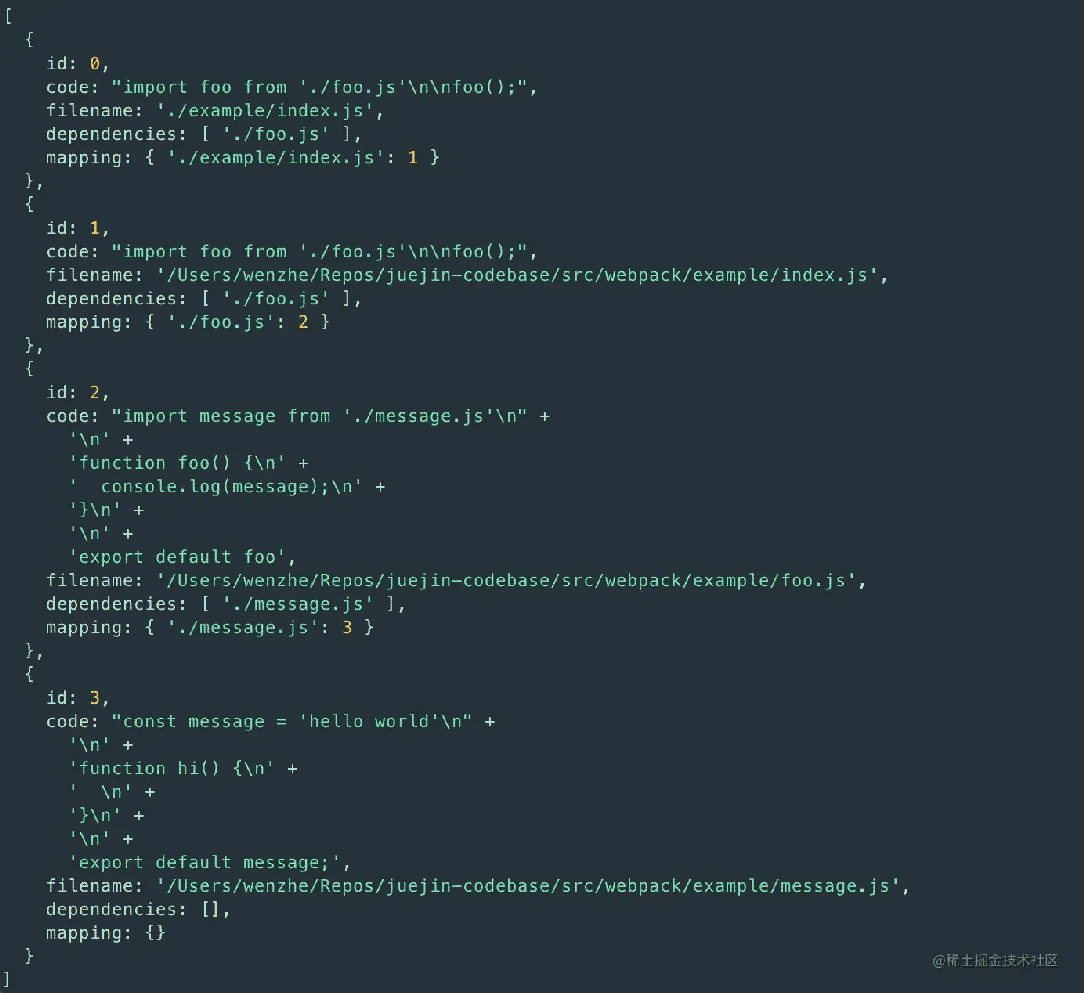
mapping 字段建立了当前项 dependencies 中文件与其他项的映射,后续将使用。
function createGraph(entry) {
  const modules = [];
  createGraphImpl(
    path.resolve(__dirname, entry),
  );
  function createGraphImpl(absoluteFilePath) {
    const assert = createAssert(absoluteFilePath);
    modules.push(assert);
    assert.dependencies.forEach(relativePath => {
      const absolutePath = path.resolve(
        path.dirname(assert.filename),
        relativePath
      );
      const id = createGraphImpl(absolutePath);
      assert.mapping[relativePath] = child.id;
    });
    return assert.id
  }
  return modules;
}
注意到截图中数组每项的 code 为源代码,但保留有 import 语句,需使用 babel 将其转换为 commonJS。
操作相对简单,即用 babel 修改 createAssert 返回值中的 code:
const code = transformFromAst(ast, null, {
  presets: ['env'],
}).code
截取其中一项,结果变为:
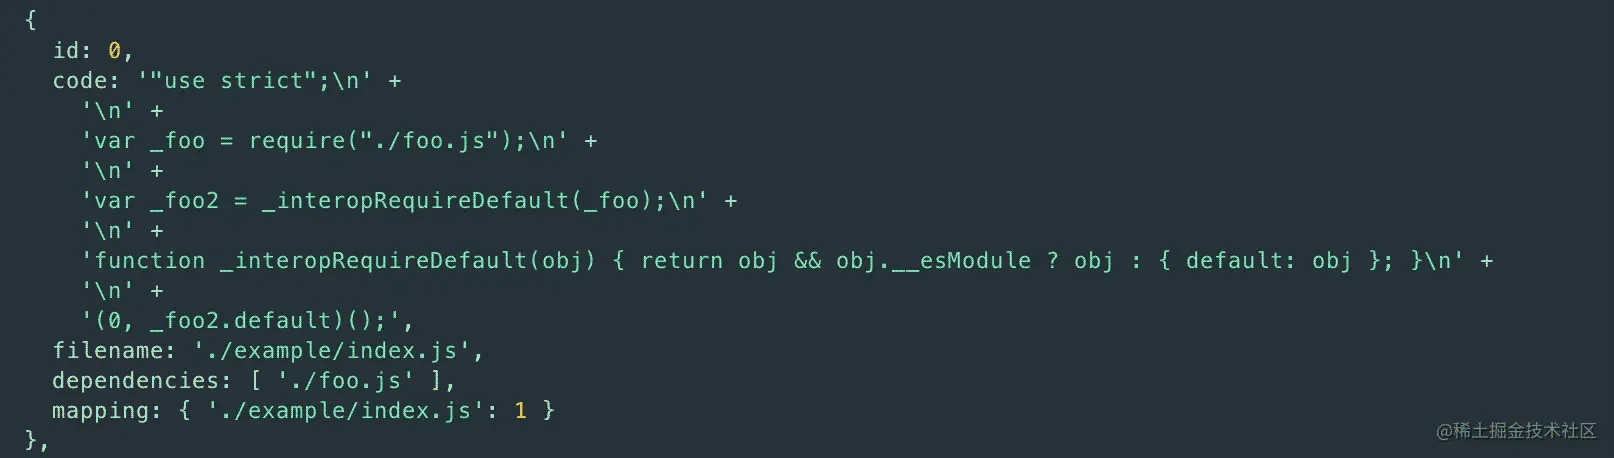
下一步涉及重写 require 函数,逻辑巧妙,请先行查看:
新建 bundle 函数以处理 createGraph 函数的结果。
function bundle(graph) {
  let moduleStr = '';
  graph.forEach(module => {
    moduleStr += `
    ${module.id}: [
      // require,module,exports 作为参数传进来
      // 在下面我们自己定义了,这里记作【位置 1】
      function(require, module, exports) {
        ${module.code}
      },
      ${JSON.stringify(module.mapping)}
    ],
    `
  })
  const result = `
    (function(modules){
      function require(id) {
        const [fn, mapping] = modules[id];
        // 这其实就是一个空对象,
        // 我们导出的那个东西会挂载到这个对象上
        const module = { exports: {} }
        // fn 就是上面【位置 1】 那个函数
        fn(localRequire, module, module.exports)
        // 我们使用 require 是 require(文件名)
        // 所有这里要做一层映射,转到 require(id)
        function localRequire(name) {
          return require(mapping[name])
        }
        return module.exports;
      }
      require(0);
    })({${moduleStr}})
  `
  return result;
}
最终使用方式如下:
const graph = createGraph('./example/index.js');
const res = bundle(graph);
res 为最终打包结果,复制整段至控制台运行,成功输出 'hello world':
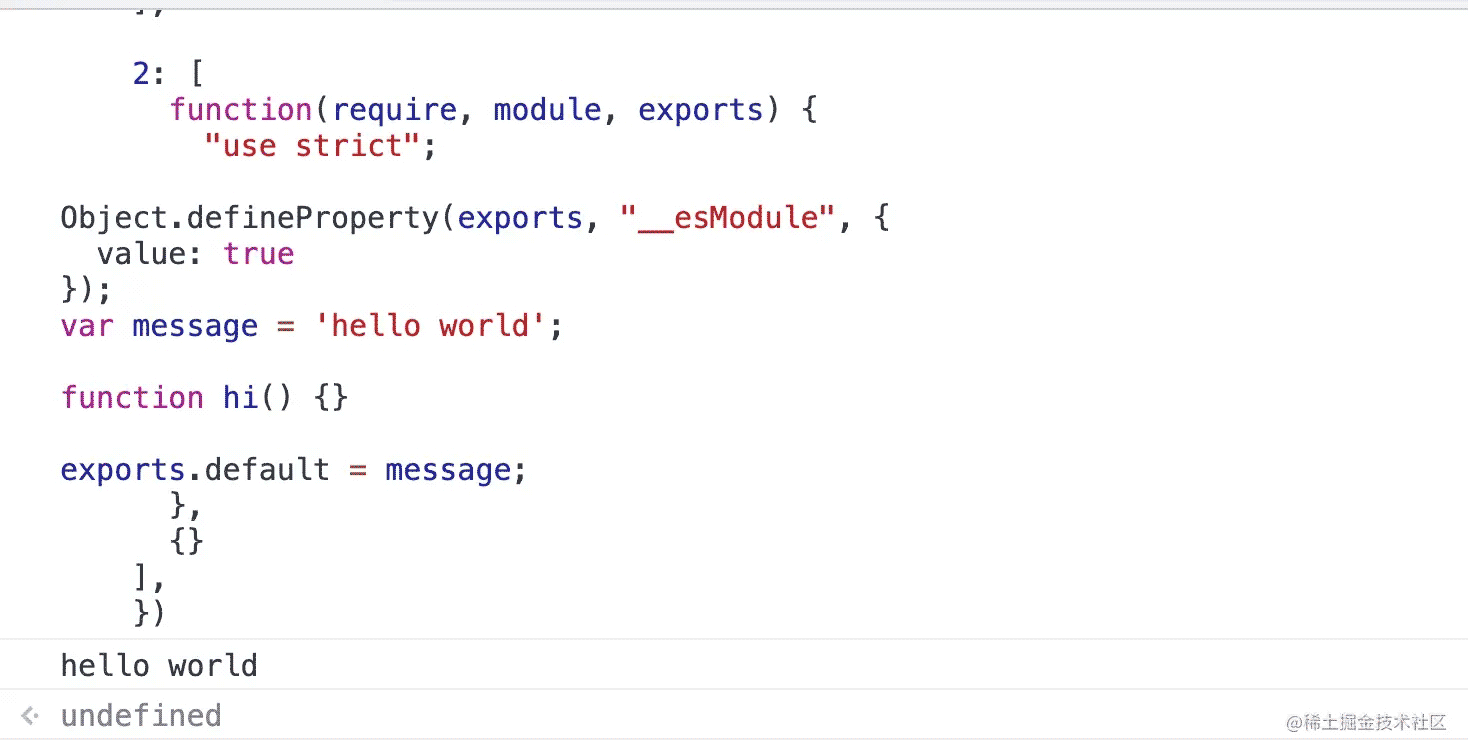
基本功能完成,即实现了 webpack 的最基础功能。
接下来解决包缓存问题,目前 import 过的文件会转为 require 函数,每次重新调用,需将已调用的结果缓存:
function createGraph(entry) {
  const modules = [];
  const visitedAssert = {}; // 增加了这个对象
  createGraphImpl(
    path.resolve(__dirname, entry),
  );
  function createGraphImpl(absoluteFilePath) {
    // 如果已经访问过了,那就直接返回
    if (visitedAssert[absoluteFilePath]) {
      return visitedAssert[absoluteFilePath]
    }
    const assert = createAssert(absoluteFilePath);
    modules.push(assert);
    visitedAssert[absoluteFilePath] = assert.id;
    assert.dependencies.forEach(relativePath => {
      const absolutePath = path.resolve(
        path.dirname(assert.filename),
        relativePath
      );
      // 优化返回值,只返回 id 即可
      const childId = createGraphImpl(absolutePath);
      assert.mapping[relativePath] = childId;
    });
    return assert.id
  }
  return modules;
}
function bundle(graph) {
  let moduleStr = '';
  graph.forEach(module => {
    moduleStr += `
    ${module.id}: [
      function(require, module, exports) {
        ${module.code}
      },
      ${JSON.stringify(module.mapping)}
    ],
    `
  })
  const result = `
    (function(modules){
      // 增加对已访问模块的缓存
      let cache = {};
      console.log(cache);
      function require(id) {
        if (cache[id]) {
          console.log('直接从缓存中取')
          return cache[id].exports;
        }
        const [fn, mapping] = modules[id];
        const module = { exports: {} }
        fn(localRequire, module, module.exports)
        cache[id] = module;
        function localRequire(name) {
          return require(mapping[name])
        }
        return module.exports;
      }
      require(0);
    })({${moduleStr}})
  `
  return result;
}
解决依赖成环问题
此问题较为经典,示例源自 Node.js 官网:
// filename: a.js
console.log('a starting');
exports.done = false;
const b = require('./b.js');
console.log('in a, b.done = %j', b.done);
exports.done = true;
console.log('a done');
// filename: b.js
console.log('b starting');
exports.done = false;
const a = require('./a.js');
console.log('in b, a.done = %j', a.done);
exports.done = true;
console.log('b done');
// filename: main.js
console.log('main starting');
const a = require('./a.js');
const b = require('./b.js');
console.log('in main, a.done = %j, b.done = %j', a.done, b.done);
目前仅支持将 import 语句引用的文件加入依赖项,需进一步支持 require。操作简便,即在解析 AST 时加入 require 语法解析:
 traverse(ast, {
    ImportDeclaration: ({ node }) => {
      dependencies.push(node.source.value);
    },
    CallExpression ({ node }) {
      if (node.callee.name === 'require') {
        dependencies.push(node.arguments[0].value)
      }
    }
  })
若直接运行,按当前写法处理此情况会报错栈溢出:

但需修改的代码极少。先查看官网对此情况的解释:
When main.js loads a.js, then a.js in turn loads b.js. At that point, b.js tries to load a.js. In order to prevent an infinite loop, an unfinished copy of the a.js exports object is returned to the b.js module. b.js then finishes loading, and its exports object is provided to the a.js module.
解决方法即这句话:『an unfinished copy of the a.js exports object is returned to the b.js module』。即提前返回一个未完成的结果。只需提前缓存结果即可。
之前的写法如下:
fn(localRequire, module, module.exports)
cache[id] = module;
修改为:
cache[id] = module;
fn(localRequire, module, module.exports)
如此便解决了该问题:
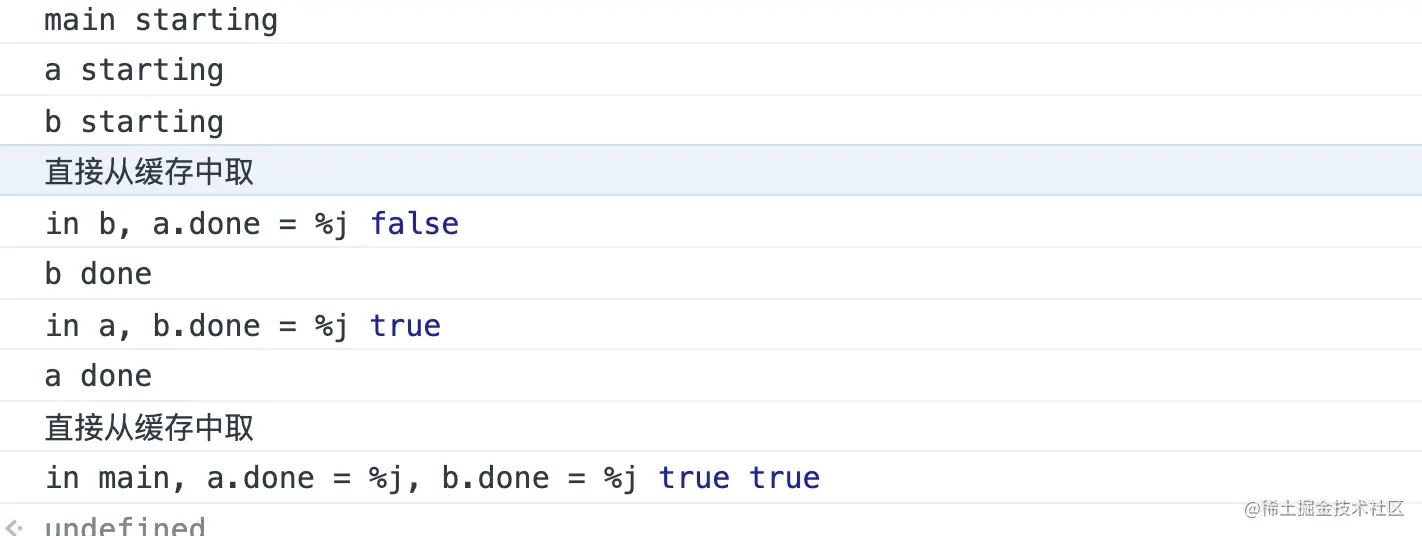
至此基本了解其实现原理,实现了初版 webpack,撒花~
明白其原理后,才知网上称 webpack 慢是因为需先收集所有依赖,参见我们的 createGraph,确实如此。
但写完发现,此题材不适合写文章,更适合视频或直接看代码,你觉得呢?ಥ_ಥ
所有代码位于此仓库
以上就是mini webpack打包基础解决包缓存和环依赖的详细内容,更多关于mini webpack包缓存环依赖的资料请关注本站其它相关文章!