

本文详解在 Vue3 和 Vite 项目中启用 JSX 支持的方法,包括安装 @vitejs/plugin-vue-jsx 及 vite.config.js 配置。针对开发中常见的 JSX 语法报错、ElementPlus Icons 挂载类型错误、TypeScript 模块找不到声明以及 Volar 插件冲突等问题提供具体解决方案,并梳理了 Vue3 中 JSX 编写组件、处理 Props/State、事件监听及插槽的最佳实践。
Vue3 项目中启用 JSX 支持时,开发者常会遇到配置缺失或类型报错等问题。
首先遇到的错误通常是:无法使用 JSX,除非提供了 "--jsx" 标志。

在基于 Vite 和 Vue3.0 的项目中使用 JSX 语法进行开发,必须安装对应的 JSX 插件。
npm i @vitejs/plugin-vue-jsx -s需要在 vite.config.js 文件中添加 JSX 相关的配置项。
// vite.config.js
import { defineConfig } from 'vite'
import vueJsx from '@vitejs/plugin-vue-jsx'
import vue from '@vitejs/plugin-vue'
// https://vitejs.dev/config/
export default defineConfig({
  plugins: [vue(), vueJsx()],
})
完成上述步骤后,新建的 Vite 项目即可全面支持 JSX 语法。此时,还需在 tsconfig.json(原文误写为 tsconfig.ts)中配置 "jsx": "preserve" 属性,即可顺利使用 JSX 形式编写 Vue 组件。
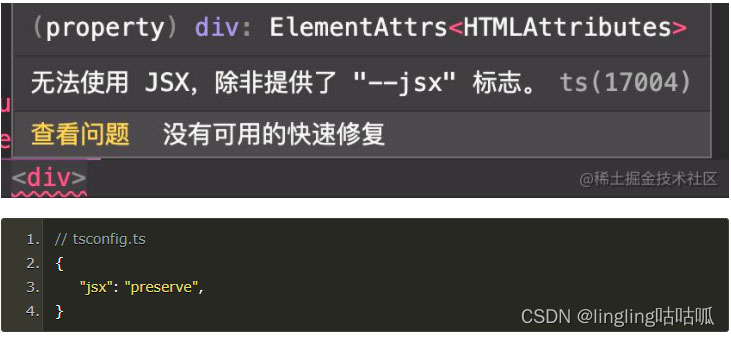
第二个常见报错涉及 ElementPlusIconsVue 的挂载问题。
尝试 import ElementPlusIconsVue 时可能遇到类型定义冲突。
类型“typeof import("D:/\u9879\u76EE/00/model-dev-platform-doc/node_modules/@element-plus/icons-vue/dist/types/index")”的参数不能赋给类型“Plugin_2”的参数。
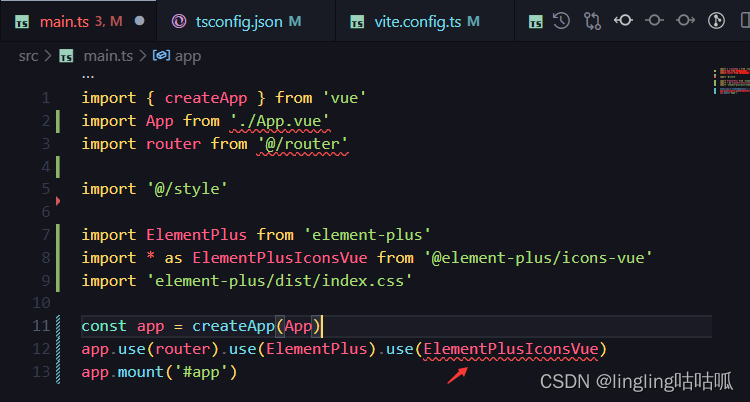
针对该问题的解决办法如下。
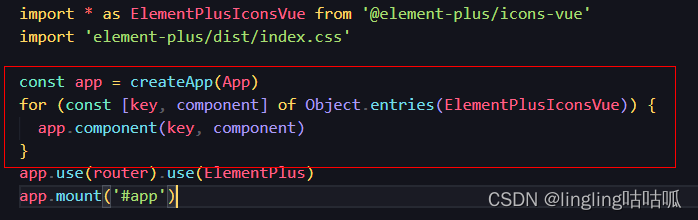
经社区开发者提示,需通过遍历方式挂载图标组件。
具体操作为遍历挂载 ElementPlus 的图标库。
另一个报错:在 vue3.0 结合 TypeScript 环境下,提示找不到模块“./XXX.vue”或其相应的类型声明。
该问题的具体成因尚未完全明确。
尝试卸载 Volar 插件后,所有相关报错消失。
关于 Vue3 中 JSX 的具体写法规范与注意事项。
需安装 @vitejs/plugin-vue-jsx 作为 Vite 的插件。
yarn add @vitejs/plugin-vue-jsx -D
npm install @vitejs/plugin-vue-jsx -D
安装完成后,需在 vite.config.js 中进行相应配置。
import { defineConfig } from "vite";
import vue from "@vitejs/plugin-vue";
import vueJsx from "@vitejs/plugin-vue-jsx";
export default defineConfig({
    plugins: [
        vue(),
        vueJsx(),
    ]
})
配置完成后,即可开始编写基于 JSX 形式的 Vue 单文件组件。
以下是具体的代码编写示例。
基础实例展示。
Vue3 引入了 setup 组合式 API,使得利用 JSX 编写 Vue 组件的风格与 React 非常相似。在 setup 函数中可以创建状态、接收 props,并直接返回 JSX 元素。
import { defineComponent} from 'vue';
export default defineComponent({
    setup() {
        return <div>123456789</div>
    }
});
关于 Props 和 State 的处理方式。
在 Vue3 中,ref 和 reactive 是创建响应式状态的两个 API。由于 Vue 内置了观察者模式,因此无需像 React 那样提供 useMemo、useCallback 等用于条件判断是否更新的钩子函数。
ref 在 render 函数中会自动解构,无需再使用 ref.value 来获取内部值。
官方推荐使用 ref,而非 reactive。
props 需要在 defineComponent 中使用 props 属性明确指定,组件才能正确接收对应的 props。
子组件若在 setup 中直接返回 JSX,会弹出警告且该子组件不会渲染。
父组件接收子组件后,不可在 setup 中直接返回 ctx 或 ctx.slots?.default?.() 的计算结果。前者会弹出警告且不渲染子组件;后者会导致子组件失去响应式。正确做法是返回一个渲染函数。
子组件的代码示例如下。
import { defineComponent, ref, reactive } from 'vue;
export default defineComponent({
    name: 'TestB',
    // 必须传递props,提醒 vue,该组件可以接受名称为 str 的值
    // 如果不填,则 props 接受不到该值。
    // 如果该组件为子组件,不可在 setup 中返回元素,必须在 render 中返回元素
    props: ['str'],
    setup(this, props, ctx) {
        const count = ref(0);
        const { str } = props;
        const reactiveCount = reactive({value: 0});
        return {
            str,
            count,
            reactiveCount,
        }
    },
    render() {
        const { count, reactiveCount, str } = this;
        return <div>{count} - {reactiveCount.value} - {str}</div>
    }
});
父组件的代码示例如下。
import { defineComponent } from "vue";
export default defineComponent({
    props: ['testStr'],
    name: 'TestA',
    setup(props, ctx) {
        const { testStr } = props;
        // 注意,不要直接返回一个 ctx.slots?.default?.() 计算后的值,这样不能响应式
        // 同时,也要注意,不能直接返回 ctx,会有警告,同时不会显示子元素
        const renderFn = () => {
            return <div>{ ctx.slots?.default?.() ?? "" }</div>
        }
        return {
            testStr,
            renderFn,
        }
    },
    render() {
        const { testStr, renderFn } = this;
        return <div>你输入的字符串: {testStr}
            <div>子组件</div>
            <div>{ renderFn() }</div>
        </div>
    }
})
事件监听的处理方式。
@vitejs/plugin-vue-jsx 插件默认将 @input 等模板语法替换为 onInput 等 JSX 形式。此处以点击事件为例进行说明。
import { defineComponent, ref, reactive } from "vue";
interface ITestAProps {
  str: string;
}
export default defineComponent({
  name: "TestA",
  props: ["str"],
  setup(this, props, ctx) {
    const count = ref(0);
    const { str } = props;
    const reactiveCount = reactive({ value: 0 });
    const onClick = () => {
      count.value++;
    };
    const reactiveClick = () => {
      reactiveCount.value++;
    };
    return {
      str,
      count,
      reactiveCount,
      onClick,
      reactiveClick,
    };
  },
  render() {
    const { count, reactiveCount, str, onClick, reactiveClick } = this;
    return (
      <div>
        <div onClick={onClick}>{count}</div>
        <div onClick={reactiveClick}>{reactiveCount.value}</div>
        <div>{str}</div>
      </div>
    );
  },
});
关于插槽的使用。
在 Vue3 中,可以使用快捷语法(以 element-plus 为例)处理插槽。
<el-popconfirm
  title="确认删除最后一个配置内容?"
  confirm-button-text="确认"
  cancel-button-text="取消"
  @confirm="
      addNewValue.newConfigList.length > 1
      ? addNewValue.newConfigList.pop()
      : ElMessage({
          message: '不能删除所有配置内容',
          type: 'error',
        })
  "
 >
   <template #reference>
    <el-button type="danger"> 删除最后一个表单配置内容 </el-button>
  </template>
</el-popconfirm>
在 JSX 形式的 Vue3 中,可以使用特定的语法结构处理插槽。
import { defineComponent } from 'vue';
import { ElPopconfirm, ElButton } from 'element-plus';
export default defineComponent({
    render() {
        return <ElPopconfirm
            title="确认删除最后一个配置内容?"
            confirmButtonText="确认"
            cancelButtonText="取消"
            onConfirm={() => {
                addNewValue.newConfigList.length > 1
                  ? addNewValue.newConfigList.pop()
                  : ElMessage({
                      message: '不能删除所有配置内容',
                      type: 'error',
                    })
            }}
            v-slot={{
                reference: () => <ElButton type="danger">删除最后一个表单配置内容</ElButton>
            }}
        >

        </ElPopconfirm>
    }
});
其余相关属性的处理方式。
对于 v-model 等其他属性,仍建议按照原有写法进行编写。
需注意,若使用 JSX 写法处理 v-model,不会自动实现双向绑定,需手动编写对应的处理函数。
以上为个人经验分享,希望能为大家提供参考,也希望大家多多支持本站。