

本文详解如何使用Vue结合原生div与CSS开发自定义日历控件。该组件支持自动定位当前月份、非当月日期灰色显示,并可自由定制样式与背景。通过从数据库获取时间信息填充色块,适用于签到打卡等场景,具备高自定义性与灵活性。
Vue自定义日历控件概述
本文分享了一个基于Vue开发的自定义日历小控件的具体实现代码,供读者参考学习。
日历控件功能与特性
首先展示该控件的实际运行效果。
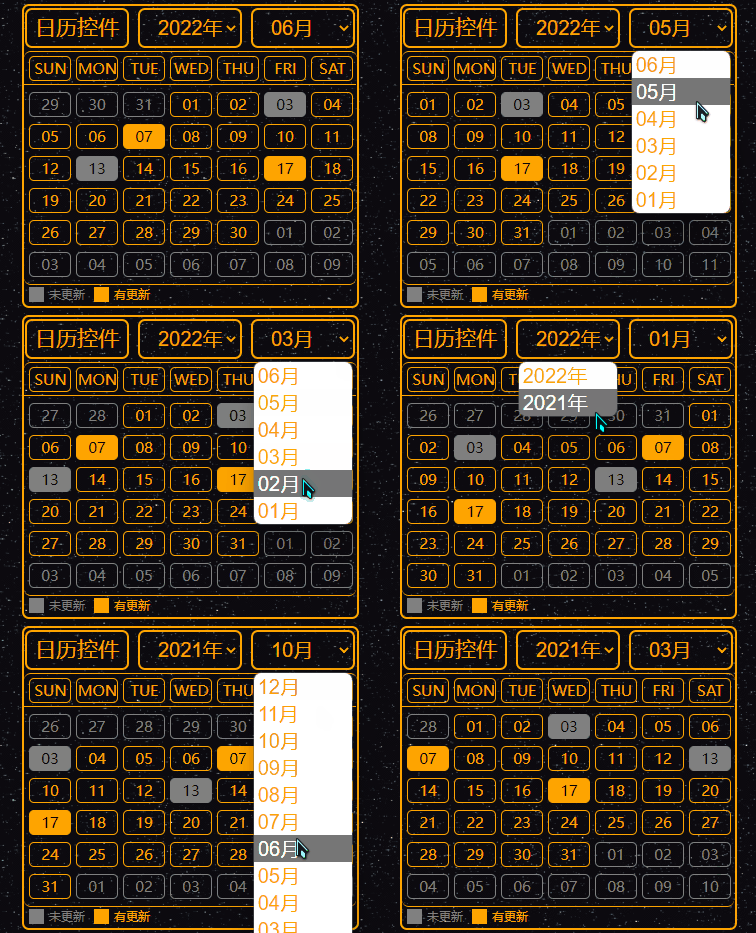
从效果图中可以看出,当切换不同月份时,当月天数与星期几的对应关系准确无误,非当月日期则以灰色显示,直观清晰。
此外,该日历控件具备自动识别当前时间的功能,每次打开时默认显示最新月份,非常适合用于签到打卡等功能场景。
由于该控件采用原生div构建,因此拥有极高的自定义自由度,用户可以随意调整样式、背景、颜色及尺寸等属性。
在数据交互方面,可以从数据库获取时间信息并填充至控件中,例如图中显示的色块即代表相关数据。
该控件由Vue、CSS以及最基础的原生div共同实现,充分展现了div在自定义样式方面的强大能力。
代码实现
具体实现代码如下:
<!DOCTYPE html>
<html lang="en">
<head>
    <meta charset="UTF-8">
    <title>日历控件</title>
    <script src="./vue.js"></script>
</head>
<style>
    .writer-upper-right {
    float: left;
    width: 333px;
    height: 300px;
    border: 2px orange solid;
    border-radius: 7px;
}
.calendar-head {
    width: 100%;
    height: 15%;
    border-radius: 7px;
}
.calendar-body {
    width: 99.9%;
    height: 84.9%;
    border-radius: 7px;
    border-top: 1px orange solid;
}
.calendar-head-title {
    float: left;
    width: 100px;
    height: 79%;
    line-height: 33px;
    border-radius: 7px;
    border: 2px orange solid;
    margin-top: 2px;
    margin-left: 1px;
    text-align: center;
    color: orange;
    font-size: 21px;
}
.calendar-head-year {
    float: left;
    margin-left: 9px;
    width: 100px;
    height: 79%;
    border-radius: 7px;
    border: 2px orange solid;
    margin-top: 2px;
    color: orange;
    text-align: center;
}
.select-calendar-year {
    float: left;
    width: 100%;
    height: 100%;
    border: none;
    background: none;
    color: orange;
    text-indent: 0.7em;
    font-size: 20px;
}
.select-calendar-year:focus {
    outline: none;
}
.select-calendar-year:hover {
    cursor: pointer;
}
.calendar-body-week {
    width: 99.8%;
    height: 32px;
    margin: 0 auto;
    border-bottom: 1px orange solid;
}
.calendar-body-days {
    width: 99.8%;
    height: 199px;
    border-bottom: 1px orange solid;
    border-top: none;
    border-radius: 7px;
}
.calendar-body-info {
    width: 99.8%;
    height: 18px;
    border-radius: 7px;
}
.weekEveryDay {
    float: left;
    width: 40px;
    height: 23px;
    margin-left: 5px;
    margin-top: 4px;
    border: 1px orange solid;
    border-radius: 5px;
    line-height: 23px;
    text-align: center;
    font-size: 15px;
    color: orange;
}
.monthEveryDay {
    margin-top: 7px;
}
.not-now-month {
    border-color: gray;
    color: gray;
}
.now-day-writer {
    background-color: orange;
    color: black;
}
.now-day-not-writer {
    border-color: gray;
    background-color: gray;
    color: black;
}
.info-if-writer {
    float: left;
    width: 60px;
    height: 16px;
    margin-left: 5px;
    margin-top: 1px;
}
.color-span {
    float: left;
    width: 15px;
    height: 15px;
    margin-top: 1px;
    background-color: gray;
}
.color-info {
    float: left;
    width: 40px;
    height: 15px;
    margin-top: 1px;
    margin-left: 5px;
    line-height: 15px;
    text-align: left;
    font-size: 12px;
    color: gray;
}
.color-span2 {
    background-color: orange;
}
.color-info2 {
    color: orange;
}
</style>
<body style="background: url('./bg-xk.gif');margin: 100px 100px;">
    <div id="app">
        <div class="writer-upper-right">
            <div class="calendar-head">
                <div class="calendar-head-title">日历控件</div>
                <div class="calendar-head-year">
                    <label>
                        <select class="select-calendar-year" v-model="calendarYear" @change="SelectCalendarYear">
                            <option v-for="year in calendarAllYear" :value="year" :key="year">{{year}}年</option>
                        </select>
                    </label>
                </div>
                <div class="calendar-head-year">
                    <label>
                        <select class="select-calendar-year" v-model="calendarMonth" @change="SelectCalendarMonth">
                            <option v-for="month in calendarAllMonth" :value="month" :key="month">{{month}}月</option>
                        </select>
                    </label>
                </div>
            </div>
            <div class="calendar-body">
                <div class="calendar-body-week">
                    <div class="weekEveryDay">SUN</div>
                    <div class="weekEveryDay">MON</div>
                    <div class="weekEveryDay">TUE</div>
                    <div class="weekEveryDay">WED</div>
                    <div class="weekEveryDay">THU</div>
                    <div class="weekEveryDay">FRI</div>
                    <div class="weekEveryDay">SAT</div>
                </div>
                <div class="calendar-body-days">
                    <div class="weekEveryDay monthEveryDay not-now-month" v-for="day in calendarPrevDays" disabled>{{day}}</div>
                    <div class="weekEveryDay monthEveryDay"
                         v-for="day in calendarNowDays"
                         :class="['weekEveryDay monthEveryDay', {'now-day-writer' : calendarHadWrite.includes(day)}, {'now-day-not-writer' : calendarNotWrite.includes(day)}]"
                    >{{day}}</div>
                    <div class="weekEveryDay monthEveryDay not-now-month" v-for="day in calendarNextDays" disabled>{{day}}</div>
                </div>
                <div class="calendar-body-info">
                    <div class="info-if-writer">
                        <div class="color-span"></div>
                        <div class="color-info">未更新</div>
                    </div>
                    <div class="info-if-writer">
                        <div class="color-span color-span2"></div>
                        <div class="color-info color-info2">有更新</div>
                    </div>
                </div>
            </div>
        </div>
    </div>
</body>
</html>
以上就是本文的全部内容,希望能为各位的学习带来帮助,也欢迎大家继续支持本站。