

本文通过JavaScript面向对象编程方式实现图片放大镜效果。详细解析了基于鼠标坐标计算遮罩层与大图位移比例的核心原理,并展示了从元素选择、事件绑定到滚轮缩放功能的完整代码实现,帮助开发者掌握前端交互组件的设计思路。
本文分享了一个使用JavaScript面向对象编程方式实现的图片放大镜具体代码示例,供读者参考学习。
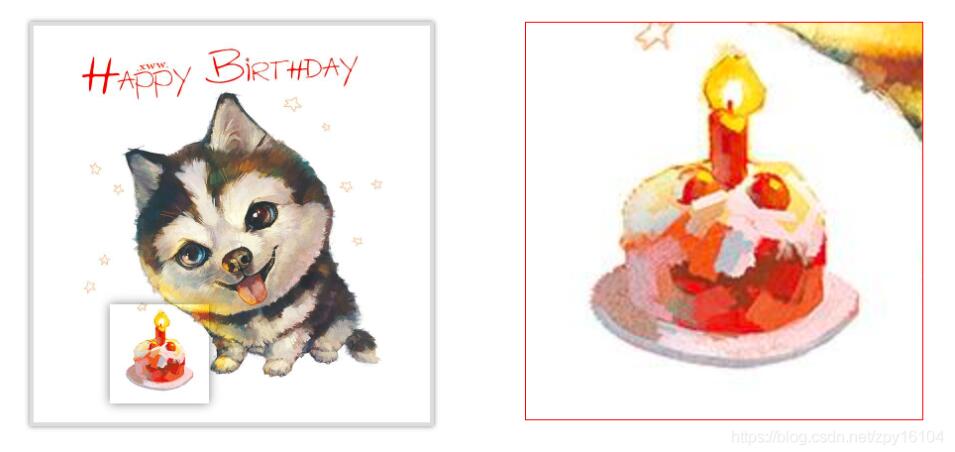
效果展示
实现原理分析
如图所示
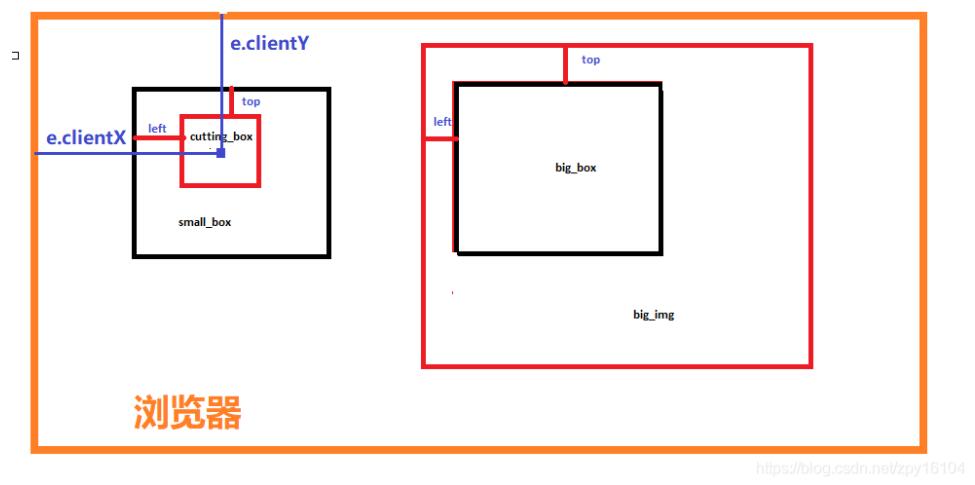
当触发鼠标移动事件时,通过事件对象的clientX和clientY属性获取实时坐标x和y值。计算cutting_box的偏移量left和top时,需减去small_box的offsetLeft值以及cutting_box宽度的一半。当cutting_box移动至右侧或下侧边界时,left和top值取最大值。通过实时变化的left/top值与各自最大值的比值,计算出右侧big_img元素对应的left和top位置。具体计算需先求出big_img放大后的宽高,进而确定其left和top的最大值,最后将该最大值乘以前述比例值得到最终坐标。关键点在于big_img放大后宽高的计算:利用small_box宽高与cutting_box的比值等于big_img宽高与big_box宽高的比例关系,其中仅big_img宽高为未知量。
基本页面结构
<div class="small">
 <img src="images/timg.jpg" alt="">
 <span class="grayBox"></span>
</div>
<div class="big">
 <img src="images/timg.jpg" alt="">
</div>
CSS样式代码
.small {
 width: 400px;
 height: 400px;
 position: relative;
 border:4px solid #ddd;
 box-shadow: 0 0 5px rgba(0,0,0,.5);
}
.small img{
 width: 100%;
 height: 100%;
}
.small .grayBox{
 display: none;
 width: 100px;
 height: 100px;
 box-shadow: 0 0 10px rgba(0, 0, 0, 0.5);
 position: absolute;
 left: 0;
 top: 0;
}
.big{
 width: 400px;
 height: 400px;
 position: absolute;
 left: 700px;
 top: 100px;
 border:1px solid #f10;
 display: none;
 overflow: hidden;
}
.big img{
 position: absolute;
}
面向对象实现方案
分析(OOA)阶段
- 元素选择功能模块
- 事件绑定驱动逻辑
- 元素显示与隐藏控制
- 小图移动与大图放大跟随联动
- 鼠标滚轮缩放功能
设计(OOD)阶段
构造函数定义
function Magnifier(){}初始化各功能模块
function init(){}事件绑定实现
function bindEvent(){}元素显隐逻辑
function eleToggle(){}小图移动与大图跟随放大功能
function eleMove(){}编写(OOP)阶段
- 首先明确所有功能方法均应挂载至放大镜构造函数的原型对象上。
- 其次,实例化对象时需传入包含配置信息的对象参数,具体形式如下:
new Magnifier({
 small_box : ".small",
 cutting_box : ".grayBox",
 big_box : ".big",
 big_img : ".big img"
});
构造函数需接收实例化时传入的配置参数对象。
function Magnifier( options ) {
 // 调用初始化函数,处理接收到的参数对象
 this.init( options );
}
初始化功能负责完成元素选取,并获取small_box、cutting_box、big_box的offset系列属性值。
Magnifier.prototype.init = function( options ){
 // 初始化元素;
 for(var attr in options){
  this[attr+"_ele"] = this.$(options[attr]);
 }
 // 为了节省性能,所以只获取一次offsetLeft;
 this.small_box_offset = {
  left : this.small_box_ele.offsetLeft,
  top  : this.small_box_ele.offsetTop,
  width : parseInt( getComputedStyle(this.small_box_ele).width ),
  height : parseInt( getComputedStyle(this.small_box_ele).width )
 }
 this.cutting_box_offset = {
  width  : parseInt( getComputedStyle(this.cutting_box_ele).width ),
  height : parseInt( getComputedStyle(this.cutting_box_ele).height ),
 }
 this.big_box_offset = {
  width : parseInt( getComputedStyle(this.big_box_ele).width ),
  height : parseInt( getComputedStyle(this.big_box_ele).height ),
 }
 // 标志变量 ,鼠标是否移入放大镜
 this.magnifier_start = false;
 this.bindEvent();
 // 图片缩放功能
 this.scaleBigImg();
}
元素选择功能实现如下:
Magnifier.prototype.$ = function(selector){
 return document.querySelector(selector);
}
事件绑定功能代码如下:
Magnifier.prototype.bindEvent = function(){
 // 鼠标移入左侧small_box
 this.small_box_ele.addEventListener( "mouseover" , function(){
  // cutting_box big_box元素显示;
  this.eleToggle("show");
  // 修改标志变量为true
  this.magnifier_start = true;
  // 修改事件函数里面的this指向为当前实例对象
 }.bind(this));
 // 鼠标移出左侧small_box
 this.small_box_ele.addEventListener( "mouseout" , function(){
  // cutting_box big_box元素隐藏;
  this.eleToggle("hide");
  this.magnifier_start = false;
 }.bind(this));
 // 鼠标移动,元素运动;
 this.small_box_ele.addEventListener("mousemove" , function( evt ){
  var e = evt || event;
  // 获取鼠标点距离浏览器可视区的 x y 值
  var x = e.clientX ;
  var y = e.clientY ;
  // 调用factoryPosition处理得到的坐标值
  this.res = this.factoryPosition( x , y );
  // 把处理好后的坐标值传入eleMove方法,改变相应的left、top值
  this.eleMove( this.res );
 }.bind(this));
 // 滚轮事件;
 document.addEventListener("mousewheel" , function( evt ){
  // 如果鼠标未移入放大镜,则不执行滚轮事件函数
  if(!this.magnifier_start){ return false }
  var e = evt || event;
  // 判定滚轮向上(缩小)还是向下(放大);
  this.changeCutBoxScale( e.wheelDelta > 0 ? "narrow" : "large" );
 }.bind(this));
}
元素显示与隐藏功能实现如下:
Magnifier.prototype.eleToggle = function( type ){
 // 根据type类型,判定元素的display的属性值 block | none
 this.cutting_box_ele.style.display = type === "show" ? "block" : "none";
 this.big_box_ele.style.display = type === "show" ? "block" : "none";
}
处理鼠标移动时获取的坐标点x和y值逻辑如下:
Magnifier.prototype.factoryPosition = function( x , y ){
 // 根据接收到的 x 和 y 计算得到 cutting_box 的 left 和 top 偏移量
 var _left =  x - this.small_box_offset.left - this.cutting_box_offset.width / 2;
 var _top  = y - this.small_box_offset.top - this.cutting_box_offset.height / 2
 // cutting_box 的 left 和 top 的最大值
 var _left_max = this.small_box_offset.width - this.cutting_box_offset.width;
 var _top_max = this.small_box_offset.height - this.cutting_box_offset.height;
 // 最小值边界监测;
 _left = _left <= 0 ? 0  : _left;
 _top  = _top  <= 0 ? 0  : _top
 // 最大值检测
 _left = _left >= _left_max ? _left_max : _left;
 _top = _top >= _top_max ? _top_max : _top;
 // 返回处理好的坐标点值 以及 移动的距离与最大值的比例系数
 return {
  x : _left,
  y : _top,
  xp: _left / _left_max,
  yp:_top / _top_max
 }
}
小图移动与大图放大跟随功能的实现代码如下:
Magnifier.prototype.eleMove =  function( position_obj ){
 // 左侧cutting_box移动范围
 this.cutting_box_ele.style.left = position_obj.x + "px";
 this.cutting_box_ele.style.top  = position_obj.y + "px";
 // 大图big_img的移动范围。cutting_box和big_img的移动方向时相反的
 this.big_img_ele.style.left = -position_obj.xp * this.big_img_boundary.left_max + "px";
 this.big_img_ele.style.top  = -position_obj.yp * this.big_img_boundary.top_max + "px";
}
图片放大功能的实现代码如下:
Magnifier.prototype.scaleBigImg = function(){
 // 放大的比例 ;
 var width_p  = this.big_box_offset.width / this.cutting_box_offset.width;
 var height_p = this.big_box_offset.height / this.cutting_box_offset.height;
 // 获得了big_img放大之后的宽高;
 this.big_img_offset = {
  width  : width_p * this.small_box_offset.width,
  height : height_p * this.small_box_offset.height,
 }
 // 计算出big_img运动的边界;
 this.big_img_boundary = {
  left_max : this.big_img_offset.width  - this.big_box_offset.width,
  top_max  : this.big_img_offset.height - this.big_box_offset.height
 }
 // 给图片设置等比例宽高;
 this.big_img_ele.style.width  = this.big_img_offset.width + "px";
 this.big_img_ele.style.height = this.big_img_offset.height + "px";
}
鼠标滚轮滚动时需同步调整左侧cutting_box的大小,具体实现如下:
Magnifier.prototype.changeCutBoxScale = function( type ){
 switch ( type ) {
  // 放大
  case "large":
   this.cutting_box_offset.width += 2;
   this.cutting_box_offset.height += 2;
   // 让cutting_box 向左 向上移动 让鼠标始终保持在中心位置
   this.res.x --;
   this.res.y --;
   break;
  // 缩小
  case "narrow":
   this.cutting_box_offset.width  -= 2;
   this.cutting_box_offset.height -= 2;
   this.res.x ++;
   this.res.y ++;
   break;
  default:
   break;
 }
 this.cutting_box_ele.style.width = this.cutting_box_offset.width + "px";
 this.cutting_box_ele.style.height = this.cutting_box_offset.height + "px";
 // 位置改变之后,调用相应的比例计算工具;
 this.scaleBigImg();
 // 重新进行大图运动的计算;
 this.eleMove(this.res);
}
功能补充:支持多图片切换,可放大对应图片。通过添加data-src自定义属性存储不同图片路径。
<button class="btn" data-src=""><img src="" alt=""></button>
<button class="btn" data-src=""><img src="" alt=""></button>
最后,在实例化放大镜对象后,需分别为每个按钮绑定点击或移入事件,并将small和big容器中img元素的src属性值替换为对应的data-src属性值,具体代码如下:
// 选中所有代表不同图片的button按钮
var btns = document.querySelectorAll(".btn");
// 选中small 和 big 容器中的 img 标签
var imgs = document.querySelectorAll(".big img,.small img");
for(var i = 0 ; i < btns.length ; i ++){
 btns[i].onclick = function(){
  // 获取每个按钮上的不同的 data-src 属性
  var src = this.getAttribute("data-src");
  for(var k = 0 ; k < imgs.length ; k ++){
   // 替换相应的 src 属性的属性值
   imgs[k].src = src;
  }
 }
}
以上就是本文的全部内容,希望能为读者提供学习帮助,也欢迎大家继续支持本站。