

本文介绍一种纯前端JavaScript实现的动态验证码方案,无需后端交互。通过Canvas绘制随机字符、干扰线及背景,并结合输入框事件实现实时校验。代码包含文字与线条构造函数,支持自定义长度与样式,适用于登录注册场景的防刷验证。
引言:
当前许多网站在用户登录或注册环节,为防范自动化程序攻击,普遍采用动态验证码机制,要求用户输入随机生成的字符进行验证。本文分享一个纯前端实现的验证码模块,无需与后台服务器交互即可完成验证过程,供开发者参考。
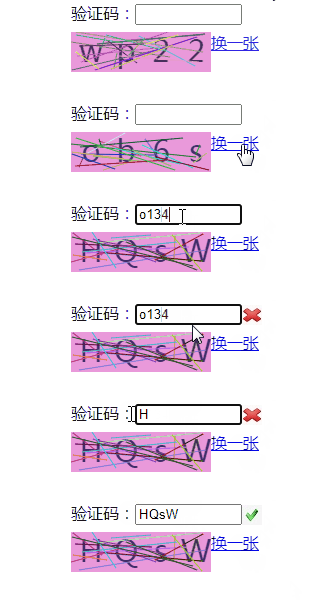
效果图:
实现思路:
- 首先构建包含数字和字母的字符数组,通过随机获取数组下标的方式,连续抽取4个字符组成验证码内容;
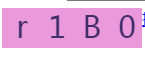
- 将生成的验证码字符逐一渲染至Canvas画布上;
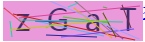
- 在画布上绘制指定数量的随机颜色干扰线条,以增加识别难度;
- 监听用户输入,当输入达到4位时触发验证逻辑:验证成功显示勾选图标,失败则显示叉号并自动刷新验证码。
编写构造函数
文字对象构造函数,用于定义字符的坐标、内容、字体及对齐方式等属性,并通过init方法初始化配置。
//文字的构造函数
	function Text(o){
		this.x=0,//x坐标
		this.y=0,//y坐标
		this.text='',//内容
		this.font=null;//字体
		this.textAlign=null;//对齐方式

		this.init(o);
	}

	Text.prototype.init=function(o){
		for(var key in o){
			this[key]=o[key];
		}
	}
	Text.prototype.render=function(context){
		this.ctx=context;
		innerRender(this);

		function innerRender(obj){
			var ctx=obj.ctx;
			ctx.save()
			ctx.beginPath();
			ctx.translate(obj.x,obj.y);

			if(obj.font){
				ctx.font=obj.font;
			}
			if(obj.textAlign){
				ctx.textAlign=obj.textAlign;
			}
			if(obj.fill){//是否填充
				obj.fillStyle?(ctx.fillStyle=obj.fillStyle):null;
				ctx.fillText(obj.text,0,0);
			}
		 	ctx.restore();
		}
	 	return this;
	}
线条对象构造函数,用于定义线条的起点、终点、颜色及粗细等属性,并通过init方法初始化配置。
	//直线的构造
	function Line(ctx,o){
		this.x=0,//x坐标
		this.y=0,//y坐标
		this.startX=0,//开始点x位置
		this.startY=0, //开始点y位置
		this.endX=0,//结束点x位置
		this.endY=0;//结束点y位置
		this.thin=false;//设置变细系数
		this.ctx=ctx;

		this.init(o);
	}
	Line.prototype.init=function(o){
		for(var key in o){
			this[key]=o[key];
		}
	}
	Line.prototype.render=function(){
		innerRender(this);

		function innerRender(obj){
			var ctx=obj.ctx;
			ctx.save()
			ctx.beginPath();
			ctx.translate(obj.x,obj.y);
			if(obj.thin){
				ctx.translate(0.5,0.5);
			}
			if(obj.lineWidth){//设定线宽
				ctx.lineWidth=obj.lineWidth;
			}
			if(obj.strokeStyle){
				ctx.strokeStyle=obj.strokeStyle;
			}
			//划线
		 	ctx.moveTo(obj.startX, obj.startY);
		 	ctx.lineTo(obj.endX, obj.endY);
		 	ctx.stroke();
		 	ctx.restore();
		}

	 	return this;
	}
按长度获取验证码
	//根据指定长度生成随机字母数字
	Verifiable.prototype.randomWord=function(range){
	 var str = "",pos,
	   arr = ['0', '1', '2', '3', '4', '5', '6', '7', '8', '9', 'a', 'b', 'c', 'd', 'e', 'f', 'g', 'h', 'i', 'j', 'k', 'l', 'm', 'n', 'o', 'p', 'q', 'r', 's', 't', 'u', 'v', 'w', 'x', 'y', 'z', 'A', 'B', 'C', 'D', 'E', 'F', 'G', 'H', 'I', 'J', 'K', 'L', 'M', 'N', 'O', 'P', 'Q', 'R', 'S', 'T', 'U', 'V', 'W', 'X', 'Y', 'Z'];
	 for(var i=0; i<range; i++){
	  pos = Math.round(Math.random() * (arr.length-1));
	  str += arr[pos];
	 }
	 return str;
	}
绘制文字
	//绘制文字
	Verifiable.prototype.drawText=function(){
		var that=this;
		var count = 4;//文字个数
		var textW = 40;//文字所占宽
		var code=this.code = this.randomWord(count);
		var codeArr = code.split("");
		var text,x ;
		codeArr.forEach(function(c,i){
			x = that.w/count*i+textW/2;
			//绘制文字
			text = new Text({
				x:x,
				y:textW-10,
				text:c,
				font:'30px ans-serif',
				textAlign:'center',
				fill:true,
				fillStyle:'#412D6A'
			});
			that.renderArr.push(text);
		})
	}
此时效果:
绘制干扰线
//绘制干扰线
	Verifiable.prototype.interfering=function(){
		var count = this.lineCount=20,line,ctx=this.ctx;
		var startX,
			startY,
			endX,
			endY,
			color;

		for(var i=0;i<count;i++){
			//随机开始坐标,结束坐标、颜色
			startX = _.getRandom(0,140);
			startY = _.getRandom(0,40);
			endX = _.getRandom(0,140);
			endY = _.getRandom(0,40);
			color = _.getRandomColor();
			//定义一条直线
			line = new Line(ctx,{
				x:0,
				y:0,
			 	startX:startX,
			 	startY:startY,
			 	endX:endX,
			 	endY:endY,
			 	strokeStyle:color
			})

			this.renderArr.push(line);
		}
	}
此时效果如下:
加入页面布局
<!DOCTYPE html>
<html lang="zh">

<head>
  <meta charset="UTF-8">
  <title>verifiable</title>
  <style>
   #box{
		width:140px;
		height:40px;
		position:absolute;

	}
	#inputDiv{
		width:220px;
		position:absolute;
		margin:0 auto;
		left:0;
		top:30px;
		right:0;
		bottom:0;
	}
	#container{
		width:220px;
		height:60px;
		position:absolute;
		margin:0 auto;
		left:0;
		top:60px;
		right:0;
		bottom:0;
	}
	.refresh{
		position:absolute;
		left:140px;
	}
  </style>
</head>

<body>
	<div id='inputDiv'>
  	验证码:<input size=10 id='codeInput'><img id='stateImg' style="vertical-align: middle;width:20px"></img>
  </div>
  <div id="container">
  	<div id='box'></div>
  	<a href="javascript:void 0" class="refresh" onclick="refresh()">换一张</a>
  </div>
</body>
	<script type="text/javascript" src='verifiable.js'></script>
  <script type="text/javascript">
 	var box = document.getElementById('box');
 	var stateImg = document.getElementById('stateImg');
 	var codeInput = document.getElementById('codeInput');

	verifiable.init(box,codeInput,stateImg);

	//换一张
	function refresh(){
		verifiable.renderArr.length=0;
		verifiable.draw();
	}
  </script>
</html>
加入输入框事件
	//输入框事件
	Verifiable.prototype.inputValid=function(input){
		var val = input.value;
		if(val.length<4) return ;

		if(this.code==val){
			console.log('suc');
			this.result(0);
		}else{
			this.result(1);
		}
	}
加入成功、失败验证
//处理结果
	Verifiable.prototype.result=function(result){
		var codeInput = this.codeInput;
		var stateImg = this.stateImg;
		if(result==0){//成功
			stateImg.src="./images/suc.jpeg";
			codeInput.readOnly=true;
		}else {//失败
			codeInput.readOnly=false;
			stateImg.src="./images/fail.jpeg";
			this.renderArr.length=0;
			this.draw();
		}
	}
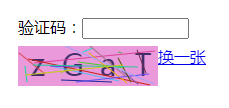
完成
代码下载
到此这篇关于JavaScript实现页面动态验证码的实现示例的文章就介绍到这了,更多相关JavaScript 动态验证码内容请搜索本站以前的文章或继续浏览下面的相关文章希望大家以后多多支持本站!