

本文详细介绍如何使用JavaScript和CSS实现一个简单的图片放大镜效果。通过讲解CSS中static、relative、fixed和absolute四种定位方式的区别,结合鼠标移入移出事件与比例计算逻辑,演示如何同步小图覆盖物与大图的位置,最终实现平滑的放大浏览体验。
JavaScript实现简单放大镜特效教程
本文分享了一段使用JavaScript实现简易图片放大镜功能的完整代码,供读者参考学习。
首先展示最终实现的视觉效果:
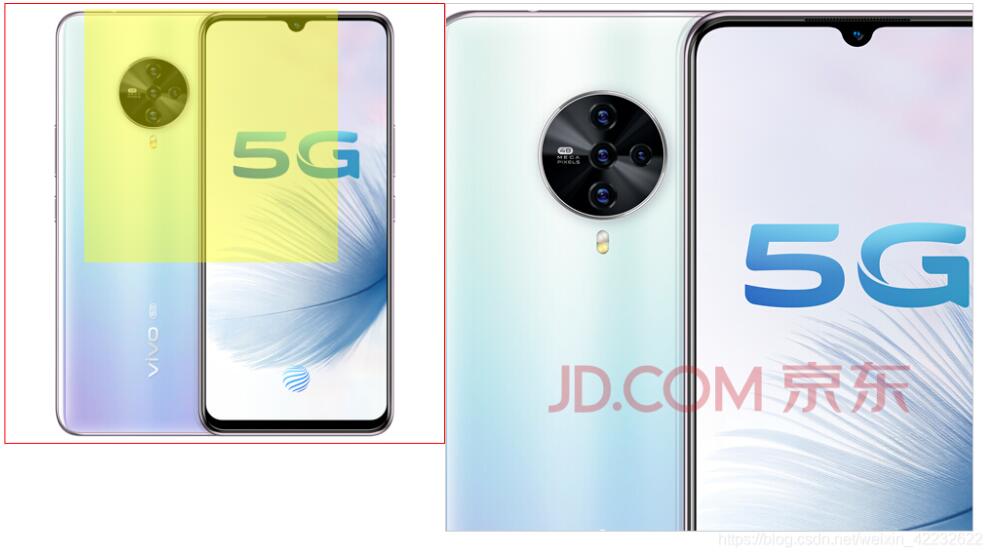
CSS定位机制详解
在编写放大镜逻辑之前,需要先掌握CSS中的定位机制。
前端开发中常见的布局模式是“子绝父相”,即父元素采用相对定位,子元素采用绝对定位。
CSS中元素的定位方式主要包含以下四种:
1、static(静态定位):这是所有元素的默认状态,不应用任何特殊的定位偏移。
2、relative(相对定位):元素不脱离文档流,其位置可以相对于自身在文档中的原始位置进行偏移。
3、fixed(固定定位):元素完全脱离文档流,其位置相对于浏览器视口(空白区域)定位,且不会随页面滚动而移动。
4、absolute(绝对定位):元素完全脱离文档流,其参考点是最近的已定位祖先元素(即父级或更上层元素中第一个具有relative、absolute或fixed定位的元素)。如果父级元素没有设置上述定位,则继续向上层查找,直至body。
放大镜特效实现逻辑
接下来确定小图盒子(box)和大图容器(bigBox)的位置,并初始状态下隐藏大图容器。
.box {
 width: 450px;
 height: 450px;
 margin: 100px 0 0 100px;
 border: 1px solid red;
 position: relative;
 }

 /* 右边大盒子 */
 .bigBox{
 width: 540px;
 height: 540px;
 position: absolute;
 top: 100px;
 left: 560px;
 border: 1px solid #ccc;
 overflow: hidden;
 display: none;
 }
 .bigBox img {
 position: absolute;
 left: 0;
 top: 0;
 }


 /* 覆盖物 */
 .box .mask{
 width: 260px;
 height: 260px;
 background-color: yellow;
 /*调整透明度 */
 opacity: .4;
 position: absolute;
 left: 0;
 top: 0;
 /* 默认消失 */
 display: none;
 }
在编写JavaScript逻辑时,需要注意以下关键点:
页面加载完成后,需要为box元素绑定鼠标进入(mouseover)和移出(mouseout)事件。
<script>

 window.onload = function (){
 var box = document.querySelector(".box");
 var mask = document.querySelector(".mask");
 var bigBox = document.querySelector(".bigBox");
 var bigImg = document.querySelector(".bigBox > img");
 console.log(bigImg);

 // 鼠标移入
 box.onmouseover = function (){
 document.querySelector(".mask").style.display = "block";
 document.querySelector(".bigBox").style.display = "block";
 }
 // 移出
 box.onmouseout = function (){
 document.querySelector(".mask").style.display = "none";
 document.querySelector(".bigBox").style.display = "none";
 }

 // 让覆盖物跟随鼠标移动
 box.onmousemove = function (){
 // 因为box有100像素的外边距,我们需要减掉,否则会错位
 var left = event.pageX - 100 - 130;
 var top = event.pageY - 100 - 130;
 // 覆盖物不能超出box范围,就需要判坐标的取值范围了
 // 得到覆盖物在box中可移动的最大距离
 var maskMax = this.offsetWidth - mask.offsetWidth;
 // 判断left
 if(left <= 0){
 left = 0;
 }else if(left >= maskMax){
 left = maskMax;
 }

 // top
 if(top <= 0){
 top = 0;
 }else if(top >= maskMax){
 top = maskMax;
 }

 // 将设置好的left,top值设置给样式
 mask.style.left = left + "px";
 mask.style.top = top + "px";
 mask.style.cursor = "move";
核心逻辑注意事项:
① 根据鼠标移动的比例,计算大图的移动坐标。 ② 计算公式为:大图的移动坐标 = 覆盖物(mask)的偏移量 × 大图的最大可移动距离 / 覆盖物的最大可移动距离。 ③ 具体表达式为:偏移量 × (图片宽度 - bigBox宽度) / maskMax。
// 大图在大盒子中的最大位移距离
var bigImgMax = bigImg.offsetWidth - bigBox.offsetWidth;
// 大图片的left值
var bigImgX = mask.offsetLeft * bigImgMax / maskMax;
// 大图的top值

var bigImgY = mask.offsetTop * bigImgMax / maskMax;
 // 覆盖物与大图片的移动方向是反的,所以这里要给负值
 bigImg.style.left = -bigImgX + "px";
 bigImg.style.top = -bigImgY + "px";

 }
 }
其中,mask代表放大镜效果中的黄色覆盖区域。
<div class="box">
 <img src="../img/small.jpg" alt="">
<div class="mask">
</div>
<div class="bigBox">
 <img src="../img/big.jpg" alt="">
</div>
以上就是本文的全部内容,希望能为读者提供有益的帮助,欢迎大家继续支持本站获取更多技术分享。