

本文介绍如何使用原生JavaScript结合HTML5 Canvas元素,实现一个轻量级的电子画板或签字板功能。通过监听鼠标按下、移动和弹起事件,记录坐标并绘制路径,最终封装为可复用的模块,适用于电子教室黑板等场景。
JS Canvas电子画板与签字板实现
本文分享使用JavaScript和Canvas技术实现电子画板及签字板功能的具体代码示例,供读者参考学习。
前言
这种技术常见于电子教室中的电子黑板应用。
本文方案的主要特点如下:
采用原生JavaScript编写,无需依赖第三方库,实现了模块化封装。
最简代码示例
以下是实现该功能的最简代码示例。
<!DOCTYPE html>
<html lang="en">
<head>
 <meta charset="UTF-8">
 <meta http-equiv="X-UA-Compatible" content="IE=edge">
 <meta name="viewport" content="width=device-width, initial-scale=1.0">
 <title>Document</title>
</head>
<body>
 <canvas id="canvas"></canvas>
 <script>
 let c = document.getElementById('canvas');
 c.width = window.innerWidth;
 c.height = window.innerHeight;
 let ctx = c.getContext('2d');

 // draw one black board
 ctx.fillStyle = "black";
 ctx.fillRect(0,0,600,300);

 // 按下标记
 let onoff = false,
  oldx = -10,
  oldy = -10;

 // 设置颜色
 let linecolor = "white";

 // 设置线宽
 let linw = 4;

 // 添加鼠标事件
 // 按下
 c.addEventListener('mousedown', event => {
  onoff = true;
  // 位置 - 10是为了矫正位置,把绘图放在鼠标指针的顶端
  oldx = event.pageX - 10;
  oldy = event.pageY - 10;
 },false);
 // 移动
 c.addEventListener('mousemove', event => {
  if(onoff == true){
  let newx = event.pageX - 10,
   newy = event.pageY - 10;

  // 绘图
  ctx.beginPath();
  ctx.moveTo(oldx,oldy);
  ctx.lineTo(newx,newy);
  ctx.strokeStyle = linecolor;
  ctx.lineWidth = linw;
  ctx.lineCap = "round";
  ctx.stroke();
  // 每次移动都要更新坐标位置
  oldx = newx,
  oldy = newy;
  }
 }, true);
 // 弹起
 c.addEventListener('mouseup', ()=> {
  onoff = false;
 },false);
 </script>
</body>
</html>
运行效果展示如下。
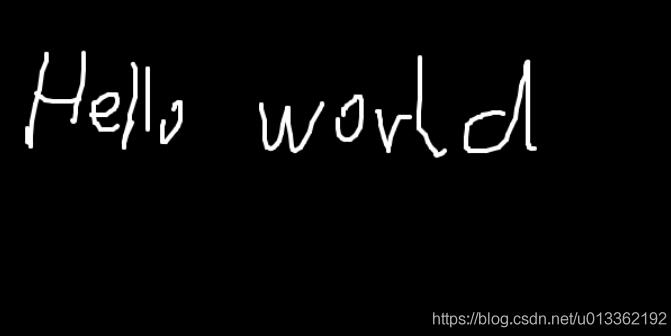
代码逻辑解析
接下来对代码逻辑进行详细讲解。
核心实现思路主要包含以下三个步骤:
1、监听鼠标按下事件,触发开始绘制状态。2、监听鼠标弹起事件,结束绘制状态。3、监听鼠标移动事件,在按下状态下持续绘制路径。
代码逻辑深入解析
整体流程为:当鼠标按下时,开启绘制开关;鼠标移动过程中,根据当前坐标与上一时刻坐标计算路径并进行绘制,同时更新旧坐标值;当鼠标松开时,关闭绘制开关。
具体实现细节包括:1、必须通过状态变量判断鼠标是否处于按下状态,仅在此状态下才执行绘图操作。2、由于鼠标指针尖端与实际绘制点存在视觉偏移,需在坐标计算时减去偏移量(如pagex-10),确保线条从指针尖端开始绘制。3、在每次鼠标移动时更新坐标位置,利用连续的小线段模拟不规则曲线。
模块化封装
上述逻辑可封装为独立的JavaScript模块以便复用。
<canvas id="canvas"></canvas>
<script>
 class Board{
 constructor(canvasName = 'canvas', data = new Map([
  ["onoff", false],
  ["oldx", -10],
  ["oldy", -10],
  ["fillStyle", "black"],
  ["lineColor", "white"],
  ["lineWidth", 4],
  ["lineCap", "round"],
  ["canvasWidth", window.innerWidth],
  ["canvasHeight", window.innerHeight]
 ])){
  // this.data = data;
  this.c = document.getElementById(canvasName);
  this.ctx = this.c.getContext('2d');
  this.onoff = data.get("onoff");
  this.oldx = data.get("oldx");
  this.oldy = data.get("oldy");
  this.lineColor = data.get("lineColor");
  this.lineWidth = data.get("lineWidth");
  this.lineCap = data.get("lineCap");

  this.c.width = data.get("canvasWidth");
  this.c.height = data.get("canvasHeight");

  this.ctx.fillStyle = data.get("fillStyle");
  this.ctx.fillRect(0,0,600,300);
 }

 eventOperation(){
  // 添加鼠标事件
  // 按下
  this.c.addEventListener('mousedown', event => {
  this.onoff = true;
  // 位置 - 10是为了矫正位置,把绘图放在鼠标指针的顶端
  this.oldx = event.pageX - 10;
  this.oldy = event.pageY - 10;
  },false);
  // 移动
  this.c.addEventListener('mousemove', event => {
  if(this.onoff == true){
   let newx = event.pageX - 10,
   newy = event.pageY - 10;

   // 绘图
   this.ctx.beginPath();
   this.ctx.moveTo(this.oldx,this.oldy);
   this.ctx.lineTo(newx,newy);

   this.ctx.strokeStyle = this.lineColor;
   this.ctx.lineWidth = this.lineWidth;
   this.ctx.lineCap = this.lineCap;

   this.ctx.stroke();
   // 每次移动都要更新坐标位置
   this.oldx = newx,
   this.oldy = newy;
  }
  }, true);
  // 弹起
  this.c.addEventListener('mouseup', ()=> {
  this.onoff = false;
  },false);
 }

 }

 let board = new Board();
 board.eventOperation();
</script>
以上内容即为基于原生JS实现Canvas画板与签字板的完整教程,希望能为相关开发工作提供帮助。