
本文详细讲解如何使用原生JavaScript实现图片轮播的左右箭头切换与底部指示点同步高亮。通过单一状态驱动模型、模运算边界判定与统一渲染函数,带你掌握稳定高效的轮播交互实现。

当前位置:首页 > JavaScript DOM 与事件 > 正文
JS图片轮播添加左右箭头切换与底部指示点同步
作者:白露
时间:2026-11-17
浏览:290
文章目录
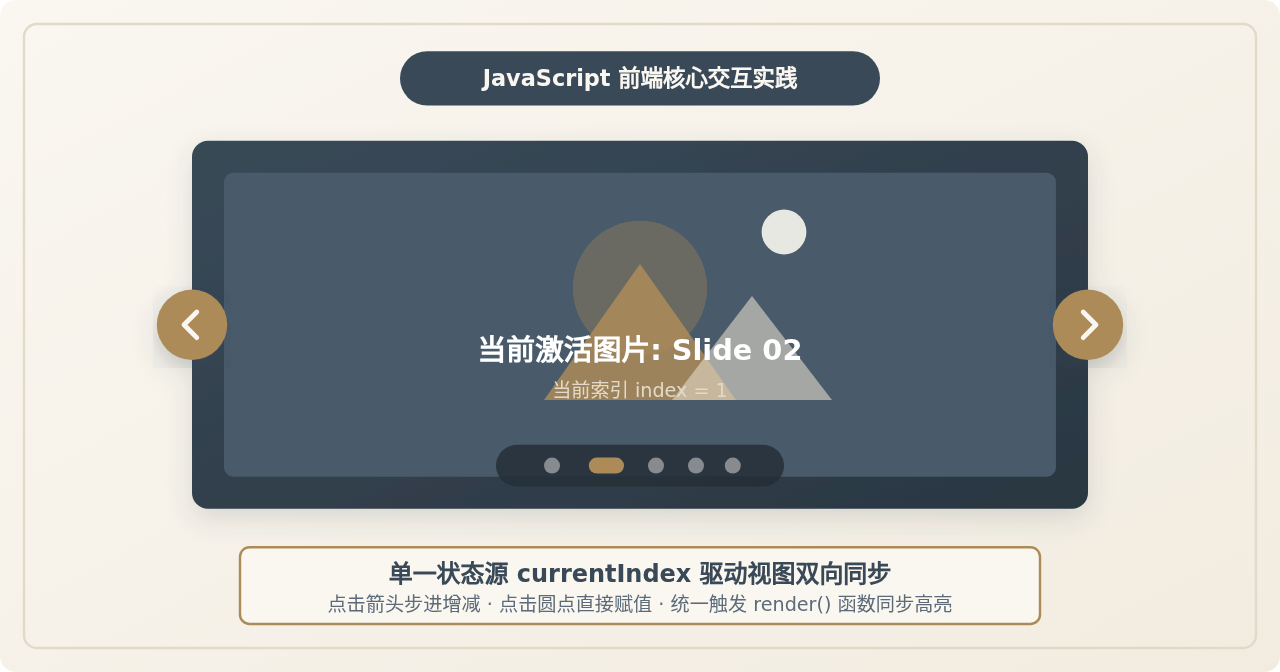
在前端交互开发中,图片轮播(Carousel / Slider)是最基础但也最容易出现状态不同步的组件之一。很多初学者在分别实现“点击上一张/下一张切换图片”与“点击底部小圆点切换图片”时,容易写出两套相互独立的控制逻辑,导致按了箭头之后圆点不更新、或者点击圆点之后箭头计数混乱。解决这一问题的根本途径,是建立单一状态源驱动的模式:在内存中维护唯一一个代表当前幻灯片位置的全局索引(currentIndex),无论是点击左箭头、右箭头,还是点击底部圆点,都只负责修改这个索引数值,最后统一调用唯一的渲染函数来同步更新图片位置与指示点高亮状态。
一、核心同步原理与单一状态源设计
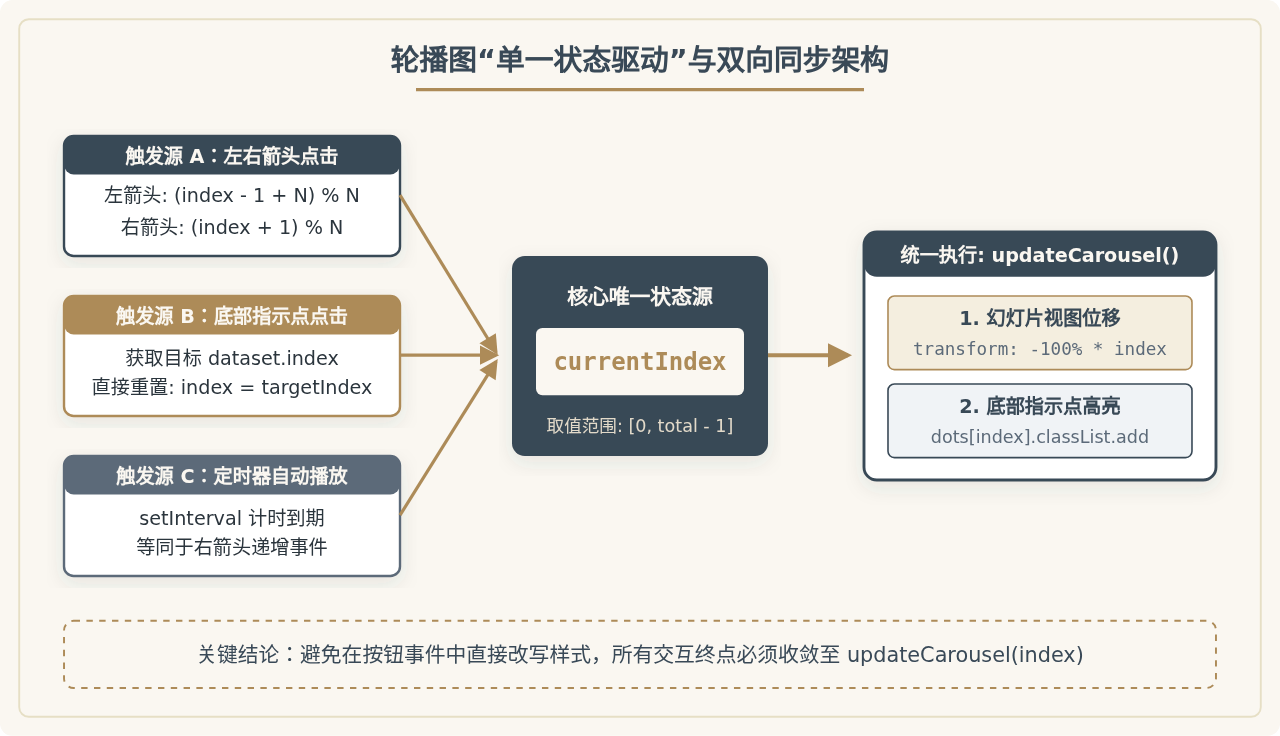
要让左右箭头与底部指示点完全同步,必须先厘清数据与视图的从属关系。轮播图本质上是一个有限状态机,页面上有 N 张图片,索引范围自然为 0 到 N - 1。任何操作都不应该直接去手动翻页或孤立地修改某个圆点的样式,而是经过统一的数据流:
- 操作触发(Actions):用户点击左箭头、右箭头或第
k个指示点,亦或是自动播放定时器倒计时结束。 - 状态更新(State Mutation):对全局变量
currentIndex进行重新计算。右箭头操作为递增,左箭头操作为递减,指示点点击直接设为k。 - 边界约束(Boundary / Loop):计算结果若超出
[0, N - 1]范围,通过模运算公式自动绕回对侧,保证无缝循环。 - 统一渲染(Render Dispatcher):调用唯一的
updateCarousel()函数,集中将第currentIndex个幻灯片移入可视区,同时将第currentIndex个指示点添加active激活类,其余项移除激活类。
二、DOM 骨架与 CSS 视觉层级搭建
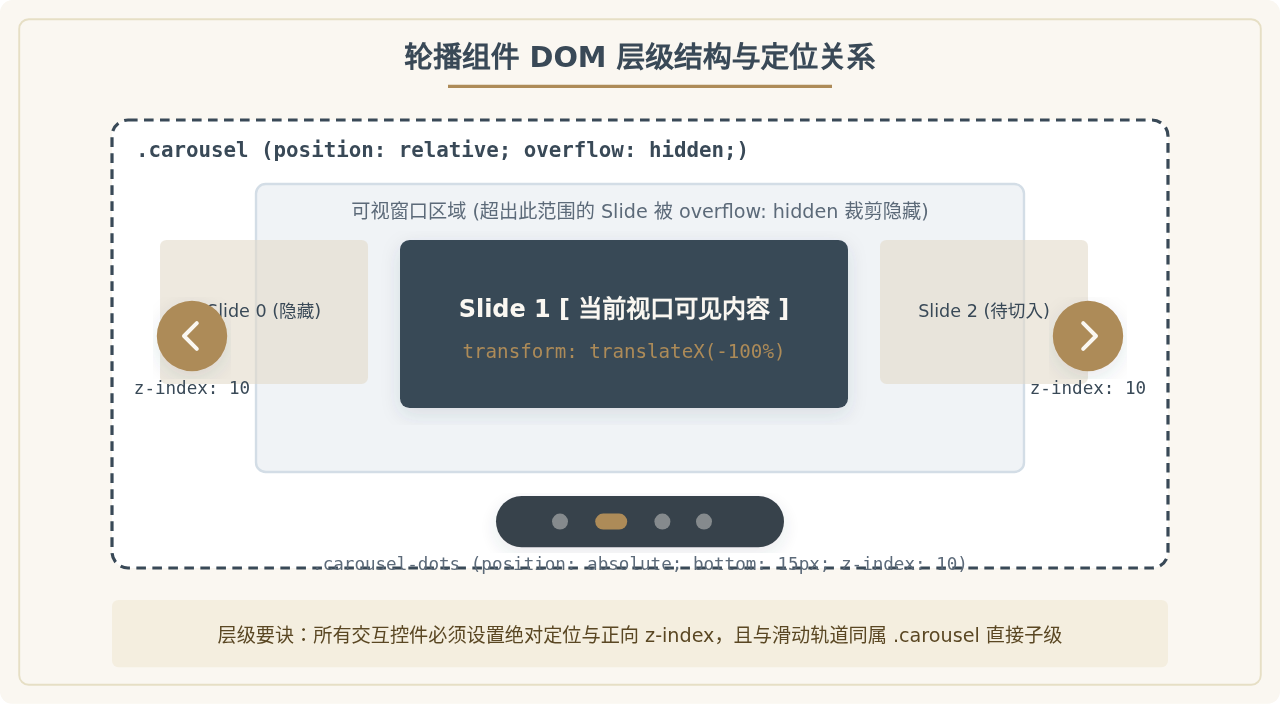
在编写 JavaScript 前,必须构建规范的 HTML 骨架与层叠上下文(CSS Stacking Context)。轮播组件的经典层叠设计由外至内分为三层:
- 外层视口容器(
.carousel):设置position: relative与overflow: hidden,作为所有绝对定位子元素的定位参考系,并遮蔽可视窗口外的幻灯片。 - 内部滑动轨道(
.carousel-track):容纳所有的幻灯片卡片。常用水平display: flex排布,配合 CSS3 的transition: transform 0.4s ease-in-out产生平滑滑动效果。 - 控制层控件(左右箭头与圆点容器):设置
position: absolute与较高的z-index: 10,悬浮在幻灯片上方,避免被图片内容遮挡导致无法点击。
依据上述设计,HTML 与 CSS 基础代码片段如下:
<!-- 轮播图 HTML 结构 -->
<div class="carousel" id="myCarousel">
<!-- 图片滚动轨道 -->
<div class="carousel-track">
<div class="carousel-slide"><img src="image1.jpg" alt="图1"></div>
<div class="carousel-slide"><img src="image2.jpg" alt="图2"></div>
<div class="carousel-slide"><img src="image3.jpg" alt="图3"></div>
<div class="carousel-slide"><img src="image4.jpg" alt="图4"></div>
</div>
<!-- 左右切换箭头 -->
<button class="carousel-arrow arrow-prev" aria-label="上一张"><</button>
<button class="carousel-arrow arrow-next" aria-label="下一张">></button>
<!-- 底部指示点容器 -->
<div class="carousel-dots">
<span class="dot active" data-index="0"></span>
<span class="dot" data-index="1"></span>
<span class="dot" data-index="2"></span>
<span class="dot" data-index="3"></span>
</div>
</div>/* 关键配套 CSS 样式 */
.carousel {
position: relative;
width: 600px;
height: 350px;
margin: 0 auto;
overflow: hidden;
border-radius: 8px;
}
.carousel-track {
display: flex;
width: 100%;
height: 100%;
transition: transform 0.4s cubic-bezier(0.25, 1, 0.5, 1);
}
.carousel-slide {
flex: 0 0 100%;
width: 100%;
height: 100%;
}
.carousel-slide img {
width: 100%;
height: 100%;
object-fit: cover;
display: block;
}
.carousel-arrow {
position: absolute;
top: 50%;
transform: translateY(-50%);
width: 40px;
height: 40px;
background-color: rgba(57, 73, 87, 0.65);
color: #FAF7F1;
border: none;
border-radius: 50%;
cursor: pointer;
z-index: 10;
display: flex;
align-items: center;
justify-content: center;
font-size: 20px;
transition: background-color 0.2s;
}
.carousel-arrow:hover {
background-color: #AD8B58;
}
.arrow-prev { left: 16px; }
.arrow-next { right: 16px; }
.carousel-dots {
position: absolute;
bottom: 16px;
left: 50%;
transform: translateX(-50%);
display: flex;
gap: 8px;
z-index: 10;
}
.dot {
width: 10px;
height: 10px;
border-radius: 50%;
background-color: rgba(250, 247, 241, 0.5);
cursor: pointer;
transition: all 0.3s ease;
}
.dot.active {
width: 24px;
border-radius: 5px;
background-color: #AD8B58;
}三、核心 JS 实现步骤拆解
完成布局后,整个同步逻辑通过 4 个清晰步骤来实现。为保证事件与渲染解耦,核心围绕 currentIndex 与 updateCarousel() 展开。
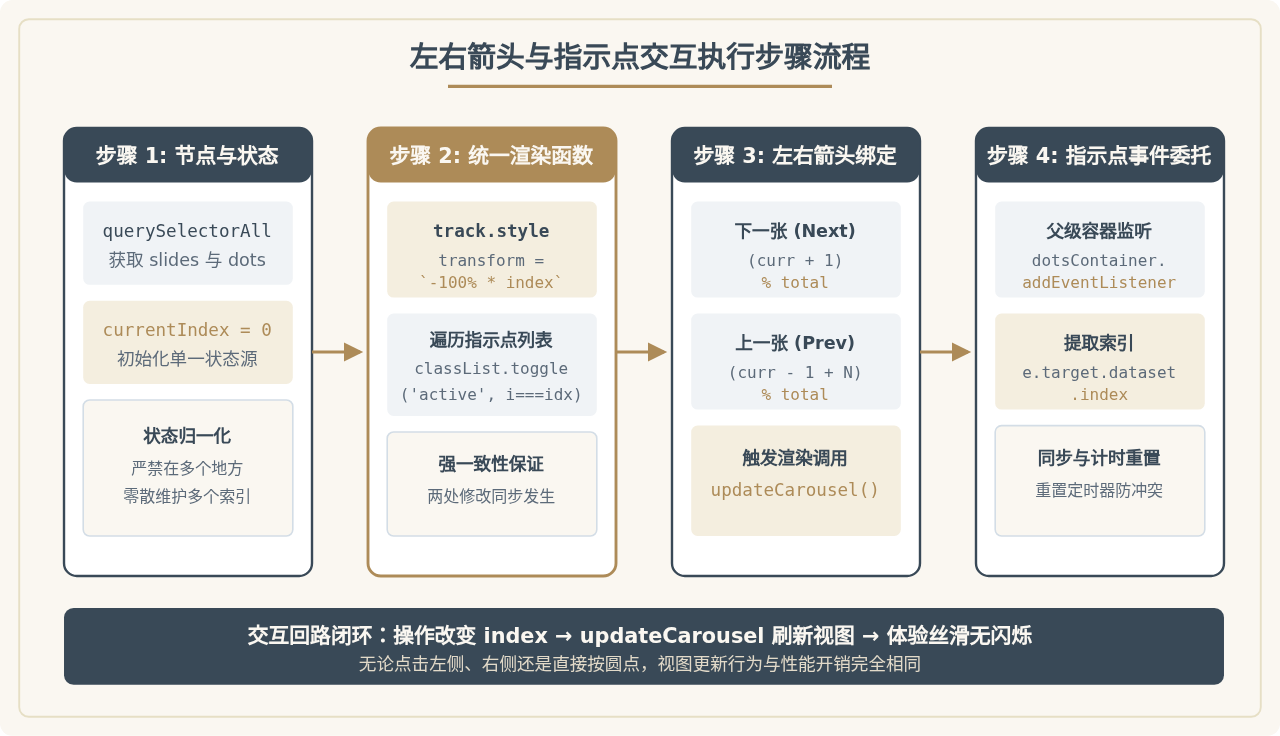
步骤一:获取 DOM 元素与初始化状态
在脚本初始化阶段,集中选取相关节点,并定义当前索引变量:
// 获取关键节点
const track = document.querySelector('.carousel-track');
const slides = document.querySelectorAll('.carousel-slide');
const prevBtn = document.querySelector('.arrow-prev');
const nextBtn = document.querySelector('.arrow-next');
const dotsContainer = document.querySelector('.carousel-dots');
const dots = document.querySelectorAll('.carousel-dots .dot');

// 幻灯片总数与当前索引
const totalSlides = slides.length;
let currentIndex = 0;
步骤二:编写集中渲染函数
渲染函数 updateCarousel() 的职责十分明确:根据传入或当前的 currentIndex,同步变更滑动轨道的位置和指示点的高亮样式。
function updateCarousel() {
  // 1. 移动幻灯片轨道:计算百分比位移
  const offset = -currentIndex * 100;
  track.style.transform = `translateX(${offset}%)`;

  // 2. 同步更新所有指示点的高亮状态
  dots.forEach((dot, index) => {
    // 只有索引等于 currentIndex 的圆点赋予 active 类
    if (index === currentIndex) {
      dot.classList.add('active');
    } else {
      dot.classList.remove('active');
    }
  });
}注意:也可以使用 dot.classList.toggle('active', index === currentIndex) 来精简代码,二者在功能与执行效率上等价。
步骤三:绑定左右箭头切换事件与循环边界处理
点击“下一张”时,索引自增;点击“上一张”时,索引自减。为了实现无限循环轮播(即第一张再往前到最后一张,最后一张往后回到第一张),这里使用模运算(Modulo)来替代冗长的 if-else 分支判定:
// 下一张切换
nextBtn.addEventListener('click', () => {
  currentIndex = (currentIndex + 1) % totalSlides;
  updateCarousel();
});

// 上一张切换:加 totalSlides 防止负数
prevBtn.addEventListener('click', () => {
  currentIndex = (currentIndex - 1 + totalSlides) % totalSlides;
  updateCarousel();
});
模运算的好处在于无论如何快速连续点击,索引数值永远严密落在 [0, totalSlides - 1] 闭区间内,不会出现由于临界判断疏漏导致的越界或 NaN 错误。
步骤四:绑定底部指示点点击事件(事件委托模式)
为底部圆点绑定点击跳转时,有两种做法:一种是用 forEach 为每个 dot 绑定 click;另一种是将事件监听挂载在它们的共同父容器 .carousel-dots 上,利用事件委托(Event Delegation)统一处理。事件委托避免了多次绑定,对动态增加幻灯片也更为友好:
dotsContainer.addEventListener('click', (event) => {
  const target = event.target;
  // 确保点击的是圆点元素且包含有效数据索引
  if (target.classList.contains('dot')) {
    const targetIndex = parseInt(target.dataset.index, 10);
    // 避免重复点击当前已激活的圆点造成多余重绘
    if (targetIndex !== currentIndex) {
      currentIndex = targetIndex;
      updateCarousel();
    }
  }
});
四、关键细节优化与避坑指南
在实际网页中应用上述逻辑时,往往还会遇到定时器冲突、快速连点卡顿或滑动白屏等细节问题。处理好以下几点能显著提升组件的稳健性:
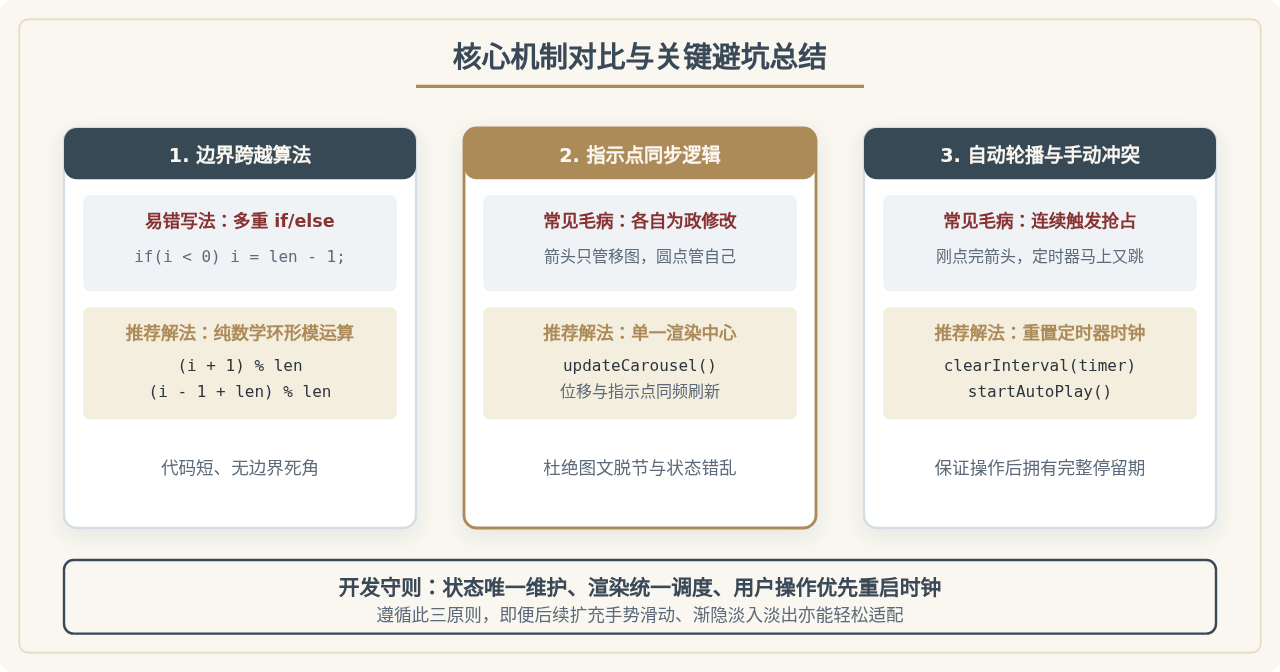
1. 自动轮播与手动操作的冲突解决
若开启了 setInterval 定时自动切页,用户在点击箭头或指示点后,必须立即重置定时器。否则会出现“刚手动切完,定时器下一毫秒又触发切页”的糟糕体验:
let timer = null;

// 启动自动播放
function startAutoPlay() {
  stopAutoPlay(); // 先清除已有定时器,防重复叠加
  timer = setInterval(() => {
    currentIndex = (currentIndex + 1) % totalSlides;
    updateCarousel();
  }, 3500);
}

// 停止自动播放
function stopAutoPlay() {
  if (timer) {
    clearInterval(timer);
    timer = null;
  }
}

// 鼠标悬停暂停,移出继续
const carouselElement = document.querySelector('.carousel');
carouselElement.addEventListener('mouseenter', stopAutoPlay);
carouselElement.addEventListener('mouseleave', startAutoPlay);
2. 快速连点的过渡动画防抖(Throttle)
用户快速点击左右箭头时,CSS 过渡可能尚未结束就连续触发位移。可以通过一个布尔变量 isTransitioning 结合 transitionend 事件进行节流锁定:
let isTransitioning = false;

function handleNext() {
  if (isTransitioning) return;
  isTransitioning = true;
  currentIndex = (currentIndex + 1) % totalSlides;
  updateCarousel();
}

// 在轨道过渡结束后解锁
track.addEventListener('transitionend', () => {
  isTransitioning = false;
});
五、完整整合实例代码
下面给出一段整合了结构、样式、左右切换、指示点同步、事件委托以及防冲突自动轮播的完整可运行代码。可以直接复制并在浏览器中预览验证:
<!DOCTYPE html>
<html lang="zh-CN">
<head>
<meta charset="UTF-8">
<title>原生JS图片轮播示例</title>
<style>
* { box-sizing: border-box; margin: 0; padding: 0; }
body { display: flex; justify-content: center; align-items: center; min-height: 100vh; background: #FAF7F1; }
.carousel {
position: relative;
width: 640px;
height: 360px;
overflow: hidden;
border-radius: 10px;
box-shadow: 0 8px 24px rgba(57, 73, 87, 0.15);
}
.carousel-track {
display: flex;
width: 100%;
height: 100%;
transition: transform 0.4s cubic-bezier(0.25, 1, 0.5, 1);
}
.carousel-slide {
flex: 0 0 100%;
width: 100%;
height: 100%;
display: flex;
align-items: center;
justify-content: center;
font-size: 28px;
color: #FAF7F1;
font-weight: bold;
}
/* 演示用色彩块 */
.slide-1 { background-color: #394957; }
.slide-2 { background-color: #485A6A; }
.slide-3 { background-color: #AD8B58; }
.slide-4 { background-color: #6C5B42; }
.arrow {
position: absolute;
top: 50%;
transform: translateY(-50%);
width: 44px;
height: 44px;
background: rgba(57, 73, 87, 0.7);
color: #FAF7F1;
border: none;
border-radius: 50%;
cursor: pointer;
font-size: 22px;
z-index: 10;
transition: background 0.2s;
}
.arrow:hover { background: #AD8B58; }
.arrow-prev { left: 16px; }
.arrow-next { right: 16px; }
.carousel-dots {
position: absolute;
bottom: 16px;
left: 50%;
transform: translateX(-50%);
display: flex;
gap: 10px;
z-index: 10;
}
.dot {
width: 12px;
height: 12px;
border-radius: 50%;
background: rgba(250, 247, 241, 0.45);
cursor: pointer;
transition: all 0.3s;
}
.dot.active {
width: 28px;
border-radius: 6px;
background: #FAF7F1;
}
</style>
</head>
<body>
<div class="carousel" id="carouselDemo">
<div class="carousel-track">
<div class="carousel-slide slide-1">第 1 张幻灯片</div>
<div class="carousel-slide slide-2">第 2 张幻灯片</div>
<div class="carousel-slide slide-3">第 3 张幻灯片</div>
<div class="carousel-slide slide-4">第 4 张幻灯片</div>
</div>
<button class="arrow arrow-prev" aria-label="上一张">❮</button>
<button class="arrow arrow-next" aria-label="下一张">❯</button>
<div class="carousel-dots">
<span class="dot active" data-index="0"></span>
<span class="dot" data-index="1"></span>
<span class="dot" data-index="2"></span>
<span class="dot" data-index="3"></span>
</div>
</div>
<script>
const track = document.querySelector('.carousel-track');
const slides = document.querySelectorAll('.carousel-slide');
const prevBtn = document.querySelector('.arrow-prev');
const nextBtn = document.querySelector('.arrow-next');
const dotsContainer = document.querySelector('.carousel-dots');
const dots = document.querySelectorAll('.carousel-dots .dot');
const carousel = document.getElementById('carouselDemo');
const total = slides.length;
let currentIndex = 0;
let timer = null;
// 统一渲染调度函数
function updateCarousel() {
track.style.transform = `translateX(-${currentIndex * 100}%)`;
dots.forEach((dot, idx) => {
dot.classList.toggle('active', idx === currentIndex);
});
}
// 左右箭头切换
nextBtn.addEventListener('click', () => {
currentIndex = (currentIndex + 1) % total;
updateCarousel();
resetAutoPlay();
});
prevBtn.addEventListener('click', () => {
currentIndex = (currentIndex - 1 + total) % total;
updateCarousel();
resetAutoPlay();
});
// 底部指示点事件委托
dotsContainer.addEventListener('click', (e) => {
if (e.target.classList.contains('dot')) {
const idx = parseInt(e.target.dataset.index, 10);
if (idx !== currentIndex) {
currentIndex = idx;
updateCarousel();
resetAutoPlay();
}
}
});
// 自动轮播与时钟重置
function startAutoPlay() {
timer = setInterval(() => {
currentIndex = (currentIndex + 1) % total;
updateCarousel();
}, 3000);
}
function stopAutoPlay() {
if (timer) clearInterval(timer);
}
function resetAutoPlay() {
stopAutoPlay();
startAutoPlay();
}
carousel.addEventListener('mouseenter', stopAutoPlay);
carousel.addEventListener('mouseleave', startAutoPlay);
// 初始化自动轮播
startAutoPlay();
</script>
</body>
</html>六、总结与要点回顾
实现图片轮播中左右箭头切换与底部指示点同步并不复杂,核心在于确立良好的架构思维:
- 单一数据源原则:永远只维护一个当前激活索引
currentIndex,箭头与指示点均为状态的改变者,而非样式的直接操纵者。 - 集中式渲染:通过
updateCarousel()将视口滑动与类名激活绑定在同一次调用中,杜绝因逻辑分散导致的界面不一致。 - 模运算处理边界:用
(currentIndex + 1) % total和(currentIndex - 1 + total) % total消除繁琐的边界if分支,兼顾严密性与代码整洁度。
只要牢牢把握这套“触发 → 改数据 → 统一刷视图”的状态驱动流,无论是后续需要扩展手势触摸滑动、渐隐淡入淡出动画,还是添加缩略图预览列表,都能在此基础之上轻松完成扩展。
实用工具推荐
电子包浆
使用 ›绿化、压缩、噪点和虚拟水印,自由调节做旧程度。
图片压缩
使用 ›选择画质和输出格式,预览压缩前后的大小。
作者最新文章
相关文章