

本文介绍如何使用原生JavaScript实现一个简易的聊天对话框,重点解决动态添加消息时的布局问题。通过ul/li列表结构管理消息项,并在每次插入新消息后手动清除浮动,确保对话气泡垂直排列。同时利用overflow-y属性为内容区域添加滚动条,支持多轮对话展示,界面简洁且易于后续美化。
简易聊天对话框实现思路
近期学习了几个JavaScript视频课程,其中一项作业是开发一个简易的聊天对话框。该实现未涉及Ajax技术,主要功能包括通过切换头像来模拟双方的对话交互。当前界面样式较为基础,后续可根据需求进行视觉优化。
在实现过程中,采用ul和li列表结构来动态添加聊天元素,这种方式更便于样式控制。需要注意的是,每次向列表中添加新的对话气泡后,必须清除浮动效果,否则会导致多个对话框错误地并排显示在同一行,破坏垂直布局。
具体实现代码如下:
核心代码与结构分析
<!DOCTYPE html>

<html>

<head>
<meta charset="utf-8">
<title>聊天对话框</title>
<style type="text/css">
#container{
width: 250px;
height: 350px;
border:1px solid #7b6b6b;
margin: 0 auto;
position: relative;

}

#content{
width: 250px;
height: 300px;
border-bottom: 1px solid #ccc;
overflow-y: auto;

}

#content ul{
margin: 0;
padding: 0;

}

#Img{
width: 30px;
height: 30px;
position: absolute;
left: 10px;
top: 310px;
border-radius: 15px;

}

#txt{
margin: 0;
position: absolute;
left: 50px;
top: 315px;
border-radius: 2px;
border:1px solid #ccc;
width: 133px;
height: 18px;

}

#btn{
margin-right: 10px;
position: absolute;
margin: 0;
left: 197px;
top: 314px;

}

#edit{
background: #ece7e766;
width: 250px;
height: 50px;

}

.showTxt{
width: auto;
height: auto;
max-width: 230px;
background: #008000a8;
border:0;
font-size: 15px;
color: white;
padding: 5px;
border-radius: 2px;
word-break: break-all;
list-style: none;
margin-top: 5px;
display: list-item;

}

.left{
text-align: left;
margin-left: 50px;
float: left;

}

.right{
text-align: right;
margin-right: 50px;
float: right;

}

.showImg{
width: 26px;
height: 26px;
border-radius: 13px;


}

.leftImg{
left: 10px;
position: absolute;

}

.rightImg{
right: 10px;
position: absolute;

}

#scroll{
position: relative;

}

</style>
</head>
<body>

<div id="container">
<div id="content">
<div id="scroll">
<ul id="save"></ul>
</div>
</div>

<div id="edit">
<img src="1.jpg" id="Img">
<input type="text" name="" id="txt">
<input type="button" name="" value="发送" id="btn">
</div>
</div>
<script type="text/javascript">

 //获取元素

var oCont=document.getElementById('content');
var oImg=document.getElementById('Img');
var oTxt=document.getElementById('txt');
var oBtn=document.getElementById('btn');
var oSTxt=document.getElementsByClassName('showTxt');
var oSave=document.getElementById('save');
var num=0;

 //切换头像
oImg.οnclick=function(){
num++;
if(num%2==0)
oImg.src='1.jpg';
else
oImg.src='2.jpg';

}

 //发送事件
oBtn.οnclick= function(){
addCon();

}

function addCon(){
//定义需要添加的元素
var newLi=document.createElement("li");
var newImg=document.createElement('img');
//判断聊天的对象是哪一方,文字框出现在左边还是右边
 if(num%2==0){
//添加对话框
newLi.innerHTML=oTxt.value;
newLi.className='showTxt right';
oSave.appendChild(newLi);
oTxt.value='';
 //添加头像
newImg.src=oImg.src;
newImg.className='showImg rightImg';
newLi.appendChild(newImg);

 //清除浮动
var div = document.createElement('div');
 div.style = 'clear:both';
 oSave.appendChild(div);
 }else{
 newLi.innerHTML=oTxt.value;
newLi.className='showTxt left';
oSave.appendChild(newLi);
oTxt.value='';
newImg.src=oImg.src;
newImg.className='showImg leftImg';
newLi.appendChild(newImg);
var div = document.createElement('div');
 div.style = 'clear:both';
 oSave.appendChild(div);

 }

}

</script>
</body>
</html>
页面最终显示效果如图所示:
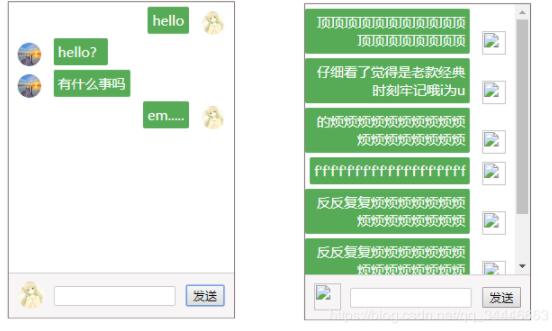
以上内容为本文的全部分享,希望能对读者的学习提供有益参考,同时也欢迎大家继续支持本站获取更多技术资源。