

本文详细介绍如何使用原生JavaScript实现鼠标框选功能。通过监听mousedown、mousemove和mouseup事件,结合定时器判断长按状态,动态创建可视化的选框元素。重点讲解了在限定容器内框选时的坐标偏移处理,以及如何通过比较DOM元素边界与选框位置来判定选中状态,适用于需要批量选择元素的交互场景。
框选功能概述
本文将探讨如何利用原生JavaScript开发一个基础的框选交互功能。
功能需求概述
- 当用户按下鼠标左键并移动时,屏幕上应出现一个矩形选框;
- 当用户松开鼠标左键时,系统需根据生成的矩形选框范围,统计并选中该区域内的DOM元素;
上述需求看似简单,但在实际实现中需考虑多种边界情况。例如,框选的范围并非整个document.body,而是限制在某个特定的div容器内。在实际开发场景中,这种受限容器内的框选更为常见。
如需查看完整代码实现,请点击此处查看完整的源码
核心实现步骤
具体实现方案
接下来直接进行代码编写。为了获得更好的浏览器兼容性,代码中避免使用ES6语法;若使用其他前端框架,需对代码进行相应调整。
<head>
<style>
.fileDiv {
 display: inline-block;
 width: 100px;
 height: 100px;
 margin: 24px;
 background-color: blue;
}
</style>
</head>
<body>
 <div class="fileDiv"></div>
 <div class="fileDiv"></div>
 <div class="fileDiv"></div>
 <div class="fileDiv"></div>
 <div class="fileDiv"></div>
 <div class="fileDiv"></div>
 <div class="fileDiv"></div>
 <div class="fileDiv"></div>
</body>
配置鼠标事件监听器
JavaScript原生事件模型中并没有直接提供“鼠标按下并停留”的事件。因此,我们需要检测鼠标左键的按下动作,并引入一个定时器来判断用户是否持续按住鼠标不放。
<script>
 (function () {
  // 定时器id
  var mouseStopId;
  // 是否开启框选功能
  var mouseOn = false;
  // 用来存放鼠标点击初始位置
  var startX = 0;
  var startY = 0;
  // 添加鼠标按下监听事件
  document.body.addEventListener('mousedown', function (e) {
   // 阻止事件冒泡
   clearEventBubble(e);
   // 判断是否为鼠标左键被按下
   if (e.buttons !== 1 || e.which !== 1) return;

   mouseStopId = setTimeout(function () {
    mouseOn = true;
    startX = e.clientX;
    startY = e.clientY;
   }, 300); // 间隔300毫秒后执行,判定这时候鼠标左键被按住不放
  });

  // 添加鼠标移动事件监听
  document.body.addEventListener('mousemove', function (e) {
   // 如果并非框选开启,退出
   if (!mouseOn) return;
   // 阻止事件冒泡
   clearEventBubble(e);
   // 处理鼠标移动
   // codes
  });

  // 添加鼠标点击松开事件监听
  document.body.addEventListener('mouseup', function (e) {
   // 阻止事件冒泡
   clearEventBubble(e);
   // 处理鼠标点击松开
   // codes
  });

  function clearEventBubble (e) {
   if (e.stopPropagation) e.stopPropagation();
   else e.cancelBubble = true;

   if (e.preventDefault) e.preventDefault();
   else e.returnValue = false;
  }
 })();
</script>
创建框选可视化元素
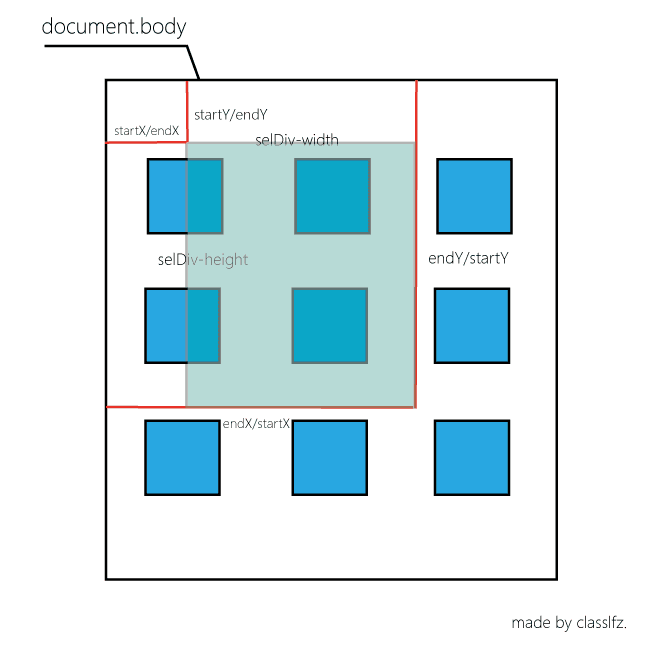
框选可视化元素示意图
仅添加事件监听不足以提供良好的用户体验,我们需要创建一个跟随鼠标移动的矩形选框元素,以便用户实时感知当前的框选范围。
<script>
 (function () {
  var mouseStopId;
  var mouseOn = false;
  var startX = 0;
  var startY = 0;
  document.body.addEventListener('mousedown', function (e) {
   clearEventBubble(e);
   if (e.buttons !== 1 || e.which !== 1) return;

   mouseStopId = setTimeout(function () {
    mouseOn = true;
    startX = e.clientX;
    startY = e.clientY;
    // 创建一个框选元素
    var selDiv = document.createElement('div');
    // 给框选元素添加css样式,这里使用绝对定位
    selDiv.style.cssText = 'position:absolute;width:0;height:0;margin:0;padding:0;border:1px dashed #eee;background-color:#aaa;z-index:1000;opacity:0.6;display:none;';
    // 添加id
    selDiv.id = 'selectDiv';
    document.body.appendChild(selDiv);
    // 根据起始位置,添加定位
    selDiv.style.left = startX + 'px';
    selDiv.style.top = startY + 'px';
   }, 300);
  });

  document.body.addEventListener('mousemove', function (e) {
   if (!mouseOn) return;
   clearEventBubble(e);
   // 获取当前坐标
   var _x = e.clientX;
   var _y = e.clientY;
   // 根据坐标给选框修改样式
   var selDiv = document.getElementById('selectDiv');
   selDiv.style.display = 'block';
   selDiv.style.left = Math.min(_x, startX) + 'px';
   selDiv.style.top = Math.min(_y, startY) + 'px';
   selDiv.style.width = Math.abs(_x - startX) + 'px';
   selDiv.style.height = Math.abs(_y - startY) + 'px';
   // 如果需要更直观一点的话,我们还可以在这里进行对框选元素覆盖到的元素进行修改被框选样式的修改。
  });

  document.body.addEventListener('mouseup', function (e) {
   clearEventBubble(e);
  });

  function clearEventBubble (e) {
   if (e.stopPropagation) e.stopPropagation();
   else e.cancelBubble = true;

   if (e.preventDefault) e.preventDefault();
   else e.returnValue = false;
  }
 })();
</script>
配置鼠标松开事件监听器
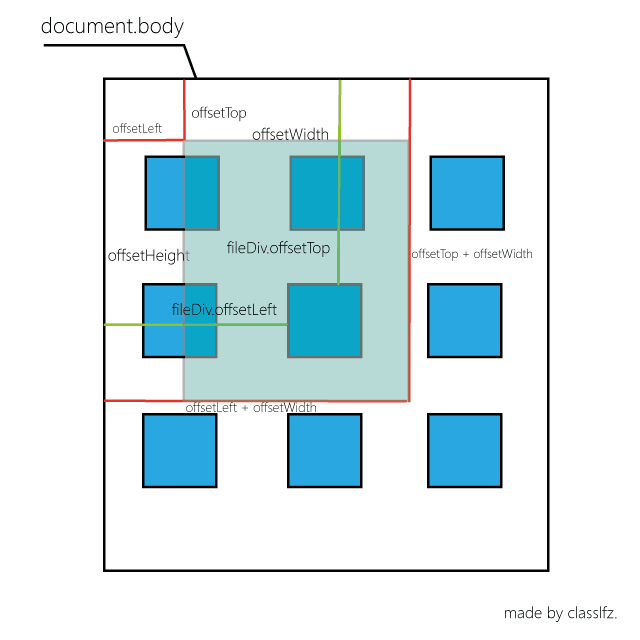
元素是否被选中示意图
如果在鼠标移动过程中需要实时统计被框选的DOM元素,或实时修改选中元素的样式以提供更精准的视觉反馈,可以在mousemove事件中执行以下逻辑:
<script>
 (function () {
  var mouseStopId;
  var mouseOn = false;
  var startX = 0;
  var startY = 0;
  document.onmousedown = function (e) {
   clearEventBubble(e);
   if (e.buttons !== 1 || e.which !== 1) return;

   mouseStopId = setTimeout(function () {
    mouseOn = true;
    startX = e.clientX;
    startY = e.clientY;
    var selDiv = document.createElement('div');
    selDiv.style.cssText = 'position:absolute;width:0;height:0;margin:0;padding:0;border:1px dashed #eee;background-color:#aaa;z-index:1000;opacity:0.6;display:none;';
    selDiv.id = 'selectDiv';
    document.body.appendChild(selDiv);
    selDiv.style.left = startX + 'px';
    selDiv.style.top = startY + 'px';
   }, 300);
  }

  document.onmousemove = function (e) {
   if (!mouseOn) return;
   clearEventBubble(e);
   var _x = e.clientX;
   var _y = e.clientY;
   var selDiv = document.getElementById('selectDiv');
   selDiv.style.display = 'block';
   selDiv.style.left = Math.min(_x, startX) + 'px';
   selDiv.style.top = Math.min(_y, startY) + 'px';
   selDiv.style.width = Math.abs(_x - startX) + 'px';
   selDiv.style.height = Math.abs(_y - startY) + 'px';
  };

  // 添加鼠标松开事件监听
  document.onmouseup = function (e) {
   if (!mouseOn) return;
   clearEventBubble(e);
   var selDiv = document.getElementById('selectDiv');
   var fileDivs = document.getElementsByClassName('fileDiv');
   var selectedEls = [];
   // 获取参数
   var l = selDiv.offsetLeft;
   var t = selDiv.offsetTop;
   var w = selDiv.offsetWidth;
   var h = selDiv.offsetHeight;
   for (var i = 0; i < fileDivs.length; i++) {
    var sl = fileDivs[i].offsetWidth + fileDivs[i].offsetLeft;
    var st = fileDivs[i].offsetHeight + fileDivs[i].offsetTop;

    if (sl > l && st > t && fileDivs[i].offsetLeft < l + w && fileDivs[i].offsetTop < t + h) {
     // 该DOM元素被选中,进行处理
     selectedEls.push(fileDivs[i]);
    }
   }
   // 打印被选中DOM元素
   console.log(selectedEls);
   // 恢复参数
   selDiv.style.display = 'none';
   mouseOn = false;
  };

  function clearEventBubble (e) {
   if (e.stopPropagation) e.stopPropagation();
   else e.cancelBubble = true;

   if (e.preventDefault) e.preventDefault();
   else e.returnValue = false;
  }
 })();
</script>
判断元素是否被选中的核心条件如下:
- 该DOM元素的最右侧坐标(fileDiv[i].offsetLeft + fileDiv[i].offsetWidth)必须大于选框元素的最左侧坐标(selDiv.offsetLeft);
- 该DOM元素的最下侧坐标(fileDiv[i].offsetTop + fileDiv[i].offsetHeight)必须大于选框元素的最上侧坐标(selDiv.offsetTop);
- 该DOM元素的最左侧坐标(fileDiv[i].offsetLeft)必须小于选框元素的最右侧坐标(selDiv.offsetLeft + selDiv.offsetWidth);
- 该DOM元素的最上侧坐标(fileDiv[i].offsetTop)必须小于选框元素的最下侧坐标(selDiv.offsetTop + selDiv.offsetHeight);
只有同时满足上述四个几何条件,才能判定该DOM元素处于被选中状态。
容器内框选与框架适配
实际应用场景
前文示例较为简化。在实际开发中,框选范围通常限定在具有特定宽高限制的容器内。此时,必须考虑容器定位带来的坐标偏差,以及容器内元素过多导致滚动条出现的情况。
面对上述复杂情况,直接处理容易混乱。本文采用的方法是修改坐标系原点:此前以document.body左上角为原点,现在需将原点修改为框选容器的左上角顶点。
具体而言,在mousedown和mousemove事件中,初始坐标需由原来的e.clientX和e.clientY,调整为e.clientX - selectContainer.offsetLeft + selectContainer.scrollLeft和e.clientY - selectContainer.offsetTop + selectContainer.scrollTop,以消除容器偏移影响。
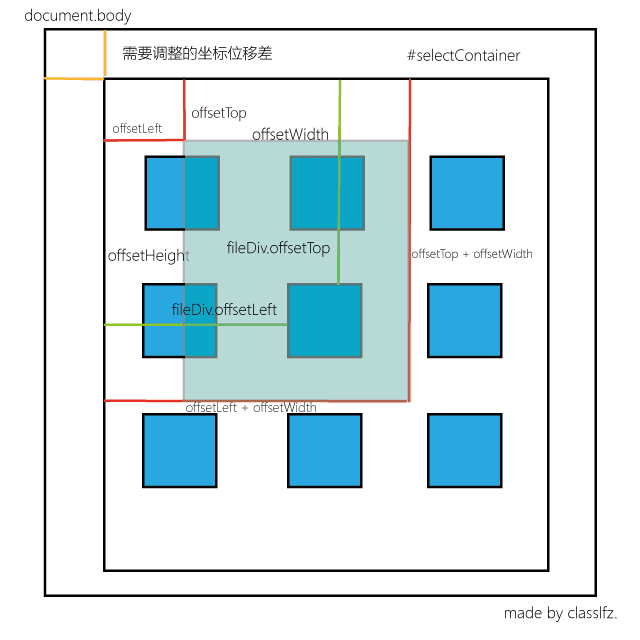
坐标更改示意图
<html>
 <head>
  <title>region</title>
  <style>
   body {
    margin: 0;
    padding: 0;
   }
   #selectContainer {
    position: relative;
    width: 400px; /* 演示宽高与位置 */
    height: 400px;
    top: 200px;
    left: 200px;
    border: 1px solid #eee;
    overflow: hidden;
    overflow-y: auto;
   }
   .fileDiv {
    display: inline-block;
    width: 100px;
    height: 100px;
    margin: 24px;
    background-color: #0082CC;
   }
  </style>
 </head>
 <body>
  <div id="selectContainer">
   <div class="fileDiv"></div>
   <div class="fileDiv"></div>
   <div class="fileDiv"></div>
   <div class="fileDiv"></div>
   <div class="fileDiv"></div>
   <div class="fileDiv"></div>
   <div class="fileDiv"></div>
   <div class="fileDiv"></div>
   <div class="fileDiv"></div>
   <div class="fileDiv"></div>
   <div class="fileDiv"></div>
   <div class="fileDiv"></div>
   <div class="fileDiv"></div>
   <div class="fileDiv"></div>
  </div>
 </body>
</html>
<script>
 (function () {
  var mouseStopId;
  var mouseOn = false;
  var startX = 0;
  var startY = 0;
  document.onmousedown = function (e) {
   clearEventBubble(e);
   if (e.buttons !== 1 || e.which !== 1) return;

   mouseStopId = setTimeout(function () {
    mouseOn = true;
    // 获取容器元素
    var selectContainer = document.getElementById('selectContainer');
    // 调整坐标原点为容器左上角
    startX = e.clientX - selectContainer.offsetLeft + selectContainer.scrollLeft;
    startY = e.clientY - selectContainer.offsetTop + selectContainer.scrollTop;
    var selDiv = document.createElement('div');
    selDiv.style.cssText = 'position:absolute;width:0;height:0;margin:0;padding:0;border:1px dashed #eee;background-color:#aaa;z-index:1000;opacity:0.6;display:none;';
    selDiv.id = 'selectDiv';
    // 添加框选元素到容器内
    document.getElementById('selectContainer').appendChild(selDiv);
    selDiv.style.left = startX + 'px';
    selDiv.style.top = startY + 'px';
   }, 300);
  }

  document.onmousemove = function (e) {
   if (!mouseOn) return;
   clearEventBubble(e);
   var selectContainer = document.getElementById('selectContainer');
   var _x = e.clientX - selectContainer.offsetLeft + selectContainer.scrollLeft;
   var _y = e.clientY - selectContainer.offsetTop + selectContainer.scrollTop;
   var _H = selectContainer.clientHeight;
   // 鼠标移动超出容器内部,进行相应的处理
   // 向下拖拽
   if (_y >= _H && selectContainer.scrollTop <= _H) {
    selectContainer.scrollTop += _y - _H;
   }
   // 向上拖拽
   if (e.clientY <= selectContainer.offsetTop && selectContainer.scrollTop > 0) {
    selectContainer.scrollTop = Math.abs(e.clientY - selectContainer.offsetTop);
   }
   var selDiv = document.getElementById('selectDiv');
   selDiv.style.display = 'block';
   selDiv.style.left = Math.min(_x, startX) + 'px';
   selDiv.style.top = Math.min(_y, startY) + 'px';
   selDiv.style.width = Math.abs(_x - startX) + 'px';
   selDiv.style.height = Math.abs(_y - startY) + 'px';
  };

  document.onmouseup = function (e) {
   if (!mouseOn) return;
   clearEventBubble(e);
   var selDiv = document.getElementById('selectDiv');
   var fileDivs = document.getElementsByClassName('fileDiv');
   var selectedEls = [];
   var l = selDiv.offsetLeft;
   var t = selDiv.offsetTop;
   var w = selDiv.offsetWidth;
   var h = selDiv.offsetHeight;
   for (var i = 0; i < fileDivs.length; i++) {
    var sl = fileDivs[i].offsetWidth + fileDivs[i].offsetLeft;
    var st = fileDivs[i].offsetHeight + fileDivs[i].offsetTop;

    if (sl > l && st > t && fileDivs[i].offsetLeft < l + w && fileDivs[i].offsetTop < t + h) {
     selectedEls.push(fileDivs[i]);
    }
   }
   console.log(selectedEls);
   selDiv.style.display = 'none';
   mouseOn = false;
  };

  function clearEventBubble (e) {
   if (e.stopPropagation) e.stopPropagation();
   else e.cancelBubble = true;

   if (e.preventDefault) e.preventDefault();
   else e.returnValue = false;
  }
 })();
</script>
结合前端框架的使用
前文代码仅在单个HTML文件中实现了框选功能。在实际工程中,常使用Vue.js、Angular、React或Polymer等前端框架。此时,可利用框架的生命周期函数添加监听事件,并在mouseup事件中移除监听,以减少资源消耗。此外,组件化开发中,被框选元素往往是可复用的小组件,需通过框架提供的特定途径获取DOM元素及其属性。
以上内容为本文的全部讲解,希望能为您的学习提供有益帮助,也欢迎大家继续支持本站。