

本文介绍如何利用 jQuery、xlsx.js 和 ECharts 三个插件,在浏览器端实现 Excel 文件的读取与解析。通过 FileReader 异步读取文件内容,使用 XLSX.utils.sheet_to_json 将数据转换为 JSON 格式,最终结合 ECharts 配置项动态生成柱状图或折线图,完成从文件导入到可视化展示的全流程。
功能效果展示
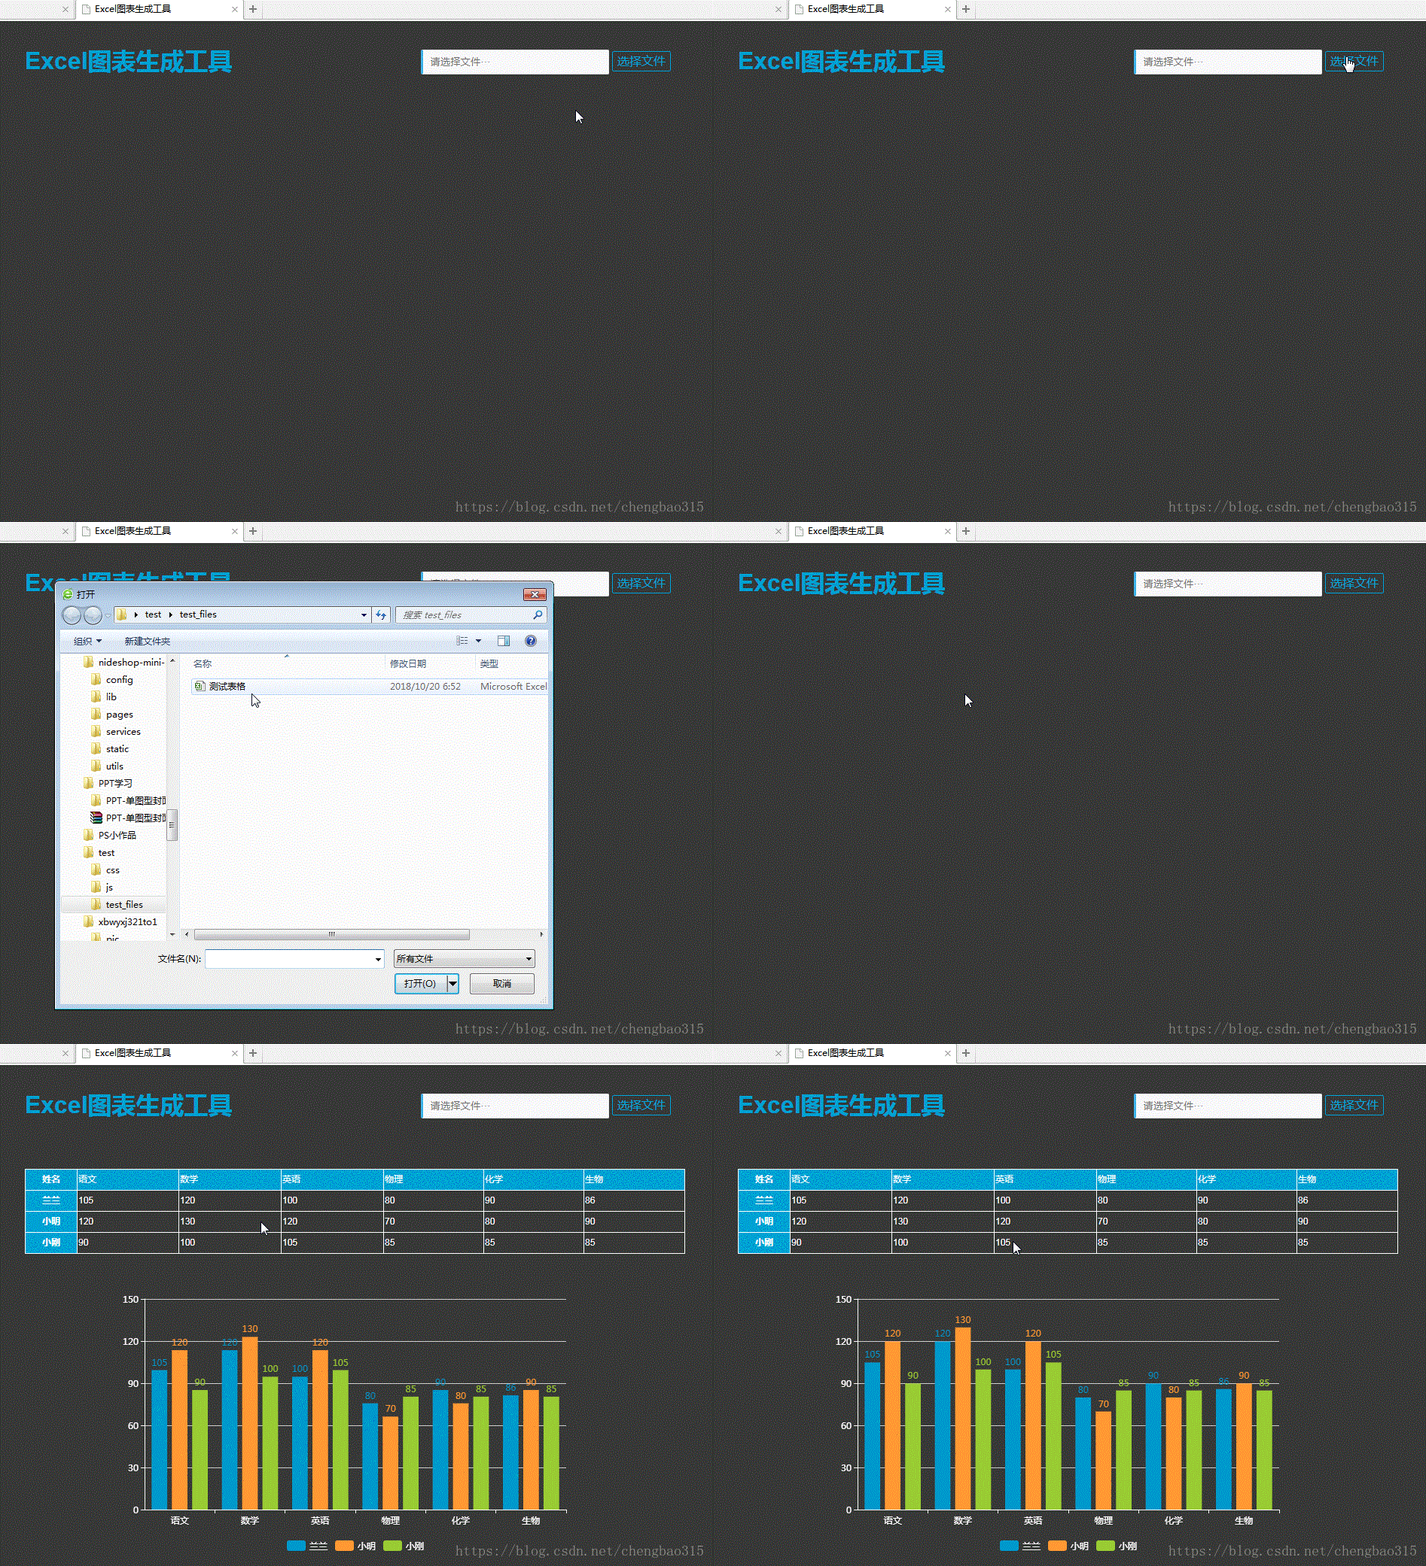
此前曾开发过基于 JS 的图表显示功能,本次在此基础上增加了 Excel 文件导入模块,最终实现的效果如下所示:
环境准备与文件结构
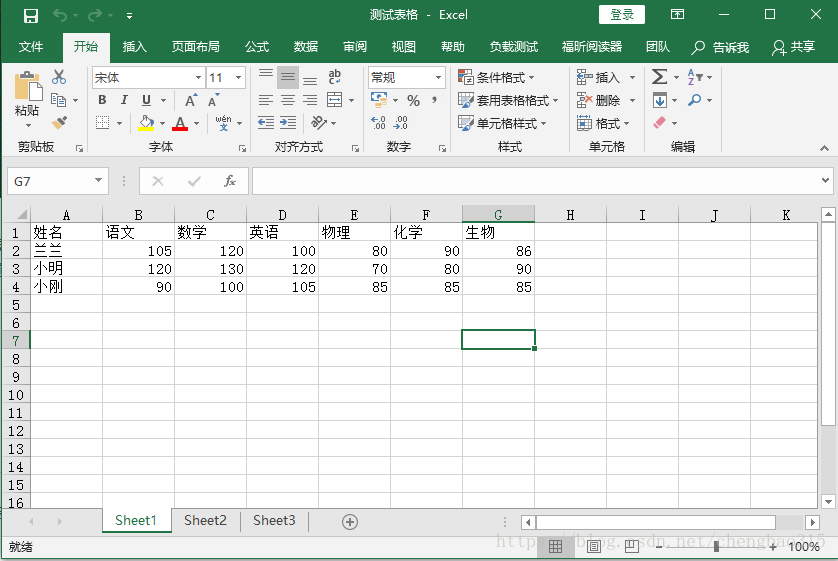
若对上述效果感兴趣,请继续阅读。本方案依赖三个核心插件:jquery.js、xlsx.js 以及 echarts.js,请提前下载备用。随后需创建 demo.html、demo.js 及 style.css 三个文件,并准备一个用于测试的 Excel 文件,示例文件格式如下:
首先查看 HTML 结构,主要包含引入必要的 JS 文件以及使用 div 进行基础布局,具体代码如下:
HTML 布局与文件选择器美化
<head>
 <meta charset="UTF-8">
 <meta name="viewport" content="width=device-width, initial-scale=1.0">
 <meta http-equiv="X-UA-Compatible" content="ie=edge">
 <title>Excel图表生成工具</title>
 <link rel="stylesheet" href="css/style.css">
 <script src="js/jquery.min.js"></script>
 <script src="js/xlsx.full.min.js"></script>
 <script src="js/echarts.min.js"></script>
 <script src="js/demo.js"></script>
</head>
<body>
 <div class="barner">
  <div class="left">
   <h1>Excel图表生成工具</h1>
  </div>
  <div class="right">
   <input id="select_text" type="text" placeholder="请选择文件···" readonly />
   <input id="select_file" type="file" />
   <a id="select_btn" href="javascript:void(0);">选择文件</a>
  </div>
 </div>
 <div class="content">
  <div id="table"></div>
  <div id="chart" style="width: 700px; height: 400px;"></div>
 </div>
</body>
此处需特别说明文件选择“input”标签的美化处理。在 CSS 样式中将该原生 input 隐藏,转而使用一个“a”链接标签模拟按钮点击效果,具体的交互逻辑将在后续的 JS 代码中实现。
接下来分析 JS 逻辑。当“a”标签被点击时,会触发隐藏的“input”标签的点击事件,随后获取并显示文件路径,最后调用导入 Excel 的核心方法:
JavaScript 交互逻辑
$(document).ready(function () {
 $('#select_btn').click(function () {
  $('#select_file').trigger('click');
 })
 $('#select_file').change(function () {
		$('#select_text').val($('#select_file').val());
  importf(this);
 })
})
随后实现 Excel 导入的具体逻辑。定义变量 wb 用于存储读取后的 Excel 文档数据。读取过程由 xlsx.js 插件完成,此处直接采用官方 Demo 中的标准写法,重点在于理解调用方式,最终通过 XLSX.utils.sheet_to_json() 方法将工作表数据转换为 JSON 格式。
获得 JSON 数据后,即可使用原生 JS 语法进行操作,从而得到一个类似 Excel 表格结构的 data 数组,代码实现如下:
Excel 数据读取与解析
var wb;//读取完成的数据
var rABS = false; //是否将文件读取为二进制字符串
function importf(obj) {//导入
 if (!obj.files) {
  return;
 }
 var f = obj.files[0];
 var reader = new FileReader();
 reader.onload = function (e) {
  var data = e.target.result;
  if (rABS) {
   wb = XLSX.read(btoa(fixdata(data)), {//手动转化
    type: 'base64'
   });
  } else {
   wb = XLSX.read(data, {
    type: 'binary'
   });
  }
  // 获取 EXCEL json数据
  var jsondata = XLSX.utils.sheet_to_json(wb.Sheets[wb.SheetNames[0]]);
  var column = [];
  var data = [column];
  for (var key in jsondata[0]) {
   data[0].push(key);
  }
  for (var i = 0; i < jsondata.length; i++) {
   var row = [];
   data.push(row);
   for (var key in jsondata[i]) {
    data[i + 1].push(jsondata[i][key]);
   }
  }
  // 显示EXCEL 表格
  creattable(data);
  // 显示数据表
  getMultiBarChart(data);
 };
 if (rABS) {
  reader.readAsArrayBuffer(f);
 } else {
  reader.readAsBinaryString(f);
 }
}
function fixdata(data) { //文件流转BinaryString
 var o = "",
  l = 0,
  w = 10240;
 for (; l < data.byteLength / w; ++l) o += String.fromCharCode.apply(null, new Uint8Array(data.slice(l * w, l * w + w)));
 o += String.fromCharCode.apply(null, new Uint8Array(data.slice(l * w)));
 return o;
}
关于表格展示部分,采用“table”标签进行渲染。代码中通过遍历 data 数组生成 HTML 字符串,最后将其插入到对应的 div 容器中。为了区分表头样式,需为特定单元格添加 id 属性,并在 CSS 中定义相应样式,代码如下:
动态表格生成
function creattable(data) {
 var _html = " <table>";
 for (var i = 0; i < data.length; i++) {
  _html += "<tr>";
  _html += "<th>" + data[i][0] + "</th>";
  for (var j = 1; j < data[i].length; j++) {
			if(i == 0){
				 _html += "<td id='column'>" + data[i][j] + "</td>";
				}
				else
				{
   _html += "<td>" + data[i][j] + "</td>";
				}
  }
  _html += "</tr>";
 }
 _html += "</table>";
 $('#table').append(_html);
}
图表功能的实现依赖于 echart.js 插件。ECharts 官网提供了详尽的设计文档及大量示例,核心工作在于理解各配置属性的含义并调用相应方法。具体实现细节请参考以下代码:
ECharts 图表配置与渲染
getMultiBarChart = function (datatable) {
 var colors = ['#0099CC', '#FF9933', '#99CC33', '#393939', '#f50001', '#fad797', '#59ccf7', '#c3b4df'];
 var myChart = echarts.init(document.getElementById('chart'));
 var option = {
  legend: { bottom: "bottom" ,textStyle:{
			color: '#fff'
			}},
  dataset: {
   source: datatable
  },
  xAxis: [
   { type: 'category', gridIndex: 0,
			axisLine:{
			lineStyle:{
				color: '#fff'
			}}}
  ],
  yAxis: [
   { gridIndex: 0,axisLine:{
			lineStyle:{
				color: '#fff'
			}}}
  ],
  series: []
 };
 for (var i = 0; i < datatable.length - 1; i++) {
  option.series[i] = {
   type: 'bar', seriesLayoutBy: 'row',
   label: {
    normal: {
     show: true,
     position: 'top'
    }
   },
   itemStyle: {
    normal: {
     color: colors[i],
    }
   },
  };
 }
 // 使用刚指定的配置项和数据显示图表。
 myChart.setOption(option);
}
至此,导入 Excel 文件并生成图表的功能已全部实现。关于 CSS 界面样式的设计,可参考下方代码,但界面友好性取决于前端工程师的个人审美与实现思路。
body {
 background-color: #383838;
 font-family: Arial, sans-serif;
 line-height: 1.5;
 color: #464646;
}
.barner {
 margin:0 auto;
 height: 80px;
 width: 70%;
 max-width:1100px;
}
.left{
 float: left;
 color: #00A2D4;
}
.right{
 float: left;
 margin: 30px 0 0 250px;
}
#select_text {
 padding:3px 6px;
 padding-left:10px;
 border:1px solid #E7EAEC;
 width:230px;
 height:25px;
 line-height:25px;
 border-left:3px solid #3FB7EB;
 background:#FAFAFB;
 border-radius:2px;
}
#select_file{
 border:0px;display:none;
}
#select_btn{
 color:#00A2D4;
 padding:4px 6px;
 border:1px solid #00A2D4;
 border-radius:2px;
 text-decoration: none;
}
.content {
 margin:50px auto;
 height: 80px;
 width: 70%;
 max-width:1100px;
}
table
{
 border-collapse :collapse ;
 margin:0 auto;
}
th
{
 width:100px;
 height:25px;
 border :1px solid white;
 font-size:12px;
 text-align :center;
 color: white;
 background-color: #00A2D4;
}
td
{
 width:200px;
 border :1px solid white;
 color: white;
 font-size:12px;
 text-align :left;
}
#column
{
	background-color: #00A2D4;
}
#chart
{
 border-collapse :collapse ;
 margin:0 auto;
}
总结
总结
以上即为基于 JavaScript 实现 Excel 导入并生成图表的完整教程,希望能对读者有所帮助。如有任何疑问,欢迎留言交流,小编会及时回复。感谢大家对本站的支持!