

本文详细介绍如何使用JavaScript结合Dynamsoft Document Viewer库,在Web应用中实现将多张图片合并为单个PDF文件的功能。内容涵盖从HTML模板搭建、依赖引入、文件选择交互,到核心代码实现(包括许可证初始化、文档创建、Blob加载及PDF导出下载)的完整步骤,并附带编辑界面的使用指南。
介绍
在工作场景中,经常需要将拍摄的照片整合进PDF文档。虽然市面上有多种工具可用,但借助Dynamsoft Document Viewer,这一流程可以在浏览器端直接完成,从而轻松集成至各类在线平台或CRM系统中。
本文将演示如何基于Dynamsoft Document Viewer构建Web应用,并通过JavaScript代码实现图像到PDF的合并处理。
新建HTML文件
首先,创建一个包含基础结构的HTML文件。
<!DOCTYPE html>
<html>
<head>
  <title>Document Scanner</title>
  <meta name="viewport" content="width=device-width,initial-scale=1.0,maximum-scale=1.0,user-scalable=0" />
  <style>
  </style>
</head>
<body>
  <h2>Merge Images into PDF</h2>
  <script>
  </script>
</body>
</html>
添加依赖项
在页面中引入Dynamsoft Document Viewer的相关资源。
<script src="https://cdn.jsdelivr.net/npm/dynamsoft-document-viewer@1.1.0/dist/ddv.js"></script>
<link rel="stylesheet" href="https://cdn.jsdelivr.net/npm/dynamsoft-document-viewer@1.1.0/dist/ddv.css" rel="external nofollow" >
选择文件
接下来,需要实现文件选择功能,以便用户选取待合并的图片。
在HTML中增加一个用于多选文件的input元素。
<input type="file" name="file" id="file" multiple="multiple">
随后,通过以下JavaScript代码获取用户选中的文件列表:
let fileInput = document.getElementById("file");
let files = fileInput.files;
将图像合并为PDF
在页面中增加一个按钮,用于触发图像合并为PDF的操作。
HTML:
<button onclick="merge()">Merge into PDF</button>
JavaScript:
首先使用许可证初始化Dynamsoft Document Viewer,如需获取许可证可访问官方申请页面。
Dynamsoft.DDV.Core.license = "DLS2eyJoYW5kc2hha2VDb2RlIjoiMjAwMDAxLTE2NDk4Mjk3OTI2MzUiLCJvcmdhbml6YXRpb25JRCI6IjIwMDAwMSIsInNlc3Npb25QYXNzd29yZCI6IndTcGR6Vm05WDJrcEQ5YUoifQ=="; // Public trial license which is valid for 24 hours
Dynamsoft.DDV.Core.engineResourcePath = "https://cdn.jsdelivr.net/npm/dynamsoft-document-viewer@1.1.0/dist/engine";// Lead to a folder containing the distributed WASM files
await Dynamsoft.DDV.Core.loadWasm();
await Dynamsoft.DDV.Core.init();
Dynamsoft.DDV.setProcessingHandler("imageFilter", new Dynamsoft.DDV.ImageFilter());
利用Dynamsoft Document Viewer提供的DocumentManager来创建一个新的文档实例。
const doc = Dynamsoft.DDV.documentManager.createDocument();
以blob格式读取选中的文件,并将其加载到创建的文档中。
let fileInput = document.getElementById("file");
let files = fileInput.files;
for (let index = 0; index < files.length; index++) {
  const file = files[index];
  const source = await readFileAsBlob(file);
  try {
    await doc.loadSource(source);
  } catch (error) {
    console.log(error);
  }
}

function readFileAsBlob(file){
  return new Promise((resolve, reject) => {
    let fileReader = new FileReader();
    fileReader.onload = function(e){
      const blob = new Blob([new Uint8Array(e.target.result)], {type: file.type });
      resolve(blob);
    };
    fileReader.onerror = function () {
      reject();
    };
    fileReader.readAsArrayBuffer(file);
  })
}
将包含图像的文档保存为PDF格式。
const blob = await doc.saveToPdf();
通过以下函数实现PDF文件的下载功能。
function downloadBlob(blob){
  const link = document.createElement('a')
  link.href = URL.createObjectURL(blob);
  link.download = "scanned.pdf";
  document.body.appendChild(link)
  link.click()
  document.body.removeChild(link)
  URL.revokeObjectURL(link.href);
}
使用编辑界面
Dynamsoft Document Viewer提供了丰富的组件集。在合并生成PDF之前,可以利用其EditViewer组件对图像进行预览和编辑处理。
在HTML结构中增加一个容器元素。
<div id="container" style="height:480px;"></div>
使用以下代码启动编辑视图。
let editViewer = new Dynamsoft.DDV.EditViewer({
  container: "container",
});
editViewer.openDocument(doc.uid);
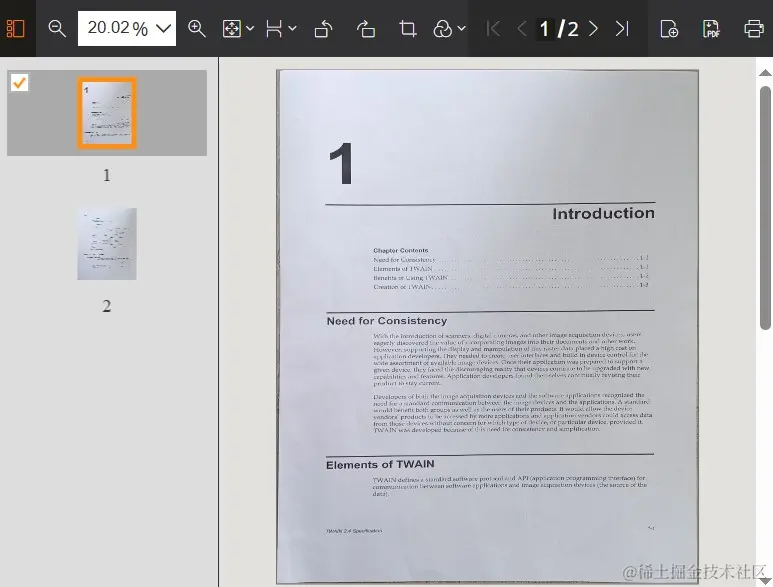
此时,用户可以对图像执行旋转、裁剪、重新排序、删除以及应用滤镜等操作。
以上就是使用JavaScript将图片合并为PDF的实现的详细内容,更多关于JavaScript图片合并为PDF的资料请关注本站其它相关文章!