

本文深入解析JavaScript生成器函数Generator在异步编程中的应用。从回调函数和Promise的局限性出发,介绍Generator的基本语法、next方法执行流程、参数传递及异常处理机制,并展示如何利用Generator实现类似async/await的异步控制流及自定义迭代器。
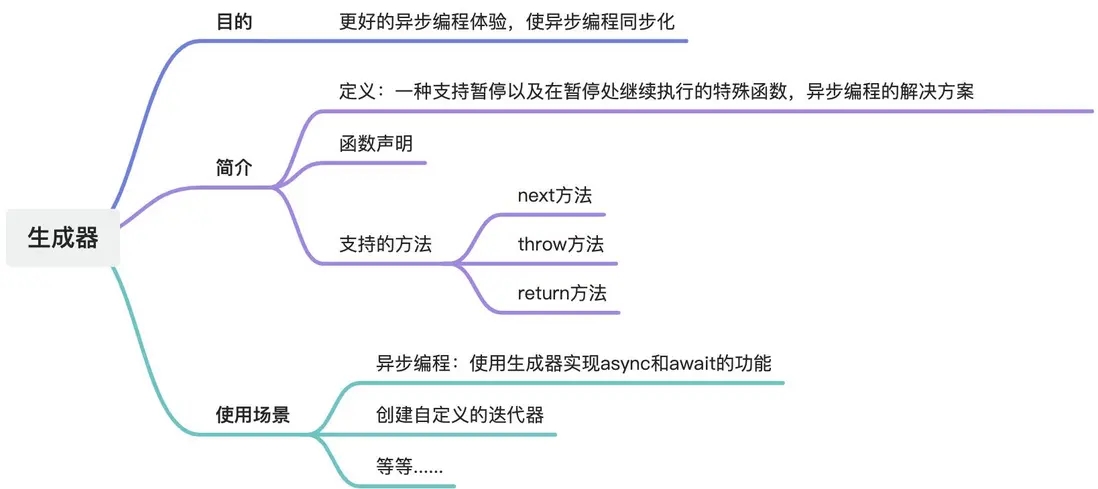
为什么使用Generator?
在JavaScript异步编程尚未引入async和await之前,开发者主要依赖回调函数和Promise来处理异步逻辑。
回调函数
回调函数的核心思想是将待执行的操作封装为函数,并将其作为参数传递给其他函数。当特定条件满足时,再由接收方调用该函数以完成操作。
// 需在浏览器中运行
function loadImage(imgUrl, callback) {
  const img = document.createElement("img");
  img.onload = function () {
    callback(this);
  };
  img.src = imgUrl;
}
loadImage(
  "https://travel.12306.cn/imgs/resources/uploadfiles/images/1716878f-79a2-4db1-af8c-b9c2039f0b3c_product_W572_H370.jpg",
  (img) => {
    document.body.appendChild(img);
    loadImage(
      "https://travel.12306.cn/imgs/resources/uploadfiles/images/8b36f9a7-f780-4e71-b719-9300109a9ff2_product_W572_H370.jpg",
      (img) => {
        document.body.appendChild(img);
        loadImage(
          "https://travel.12306.cn/imgs/resources/uploadfiles/images/6d77d0ea-53d0-4518-b7e9-e53795b4920c_product_W572_H370.jpg",
          (img) => {
            document.body.appendChild(img);
          }
        );
      }
    );
  }
);
Promise
Promise的引入旨在解决回调函数嵌套过深导致的“回调地狱”问题。
function loadImage(imgUrl) {
  return new Promise((resolve) => {
    const img = document.createElement("img");
    img.onload = function () {
      resolve(this);
    };
    img.src = imgUrl;
  });
}
loadImage(
  "https://travel.12306.cn/imgs/resources/uploadfiles/images/1716878f-79a2-4db1-af8c-b9c2039f0b3c_product_W572_H370.jpg"
)
  .then((img) => {
    document.body.appendChild(img);
    return loadImage(
      "https://travel.12306.cn/imgs/resources/uploadfiles/images/8b36f9a7-f780-4e71-b719-9300109a9ff2_product_W572_H370.jpg"
    );
  })
  .then((img) => {
    document.body.appendChild(img);
    return loadImage(
      "https://travel.12306.cn/imgs/resources/uploadfiles/images/6d77d0ea-53d0-4518-b7e9-e53795b4920c_product_W572_H370.jpg"
    );
  })
  .then((img) => {
    document.body.appendChild(img);
  });
尽管Promise使异步任务的执行步骤更加清晰,但其语法复杂度仍高于后来的async/await。在async/await正式推出前,社区已利用生成器函数模拟实现了类似async/await的功能,这表明生成器函数从诞生之初便服务于异步编程场景。
使用方式
创建方式
function* getValue() {
  yield 1;
  yield 2;
  return 3;
}
const generator = getValue() // 获取到生成器
console.log(Object.prototype.toString.call(generator)); // [object Generator]
next方法
获取返回值
生成器函数的调用方式与普通函数截然不同。调用生成器函数仅会返回一个生成器对象,而不会立即执行函数体内的代码。
那么需要怎样操作才能让生成器内部的代码执行?
生成器对象提供了一个next方法。调用该方法时,函数会执行至第一个yield语句并返回其后的值,随后暂停执行。再次调用next方法,函数将从上次暂停处继续执行,直到遇到下一个yield语句或函数结束。
next()方法返回的对象包含两个属性:
- value:返回的值,也就是yield关键字后面的值。
done:表示生成器函数是否已经完成,true表示已经完成,false表示未完成。
function* getValue() {
yield 1;
yield 2;
yield 3;
}
const generator = getValue();
console.log(generator.next()); // { value: 1, done: false }
console.log(generator.next()); // { value: 2, done: false }
console.log(generator.next()); // { value: 3, done: false }
console.log(generator.next()); // { value: undefined, done: true }
当生成器内最后的yield语句执行完毕后,意味着整个生成器函数执行完毕,调用next()方法产出的结果中done的值为true了。
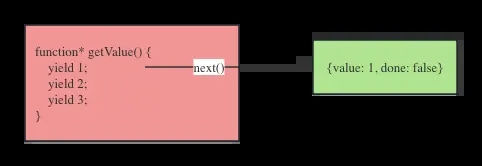
简单用图片演示下运行流程:
第一次调用next()方法,生成器函数会暂停在第一个yield语句
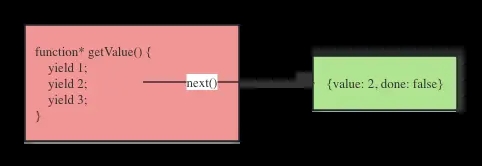
再次调用next()方法,生成器函数会暂停在第二个yield语句
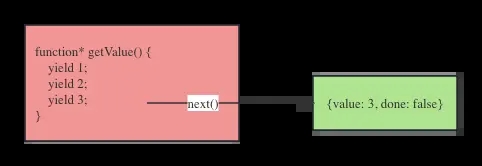
再次调用next()方法,生成器函数会暂停在第三个yield语句
再次调用next()方法,生成器函数执行完毕
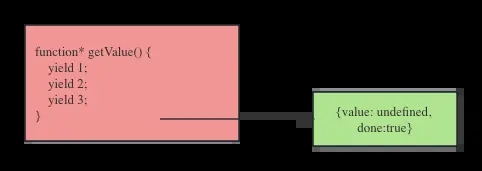
这里返回的value为什么是undefined,其实可以这么理解,因为在JavaScript中,函数不主动return,那么会默认返回undefined。
function* getValue() {
  yield 1;
  yield 2;
  yield 3;
  return undefined;
}
如果生成器函数中有return语句,那么在执行return语句的时候就会把生成器的状态置为已完成,后面的yield语句将不再被执行,这点和普通函数是保持一致的。
function* getValue() {
  yield 1;
  yield 2;
  return 3;
}
const generator = getValue();
console.log(generator.next()); // { value: 1, done: false }
console.log(generator.next()); // { value: 2, done: false }
console.log(generator.next()); // { value: 3, done: true }
传递参数
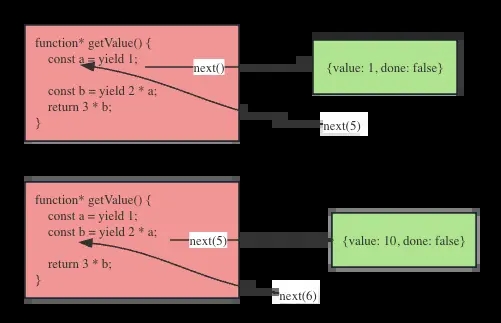
next函数其实也可以传递参数,这个参数将被yield语句消费。
function* getValue() {
  const a = yield 1;
  const b = yield 2 * a;
  return 3 * b;
}

const generator = getValue();

console.log(generator.next()); // { value: 1, done: false }
console.log(generator.next(5)); // { value: 10, done: false }
console.log(generator.next(6)); // { value: 18, done: true }
还是使用图片来演示整个流程。
- 首先调用next(),语句在第一个yield语句处暂停
- 然后调用next(5),参数5会传递给yield语句等号左边的变量a,语句会停在第二个yield语句处
- 然后调用next(6),参数6会传递给yield语句等号左边的变量b,碰到return语句直接返回,整个生成器函数执行完毕。
throw函数
next函数可以往生成器里面传递函数,而throw方法可以往生成器函数里面抛出异常,如果没有在生成器函数里面捕获异常,那么生成器函数会向其它函数一样抛出异常。
function* getValue() {
  yield 1;
  try {
    yield 2;
  } catch (error) {
    console.error(error); // 捕获异常, 打印 trhow error
  }
  yield 3;
}

const generator = getValue();

console.log(generator.next()); // { value: 1, done: false }
console.log(generator.next(5)); // { value: 2, done: false }
console.log(generator.throw("throw error")); // {value: 3, done: false}
return函数
reutrn函数在被调用后,生成器函数会直接返回return函数传递的值,而且生成器函数整个函数执行完毕。
function* getValue() {
  yield 1;
  yield 2;
  yield 3;
}
const generator = getValue();
console.log(generator.next()); // { value: 1, done: false }
console.log(generator.return(5)); // { value: 5, done: true } // 此时生成器函数执行完毕
console.log(generator.next()); // {value: undefined, done: true}
使用场景
实现Async和Await
function getValue(n, ms = 1000) {
  return new Promise((resolve) => {
    setTimeout(() => {
      resolve(n);
    }, ms);
  });
}
function* generator() {
  console.log(1);
  let x = yield getValue(2);
  console.log(x);
  x = yield getValue(3, 2000);
  console.log(x);
  x = yield 4;
  console.log(x);
}
function asyncGenerator(generator) {
  return new Promise((resolve, reject) => {
    let iterable = generator();
    let generated = iterable.next();
    tick();
    function tick() {
      if (generated.done === false) {
        Promise.resolve(generated.value).then(
          (value) => {
            try {
              generated = iterable.next(value);
              tick();
            } catch (err) {
              reject(err);
            }
          },
          (reason) => {
            try {
              generated = iterable.throw(reason);
              tick();
            } catch (err) {
              reject(err);
            }
          }
        );
      } else {
        resolve(generated.value);
      }
    }
  });
}
asyncGenerator(generator);
借用上面实现asyncGenerator函数,我们可以再来优化下加载图片的代码
<!DOCTYPE html>
<html lang="en">
  <head>
    <meta charset="UTF-8" />
    <meta name="viewport" content="width=device-width, initial-scale=1.0" />
    <title>Document</title>
  </head>
  <body></body>
  <script>
    const imgUrlList = [
      "https://travel.12306.cn/imgs/resources/uploadfiles/images/1716878f-79a2-4db1-af8c-b9c2039f0b3c_product_W572_H370.jpg",
      "https://travel.12306.cn/imgs/resources/uploadfiles/images/8b36f9a7-f780-4e71-b719-9300109a9ff2_product_W572_H370.jpg",
      "https://travel.12306.cn/imgs/resources/uploadfiles/images/6d77d0ea-53d0-4518-b7e9-e53795b4920c_product_W572_H370.jpg",
    ];

    function loadImage(imgUrl) {
      return new Promise((resolve) => {
        const img = document.createElement("img");
        img.onload = function () {
          resolve(this);
        };
        img.src = imgUrl;
      });
    }

    function* loadImageList() {
      const img1 = yield loadImage(imgUrlList[0]);
      document.body.appendChild(img1);
      const img2 = yield loadImage(imgUrlList[1]);
      document.body.appendChild(img2);
      const img3 = yield loadImage(imgUrlList[2]);
      document.body.appendChild(img3);
    }

    function asyncGenerator(generator) {
      return new Promise((resolve, reject) => {
        let iterable = generator();
        let generated = iterable.next();
        tick();

        function tick() {
          if (generated.done === false) {
            Promise.resolve(generated.value).then(
              (value) => {
                try {
                  generated = iterable.next(value);
                  tick();
                } catch (err) {
                  reject(err);
                }
              },
              (reason) => {
                try {
                  generated = iterable.throw(reason);
                  tick();
                } catch (err) {
                  reject(err);
                }
              }
            );
          } else {
            resolve(generated.value);
          }
        }
      });
    }

    asyncGenerator(loadImageList).then(() => {
      console.log("load success");
    });
  </script>
</html>
实现自定义迭代器
const list = {
  head: {
    value: 1,
    next: {
      value: 2,
      next: {
        value: 3,
        next: null,
      },
    },
  },
  *[Symbol.iterator]() {
    let curNode = list.head;
    while (curNode) {
      yield curNode.value;
      curNode = curNode.next;
    }
  },
};
for (let val of list) {
  console.log(val);
}
上面针对链表数据结构使用for...of的进行遍历,这得益于在list内部声明了迭代器,有两点是for...of所需要的
- 返回包含next方法的对象
- 调用返回的next方法返回的对象包含value和done这两个属性
而这两点生成器函数全部满足,无疑是天作之合。
以上就是JavaScript生成器函数Generator解决异步操作问题的详细内容,更多关于JavaScript生成器函数Generator的资料请关注本站其它相关文章!