

本文介绍 React Router 的基础使用方法,涵盖通过浏览器直接引入和 npm 安装两种方式。详细解析 Router、Route、Link 等核心组件,讲解 hashHistory 与 browserHistory 的区别,以及 IndexRoute、Redirect 等高级路由配置和路径参数规则。
React Router 简介与引入方式
React 作为前端技术栈的核心,单独使用时难以构建结构复杂的 Web 应用程序,因此通常需要引入其他辅助技术来完善功能。
React Router 是专为 React 设计的路由库,主要作用是保持页面组件与 URL 地址之间的状态同步,实现单页应用(SPA)的视图切换。
接下来简要介绍其基础用法,如需了解更全面的功能,可参考官方提供的详细指南。
1. 基本结构示例
在页面文件中,我们需要定义路由结构。
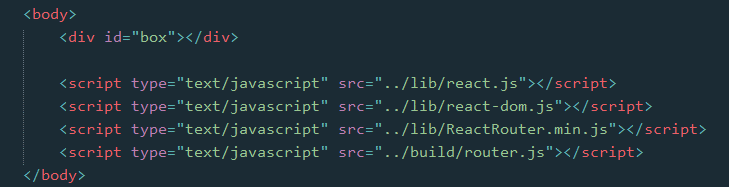
在外部脚本文件中,则负责引入相关库并执行渲染逻辑。

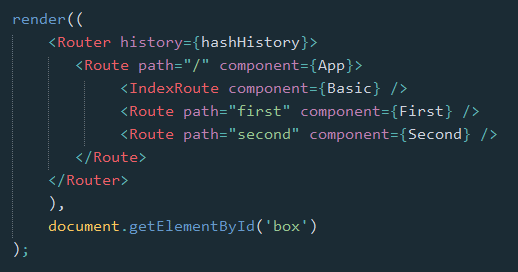
2. 库的引入方式
React Router 库的引入主要有两种常见方式。
2.1 浏览器直接引入
开发者可以直接引用官方提供的浏览器版本文件,或者下载该文件后通过 script 标签引入项目中。
引入后,即可在全局对象 中直接使用 ReactRouter 提供的属性,常用到的包括 Router、Route 等核心组件。
let {Router, Route, IndexRoute, Redirect, IndexRedirect, Link, IndexLink, hashHistory, browserHistory} = ReactRouter;2.2 npm 安装,通过构建工具编译引入
npm install --save react-router
安装好路由库后,需在脚本文件中通过模块系统引入所需属性。
import {Router, Route, IndexRoute, Redirect, IndexRedirect, Link, IndexLink, hashHistory, browserHistory} from 'react-router';由于当前浏览器尚未原生支持 import 与 export 命令,且 Babel 工具不会自动编译 require 命令,因此必须借助 Webpack 等构建工具进行打包和引入处理。
完成库的引入后,在 ReactDOM 的 render 方法中即可使用相关的 React Router 组件进行页面渲染。
路由基础配置与使用
3. 路由简单使用
最基础的应用场景是通过 URL 路径判断并渲染对应的页面组件。

class First extends Component {
 constructor(props) {
 super(props);
 }
 render() {
 return <p>First</p>
 }
}
class Second extends Component {
 constructor(props) {
 super(props);
 }
 render() {
 return <p>Second</p>
 }
}
class App extends Component {
 constructor(props) {
 super(props);
 }
 render() {
 return <div></div>
 }
}
render((
 <Router history={hashHistory}>
 <Route path="/" component={App} />
 <Route path="first" component={First} />
 <Route path="second" component={Second} />
 </Router>
 ),
 document.getElementById('box')
);
首先,Router 作为路由容器,其 history 属性用于定义处理 URL 变化的方式。
目前主要支持三种模式:
- browserHistory:通过 URL 的变化改变路由,这是推荐的方式,但需要在服务器端进行相应的配置以支持刷新(具体配置方法视服务器环境而定)。
- hashHistory:通过 URL 中的 # 符号(如 example.com/#/path)实现路由,类似于单页应用中常见的 hashbang 方式,配置简单,本文暂以此为例。
- createMemoryHistory:Memory history 不与地址栏交互,主要用于服务器端渲染(SSR)场景,需手动创建 history 对象。
在容器中使用 Route 组件定义具体路由,通过 path 属性指定路径(不区分大小写),并通过 component 属性指定该路径对应的组件。
也可以直接在 Router 容器上使用 routes 属性批量定义路由,例如:
let routes =
 <div>
 <Route path="/" component={App} />
 <Route path="first" component={First} />
 <Route path="second" component={Second} />
 </div>;
render(<Router routes={routes} history={hashHistory}></Router>, document.getElementById('box'));
需要注意的是,routes 中只能有一个父级组件,因此示例中使用了 <div> 标签包裹。
此外,Route 支持嵌套配置,在实际开发中,嵌套结构往往更符合业务逻辑。
需要注意的是,父级组件 App 为了渲染子级组件 First 与 Second,必须在 render 方法中返回 以获取并展示子组件。
class App extends Component {
 constructor(props) {
 super(props);
 }
 render() {
 return <div>{this.props.children}</div>
 }
}
render((
 <Router history={hashHistory}>
 <Route path="/" component={App}>
 <Route path="first" component={First} />
 <Route path="second" component={Second} />
 </Route>
 </Router>
 ),
 document.getElementById('box')
);
同样地,也可以直接在 Router 中使用 routes 属性来定义嵌套路由,例如:
let routes =
 <Route path="/" component={App}>
 <Route path="first" component={First} />
 <Route path="second" component={Second} />
 </Route>;
render(<Router routes={routes} history={hashHistory}></Router>, document.getElementById('box'));
常用路由组件详解
4. 路由的其他组件
除了基础的 Route 外,React Router 还提供了 IndexRoute、Redirect、IndexRedirect、Link、IndexLink 等组件,其名称直观反映了功能。
- IndexRoute:常用于主页,例如在上述例子中,路径 “/” 下显示空白,可通过 IndexRoute 指定默认显示的页面组件以提供导航。
- Link:可视为 React 中的 <a> 标签,使用 to 属性定义跳转路径,还可通过 activeClass 或 activeStyle 属性定义激活状态的样式。
- IndexLink:类似于 Link,但专门推荐用于指向主页的链接,当然也可用于其他路径。

class First extends Component {
 constructor(props) {
 super(props);
 }
 render() {
 return (
 <p>First
 <IndexLink to="/" activeStyle={{color: 'red'}}>Basic</IndexLink>
 </p>
 )
 }
}
class Second extends Component {
 constructor(props) {
 super(props);
 }
 render() {
 return <p>Second</p>
 }
}
class Basic extends Component {
 constructor(props) {
 super(props);
 }
 render() {
 return (
 <ul role="nav">
 <li><IndexLink to="/" activeStyle={{color: 'red'}}>Basic</IndexLink></li>
 <li><Link to="/first" activeStyle={{color: 'red'}}>First</Link></li>
 <li><Link to="/Second" activeClass="active">Second</Link></li>
 </ul>
 )
 }
}
class App extends Component {
 constructor(props) {
 super(props);
 }

 render() {
 return <div>
 {this.props.children}
 </div>
 }
}
render((
 <Router history={hashHistory}>
 <Route path="/" component={App}>
 <IndexRoute component={Basic} />
 <Route path="first" component={First} />
 <Route path="second" component={Second} />
 </Route>
 </Router>
 ),
 document.getElementById('box')
);
- Redirect:用于从 from 路径重定向到 to 路径。
- IndexRedirect:在主页面(/)时,直接重定向到指定的 to 路径。

render((
 <Router history={hashHistory}>
 <Route path="/" component={App}>
 <IndexRoute component={Basic} />
 <IndexRedirect to="first" />
 <Redirect from="second" to="first" />
 <Route path="first" component={First} />
 <Route path="second" component={Second} />
 </Route>
 </Router>
 ),
 document.getElementById('box')
);
路径规则与参数获取
5. 路由的 path 规则
在 hashHistory 模式下,主页路径通常以 #/ 开头。
自定义 Route 的路径会与父级 Route 的 path 合并,再与主页路径合并,从而得到最终的有效路径。
path 的语法支持以下特殊符号:
- :paramName:匹配 URL 的一个部分,直到遇到下一个 /、? 或 #。
- ():表示 URL 的该部分是可选的。
- *:匹配任意字符(非贪婪模式),直到模式中的下一个字符为止。
- **:匹配任意字符(贪婪模式),直到遇到下一个 /、? 或 # 为止。
<Route path="/hello/:name"> // 匹配 /hello/michael 和 /hello/ryan
<Route path="/hello(/:name)"> // 匹配 /hello, /hello/michael, 和 /hello/ryan
<Route path="/files/*.*"> // 匹配 /files/hello.jpg 和 /files/hello.html
<Route path="/**/*.jpg"> // 匹配 /files/hello.jpg 和 /files/path/to/file.jpg
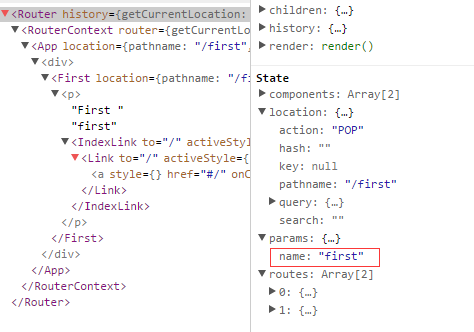
通过 中的 params 对象可以获取到 :paramName 对应的值。
class First extends Component {
 constructor(props) {
 super(props);
 }
 render() {
 return (
 <p>First {this.props.params.name}
 <IndexLink to="/" activeStyle={{color: 'red'}}>Basic</IndexLink>
 </p>
 )
 }
}
.
.
<Route path="/:name" component={First} />

此外,通过 React DevTools 也可以查看组件的相关数据状态。
路由钩子函数应用
6. 路由的 onEnter、onLeave 钩子
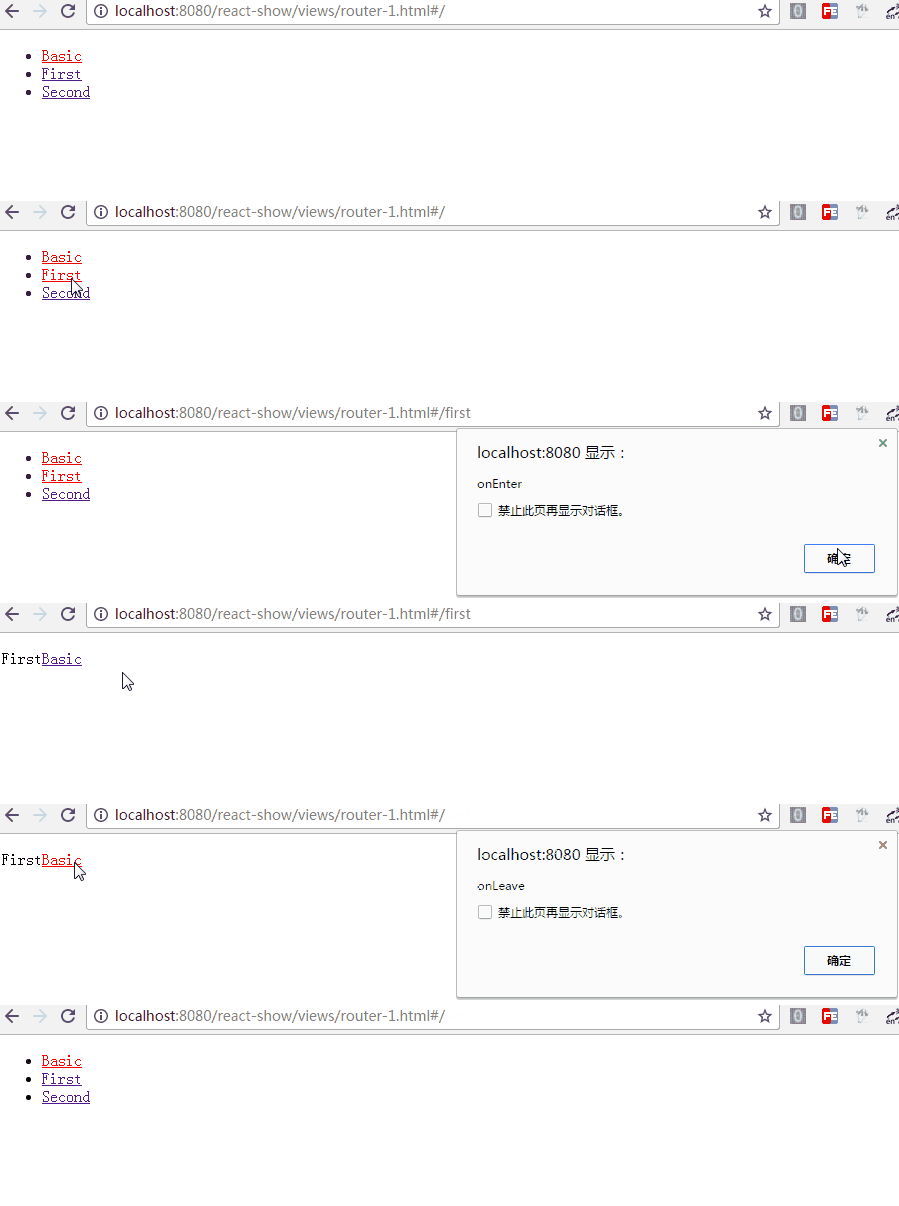
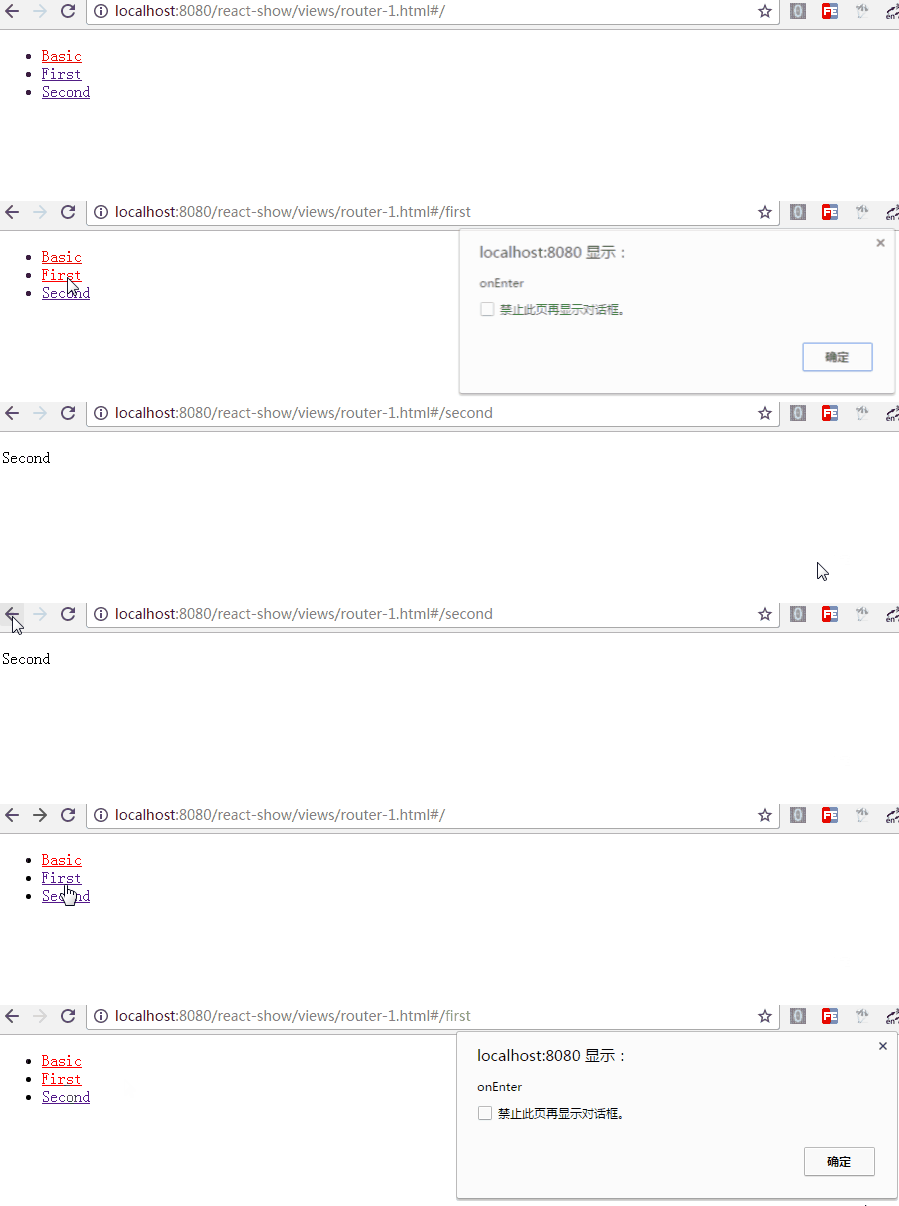
在路由跳转过程中,若需在进入或离开页面时执行特殊操作,可通过 Route 的 onEnter 与 onLeave 钩子函数定义这些行为。
<Route path="first" component={First} onEnter={(nextState, replace) => {
 console.log(nextState);
 alert('onEnter');
 // replace('second');
 }} onLeave={() => {
 alert('onLeave');
 }}/>
如上例所示,钩子函数接收两个参数,通过 replace 方法可以更新路径。若启用相关逻辑,进入 “/first” 时会立即跳转至 “/second”,这在登录状态检测等场景中较为有用。
更多高级用法请参阅官方指南。
以上就是本文的全部内容,希望本文的内容对大家的学习或者工作能带来一定的帮助,同时也希望多多支持本站!