

本文详细讲解如何在Web端实现登录拼图验证功能,涵盖从HTML/CSS结构搭建到JavaScript交互逻辑的完整流程。通过解析背景图切片、滑块拖拽联动及位置校验算法,帮助开发者掌握防止机器操作的前端验证技术,并提供完整的代码实现参考。
前言
观察当前的Web登录流程可以发现,验证方式经历了从简单的账号密码直接登录,到图形验证码,再到数字运算验证,直至如今广泛应用的拼图验证的演变。这一系列技术迭代的核心目的在于抵御自动化脚本和机器攻击。尽管对普通用户而言操作略显繁琐,但出于安全考量,这种机制已成为行业标配。
本文将逐步演示如何从零开始构建一个完整的拼图验证模块。
核心功能
- 滑动解锁功能
- 重置位置功能
- 滑块进度条功能
- 结果提示功能
- 随机生成滑块位置
实现原理
该功能的技术原理相对直观:系统需准备一张背景图片作为拼图素材,同时定义一个独立的滑块容器。当用户拖拽该容器至预设的特定坐标位置时,即完成拼图验证逻辑。
实现前端登录拼图验证
搭建框架
实现此功能的第一步是构建基础的HTML结构与CSS样式,确立视觉布局。
// css
:root {
	 --iWidth: 50px;
	 --iHeight: 50px;
}

.wrapper {
    width: 100%;
    width: 500px;
    margin: 0 auto;
}

.container {
    position: relative;
    width: 500px;
    height: 300px;
    box-shadow: 0px 2px 4px 0px rgba(0,0,0,0.5);
    border-radius: 8px;
    background-image: url("./bg.webp");
    background-size: 100% 100%;
    background-repeat: no-repeat;
}

// html
<div class="wrapper">
   <!-- 容器 -->
   <div class="container"></div>
</div>
完成基础样式搭建后,页面呈现如图[[a1]]所示的初始状态。

添加被校验区域及校验区域
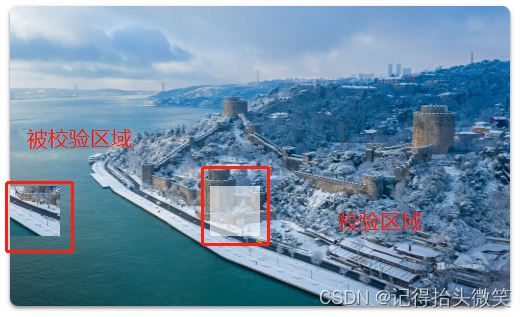
接下来,需要在界面中引入被校验区域与校验区域,以支持滑动校验逻辑。具体实现上,利用CSS的background-position配合background-size属性,根据校验区域的尺寸和坐标,从背景图中精确切分出滑块所需的图像部分。
// css
// 被校验区域样式
.container-move {
    position: absolute;
    width: var(--iWidth);
    height: var(--iHeight);
    top: 180px;
    left: 0;
    z-index: 3;
    background-size: 500px 300px;
    background-repeat: no-repeat;
    background-image: url("./img/bg.jpg");
    background-position: -180px -200px;
}
// 校验区域样式
.container-empty {
    position: absolute;
    width: var(--iWidth);
    height: var(--iHeight);
    top: 180px;
    left: 200px;
    background: #fff;
    z-index: 2;
    opacity: .6;
}
// html
<div class="wrapper">
    <!-- 容器 -->
    <div class="container">
    	<!-- 被校验区域 -->
        <div class="container-move"></div>
        <!-- 校验区域 -->
        <div class="container-empty"></div>
    </div>
</div>
效果如图[[a3]]所示。
添加滑块、滑块背景、拖动条、提示文字
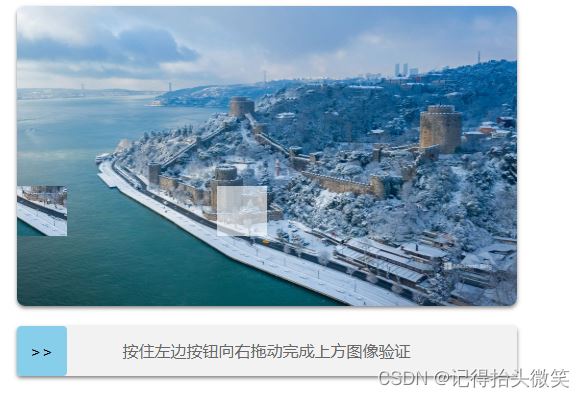
拖动条用于限制滑块移动的最大距离;滑块负责带动被校验区域同步移动;提示文字则用于引导用户执行解锁操作。
为确保视觉层级正确,拖动条内的滑块、滑块背景及提示文字均相对于拖动条进行绝对定位。层级关系设定为:提示文字位于最底层,滑块背景居中,滑块位于最顶层,即 提示文字 < 滑块背景 < 滑块。
完成上述元素的添加后,界面结构如下。
// css
/* 拖动条样式 */
.slider-control {
    width: 500px;
    height: 50px;
    margin-top: 20px;
    border-radius: 4px;
    position: relative;
    overflow: hidden;
    background: #f2f2f2;
    box-shadow: 0px 2px 4px 0px rgba(0, 0, 0, 0.5);
}

/* 滑块 */
.slider {
    width: var(--iWidth);
    height: var(--iHeight);
    position: absolute;
    left: 0;
    top: 0;
    background: skyblue;
    border-radius: 4px;
    text-align: center;
    line-height: var(--iHeight);
    transition: all;
    user-select: none;
    z-index: 3;
}

/* 滑块背景 */
.slider-shadow {
    position: absolute;
    left: 0;
    top: 0;
    width: 0;
    height: 50px;
    background: #fff;
    z-index: 2;
}

/* 提示文案 */
.slider-info {
    text-align: center;
    color: rgba(102, 102, 102, 1);
    margin: 0;
    line-height: 50px;
}
// html
<div class="wrapper">
    <!-- 控制容器 -->
    <div class="slider-control">
    	// 提示文字
        <p class="slider-info">按住左边按钮向右拖动完成上方图像验证</p>
         // 滑块
        <div class="slider">>></div>
        // 滑块背景
        <div class="slider-shadow"></div>
    </div>
</div>
最终效果如图[[a5]]所示。
添加交互
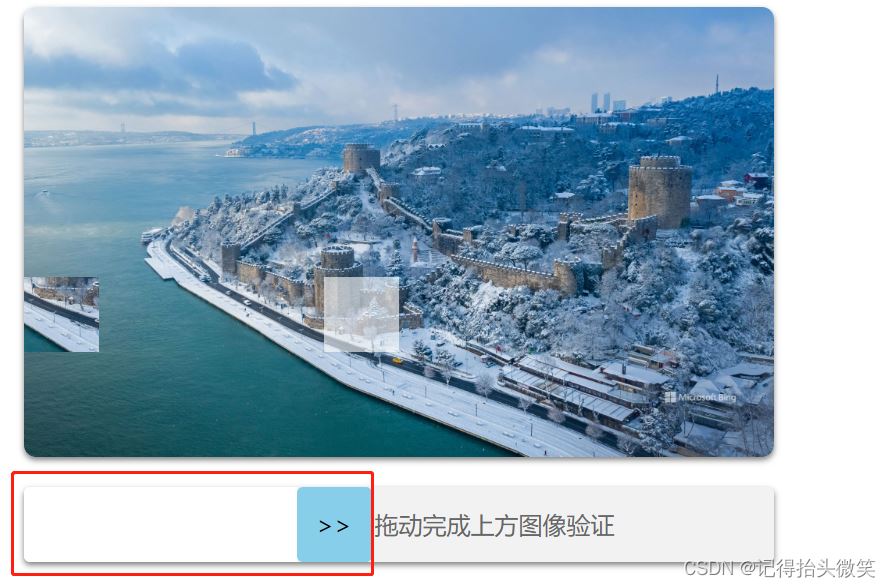
此时拼图验证的静态样式结构已构建完毕,下一步需为相关DOM元素绑定交互事件,以实现动态功能。
首要任务是实现滑块在拖动条内的自由拖拽功能。
// 我太懒了,不想写那么一大堆,这里封装个用 class 来获取实例的函数
function getElement(elName) {
   return document.getElementsByClassName(elName)[0]
}

// 获取实例
let sliderBox = getElement('slider'); // 滑动的块
let sliderShadow = getElement('slider-shadow'); // 滑动背景

let container = getElement("container"); // 容器的实例
let sliderMove = getElement("container-move"); // 解锁的块

let containerWidth = container.clientWidth; // 获取容器的可视区宽度
let sliderMoveWidth = sliderMove.clientWidth; // 被校验区域的可视区宽度

let maxDistance = (containerWidth - sliderMoveWidth); // 根据容器和被校验区域的大小限制滑块移动最大的距离

/**
* 监听鼠标在sliderBox(滑动块)按下时 mousedowm, 并根据可视区左边的距离减去鼠标按下的距离, 获取到实际
* document的onmouseMove和mouseup事件,
* 获取鼠标滑动的位置
*/
sliderBox.onmousedown = function (moveStart) {
   // console.log("🚀 ~ file: index.html ~ line 94 ~ moveStart", moveStart)
   let left = moveStart.clientX - sliderBox.offsetLeft; // 获取按下时元素距离可视区左边的位置 - 鼠标按下时的位置, 获取到鼠标距离元素边缘的位置
   let lefta // 记录移动的距离
   // 鼠标按下持续移动中
   document.onmousemove = function (moveTo) {
       // 如果不减去 left 那么就会导致鼠标一直在移动元素的左边框上, 也就会出现元素不跟着鼠标走的问题, 有偏差
       lefta = moveTo.clientX - left; // 元素移动的距离
       // 限制元素的移动距离,不能小于0, 或者大于最大宽度 - 元素本身的距离, 否则就初始化位置
       if (lefta < 0) {
           lefta = 0;
       } else if (maxDistance < lefta) {
           lefta = maxDistance;
       }
       sliderBox.style.left = lefta + 'px';
       // 因为滑块加了圆角的功能,所以要在这里加4px,让滑块刚好压住滑块背景,不加的话,放大的时候会比较突兀
       sliderShadow.style.width = (lefta + 4) + 'px';
   }

   // 鼠标移动结束
   document.onmouseup = function (moveEnd) {
       // 解除document身上绑定的事件, 不让事件一直触发
       document.onmousemove = null;
       document.onmouseup = null;
       // 重置位置
       sliderBox.style.left = 0 + 'px'
       sliderShadow.style.width = 0 + 'px'
   }
}
结合前述代码实现后,效果如图[[a7]]所示。可以看到滑块已在拖动条内支持自由拖拽,且各元素的层级关系已正确处理。
联动被校验区域
在实现滑块自由拖拽的基础上,下一步需将滑块的移动距离与被校验区域的位置进行联动,并在此基础上进行位置校验。
// 获取实例以及定义常量
let faultSize = 10; // 滑动距离的容错处理, 滑动距离- 10, +10 都可解锁
// 事件处理
sliderBox.onmousedown = function (moveStart) {
    let left = moveStart.clientX - sliderBox.offsetLeft; // 获取按下时元素距离可视区左边的位置 - 鼠标按下时的位置, 获取到鼠标距离元素边缘的位置
    let lefta // 记录移动的距离
    // 鼠标按下持续移动中
    document.onmousemove = function (moveTo) {
        // 如果不减去 left 那么就会导致鼠标一直在移动元素的左边框上, 也就会出现元素不跟着鼠标走的问题, 有偏差
        lefta = moveTo.clientX - left; // 元素移动的距离
        sliderMove.style.left = lefta + 'px'
    }

    // 鼠标移动结束
    document.onmouseup = function (moveEnd) {
        // 判断滑动距离是否相同,这里的滑动距离允许10px的容错,所以在当被校验区域大于小于校验区域10px都可以校验通过
        if (lefta >= movePointer - faultSize && lefta <= movePointer + faultSize) {
            success(true)
        } else {
            success(false)
        }
        init()
        // 重置位置
        sliderBox.style.left = 0 + 'px'
        sliderMove.style.left = 0 + 'px'
        sliderShadow.style.width = 0 + 'px';
        infomation.innerText = ''
    }
}

function success(valid) {
    let text = valid ? '成功' : "失败"
    alert(`解锁${text}`)
}
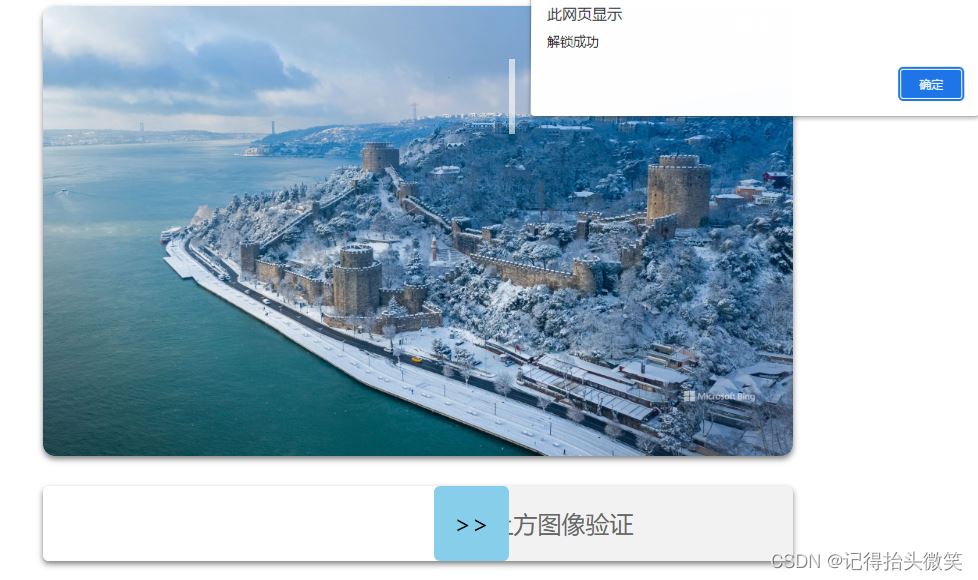
至此,拼图验证的核心交互功能已实现。剩余尚未实现的功能为随机生成校验位置,接下来将补充该部分逻辑。
随机生成校验位置
在实际登录场景中,若用户未将拼图移动至指定位置或移动偏差过大,系统需重新生成校验位置。因此,实现拼图刷新与随机定位功能至关重要。
// css
/* 重置 */
.container-reset {
   position: absolute;
   top: 0;
   right: 10px;
   cursor: pointer;
   user-select: none;
   z-index: 1;
   color:#fff;
}
// html
<div class="wrapper">
<!-- 解锁容器 -->
<div class="container">
   <div class="container-reset">刷新</div>
</div>
</div>
// js

// 获取实例
let containerReset = getElement('container-reset'); // 刷新按钮实例

// 初始化位置
init()
// 刷新拼图位置
containerReset.onclick = function () {
    init()
}
/**
 * 随机生成空白的位置, 并指定解锁块的高度
 *  */
function init() {
    const moveTop = Math.floor(Math.random() * 90); // 校验区域随机生成的 top 高度
    const moveLeft = Math.floor(Math.random() * (270 - 60) + 60); // 校验区域随机生成的 left 距离

    movePointer = moveLeft // 重置校验区域解锁的位置

    sliderMove.style.top = moveTop + 'px'; // 初始化被校验区域位置

    containerEmpty.style.top = moveTop + 'px'; // 初始化校验区域
    containerEmpty.style.left = moveLeft + 'px'; // 初始化校验区域

    sliderShadow.style.width = 0 + 'px'; // 重置拖拖动条阴影位置

    sliderMove.style.backgroundPosition = `-${moveLeft}px  -${moveTop}px`; // 裁剪被校验区域上的切图
}
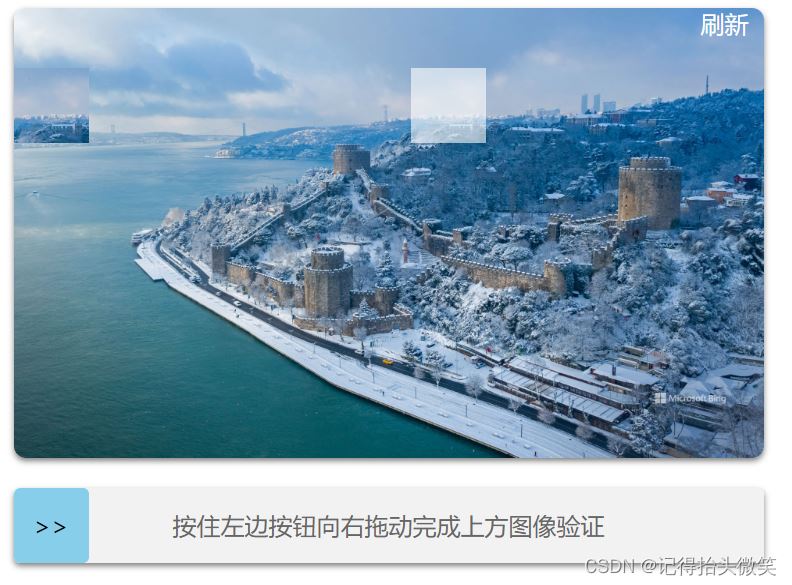
回顾前文所述的各项功能,整体实现过程并未如想象中复杂。
- 滑动解锁功能
- 重置位置功能
- 滑块进度条功能
- 结果提示功能
- 随机生成滑块位置
完整代码
<!DOCTYPE html>
<html lang="en">

<head>
    <meta charset="UTF-8">
    <meta http-equiv="X-UA-Compatible" content="IE=edge">
    <meta name="viewport" content="width=device-width, initial-scale=1.0">
    <title>滑动验证码</title>
    <style>
        :root {
            --iWidth: 50px;
            --iHeight: 50px;
        }

        .wrapper {
            width: 100%;
            width: 500px;
            margin: 0 auto;
        }

        /* 容器 */
        .container {
            position: relative;
            width: 500px;
            height: 300px;
            box-shadow: 0px 2px 4px 0px rgba(0, 0, 0, 0.5);
            border-radius: 8px;
            background-image: url("./img/bg.jpg");
            background-size: 100% 100%;
            background-repeat: no-repeat;
        }

        /* 被校验区域 */
        .container-move {
            position: absolute;
            width: var(--iWidth);
            height: var(--iHeight);
            top: 180px;
            left: 0;
            z-index: 3;
            background-size: 500px 300px;
            background-repeat: no-repeat;
            background-image: url("./img/bg.jpg");
            background-position: -180px -200px;
        }

        /* 校验区域 */
        .container-empty {
            position: absolute;
            width: var(--iWidth);
            height: var(--iHeight);
            top: 180px;
            left: 200px;
            background: #fff;
            z-index: 2;
            opacity: .6;
        }

        /* 重置 */
        .container-reset {
            position: absolute;
            top: 0;
            right: 10px;
            cursor: pointer;
            user-select: none;
            z-index: 1;
            color:#fff;
        }

        /* 拖动条样式 */
        .slider-control {
            width: 500px;
            height: 50px;
            margin-top: 20px;
            border-radius: 4px;
            position: relative;
            overflow: hidden;
            background: #f2f2f2;
            box-shadow: 0px 2px 4px 0px rgba(0, 0, 0, 0.5);
        }

        /* 滑块 */
        .slider {
            width: var(--iWidth);
            height: var(--iHeight);
            position: absolute;
            left: 0;
            top: 0;
            background: skyblue;
            border-radius: 4px;
            text-align: center;
            line-height: var(--iHeight);
            transition: all;
            user-select: none;
            z-index: 3;
        }

        /* 滑块背景 */
        .slider-shadow {
            position: absolute;
            left: 0;
            top: 0;
            width: 0;
            height: 50px;
            background: #fff;
            z-index: 2;
        }

        /* 提示文案 */
        .slider-info {
            text-align: center;
            color: rgba(102, 102, 102, 1);
            margin: 0;
            line-height: 50px;
            user-select: none;
        }
    </style>
</head>

<body>
    <div class="wrapper">
        <!-- 解锁容器 -->
        <div class="container">
            <div class="container-move"></div>
            <div class="container-empty"></div>
            <div class="container-reset">刷新</div>
        </div>
        <!-- 控制容器 -->
        <div class="slider-control">
            <p class="slider-info">按住左边按钮向右拖动完成上方图像验证</p>
            <div class="slider">>></div>
            <div class="slider-shadow"></div>
        </div>
        <p class="infomation"></p>
    </div>


    <script>
        let sliderBox = getElement('slider'); // 滑动的块

        let sliderShadow = getElement('slider-shadow'); // 滑动的阴影
        let container = getElement("container"); // 最外层的盒子
        let sliderMove = getElement("container-move"); // 解锁的块
        let containerEmpty = getElement("container-empty"); // 解锁的位置

        let infomation = getElement('infomation'); // 解锁提示
        let containerReset = getElement('container-reset'); // 重置功能

        let containerWidth = container.clientWidth; // 获取背景图的大小
        let sliderMoveWidth = sliderMove.clientWidth; // 解锁的块的大小

        let movePointer = containerEmpty.offsetLeft // 解锁的位置

        let maxDistance = (containerWidth - sliderMoveWidth); // 根据背景和解锁块的宽度限制滑块移动最大的距离

        let faultSize = 10; // 滑动距离的容错处理, 滑动距离- 10, +10 都可解锁

        init()

        containerReset.onclick = function () {
            init()
        }

        /**
         * 监听鼠标在sliderBox(滑动块)按下时 mousedowm, 并根据可视区左边的距离减去鼠标按下的距离, 获取到实际
         * document的onmouseMove和mouseup事件,
         * 获取鼠标滑动的位置
        */
        sliderBox.onmousedown = function (moveStart) {
            let left = moveStart.clientX - sliderBox.offsetLeft; // 获取按下时元素距离可视区左边的位置 - 鼠标按下时的位置, 获取到鼠标距离元素边缘的位置
            let lefta // 记录移动的距离
            // 鼠标按下持续移动中
            document.onmousemove = function (moveTo) {
                // 如果不减去 left 那么就会导致鼠标一直在移动元素的左边框上, 也就会出现元素不跟着鼠标走的问题, 有偏差
                lefta = moveTo.clientX - left; // 元素移动的距离
                // 限制元素的移动距离,不能小于0, 或者大于最大宽度 - 元素本身的距离, 否则就初始化位置
                if (lefta < 0) {
                    lefta = 0;
                } else if (maxDistance < lefta) {
                    lefta = maxDistance;
                }
                sliderBox.style.left = lefta + 'px'
                sliderMove.style.left = lefta + 'px'
                // 因为滑块加了圆角的功能,所以要在这里加4px,让滑块刚好压住滑块背景,不加的话,放大的时候会比较突兀
                sliderShadow.style.width = (lefta + 4) + 'px';
            }

            // 鼠标移动结束
            document.onmouseup = function (moveEnd) {
                // 解除document身上绑定的事件, 不让事件一直触发
                document.onmousemove = null;
                document.onmouseup = null;
                // 判断滑动距离是否相同,这里的滑动距离允许10px的容错,所以在当被校验区域大于小于校验区域10px都可以校验通过
                if (lefta >= movePointer - faultSize && lefta <= movePointer + faultSize) {
                    success(true)
                } else {
                    success(false)
                }
                init()
                // 重置位置
                sliderBox.style.left = 0 + 'px'
                sliderMove.style.left = 0 + 'px'
                sliderShadow.style.width = 0 + 'px';
                infomation.innerText = ''
            }
        }


        function success(valid) {
            let text = valid ? '成功' : "失败"
            infomation.innerText = `解锁${text}`
            alert(`解锁${text}`)
        }

        /**
         * 随机生成空白的位置, 并指定解锁块的高度
         *  */
        function init() {
            const moveTop = Math.floor(Math.random() * 90); // 滑块随机生成的高度
            const moveLeft = Math.floor(Math.random() * (270 - 60) + 60); // 滑块随机生成的left距离

            movePointer = moveLeft // 重置滑块解锁的位置

            sliderMove.style.top = moveTop + 'px'; // 初始化滑块位置

            containerEmpty.style.top = moveTop + 'px'; // 初始化解锁区域
            containerEmpty.style.left = moveLeft + 'px';

            sliderShadow.style.width = 0 + 'px';

            sliderMove.style.backgroundPosition = `-${moveLeft}px  -${moveTop}px`
        }

        function getElement(elName) {
            return document.getElementsByClassName(elName)[0]
        }
    </script>
</body>

</html>
本篇关于前端实现登录拼图验证的教程到此结束。该功能常见于各类Web系统的登录环节,文中提供的案例代码可直接运行使用。
总结
本文介绍了基于JavaScript实现前端登录拼图验证的完整方案。如需了解更多前端登录验证相关内容,建议查阅本站过往文章或继续浏览后续更新,感谢大家的支持。