

本文介绍基于 Vue.js 和 ElementUI 框架,结合 TypeScript 语法实现的免密登录与手机号绑定功能。核心逻辑包括通过 currentVerifyingType 区分验证码用途(登录、绑定、解绑),利用 Token 存入 Cookie 实现状态保持,并处理短信发送倒计时与用户信息获取。
前言
前端开发选用 Vue.js 配合 ElementUI 组件库,这种组合实现起来相对简洁,同时引入 TypeScript 语法以提升代码的可读性与维护性。
首先实现发送验证码的逻辑函数。无论是登录、绑定还是解绑业务,都依赖于验证码发送功能,系统通过 currentVerifyingType 变量来区分当前请求的验证码类型,这对应服务端 Purpose 参数的不同值。
VerifyingType 枚举值可设定为 LOGIN、UNBIND_PHONENUMBER 或 BIND_PHONENUMBER。
async sendVerificationCode(phoneNumber, type) {
    this.currentVerifyingType = type;
    this.smsSendCd = 60;
    this.timer = setInterval(() => {
    this.smsSendCd--;
    if (this.smsSendCd <= 0) {
        clearInterval(this.timer);
    }
    }, 1000);
    await request(`${this.host}${this.prefix}/Captcha/Send`, "post", {
    userId: this.userInfo == null ? null : this.userInfo.id,
    phoneNumber: phoneNumber,
    type: type,
    })
    .catch((re) => {
        var res = re.response.data;
        this.errorMessage(res.error.message);
    })
    .then((re) => {
        var res = re.data.result;
        this.successMessage("发送验证码成功");
    });
}
开发过程中需注意几个关键的全局状态变量,它们用于管理用户会话和验证码流程。
userInfo: null,                   //用户对象
currentVerifyingType: null,       //当前发送验证码的用途
smsSendCd: 0,                     //发送验证码的冷却时间,默认60s
loginForm: {                      //登录对象
username: "",
password: "",
},
token: null,                      //登录凭证Token
verifyNumber: null,               //填写的验证码
登录功能模块
构建手机号输入控件,用于接收用户输入的手机号码。
<el-input
    ref="username"
    v-model="loginForm.username"
    :placeholder="'请输入手机号'"
    type="text"
    tabindex="1"
    autocomplete="on">
    <template slot="prepend">+86</template>
</el-input>
构建验证码输入控件,并附加一个发送验证码按钮。点击该按钮将触发 sendVerificationCode 函数,向服务器请求发送短信验证码。
<el-input
    ref="password"
    v-model="loginForm.password"
    :type="passwordType"
    :placeholder="'发送验证码后键入验证码'"
    tabindex="2"
    autocomplete="on"
    @blur="capsTooltip = false"
    @keyup.enter.native="handleLogin"
    >
    <el-button
        slot="append"
        :disabled="smsSendCd > 0"
        @click="sendVerificationCode(loginForm.username, 'LOGIN')"
        >{{
        smsSendCd == 0 ? "发送验证码" : smsSendCd + "后重试"
        }}
    </el-button>
</el-input>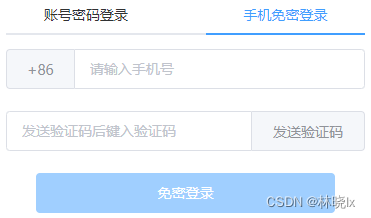
登录处理函数负责验证电话号码(作为用户名)以及用户输入的验证码,确保身份合法性。
async handleLogin() {
    this.loading = true;
    let phoneNumber = this.loginForm.username;
    let password = this.loginForm.password;
    phoneNumber = phoneNumber.trim();
    await request(`${this.host}api/TokenAuth/Authenticate`, "post", {
    phoneNumber,
    password,
    });
}
登录成功后,系统将获取的 Token 存储至 Cookie 中,以便后续请求携带凭证。
.then(async (res) => {
    var data = res.data.result;
    setToken(data.accessToken);
绑定与解绑功能模块
构建新的手机号输入框。若用户尚未绑定手机,界面显示绑定按钮,点击后发送验证码;若用户已绑定手机,则需先执行解绑操作才能绑定新号码,界面提供解绑按钮,点击后同样发送验证码。
<el-input v-model="userInfo.phoneNumber"> </el-input>
<el-button
    v-if="!userInfo.isPhoneNumberConfirmed"
    size="mini"
    type="primary"
    :disabled="smsSendCd > 0"
    @click="
    sendVerificationCode(userInfo.phoneNumber, 'BIND_PHONENUMBER')
    "
    >{{ smsSendCd == 0 ? "验证手机号" : smsSendCd + "后重试" }}
</el-button>
<el-button
    v-else
    size="mini"
    type="danger"
    :disabled="smsSendCd > 0"
    @click="
    sendVerificationCode(userInfo.phoneNumber, 'UNBIND_PHONENUMBER')
    "
    >{{ smsSendCd == 0 ? "解绑手机号" : smsSendCd + "后重试" }}
</el-button>
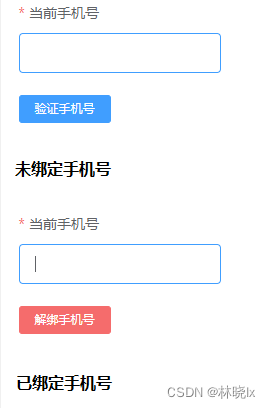
构建用于校验短信验证码的输入控件。
<el-input v-model="verifyNumber">
    <el-button
        slot="append"
        type="primary"
        size="mini"
        @click="verify">
        完成验证
    </el-button>
</el-input>
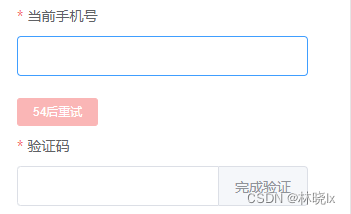
实现校验短信验证码的具体函数逻辑。
async verify() {
    var action = null;
    if (this.currentVerifyingType == "BIND_PHONENUMBER") {
    action = "Bind";
    } else if (this.currentVerifyingType == "UNBIND_PHONENUMBER") {
    action = "Unbind";
    } else {
    action = "Verify";
    }
    await request(`${this.host}${this.prefix}/Captcha/${action}`, "post", {
    token: this.verifyNumber,
    })
    .catch((re) => {
        var res = re.response.data;
        this.errorMessage(res.error.message);
    })
    .then((re) => {
        var res = re.data;
        if (res.success) {
        this.successMessage("绑定成功");
        window.location.reload()
        }
    });
}
获取用户信息功能模块
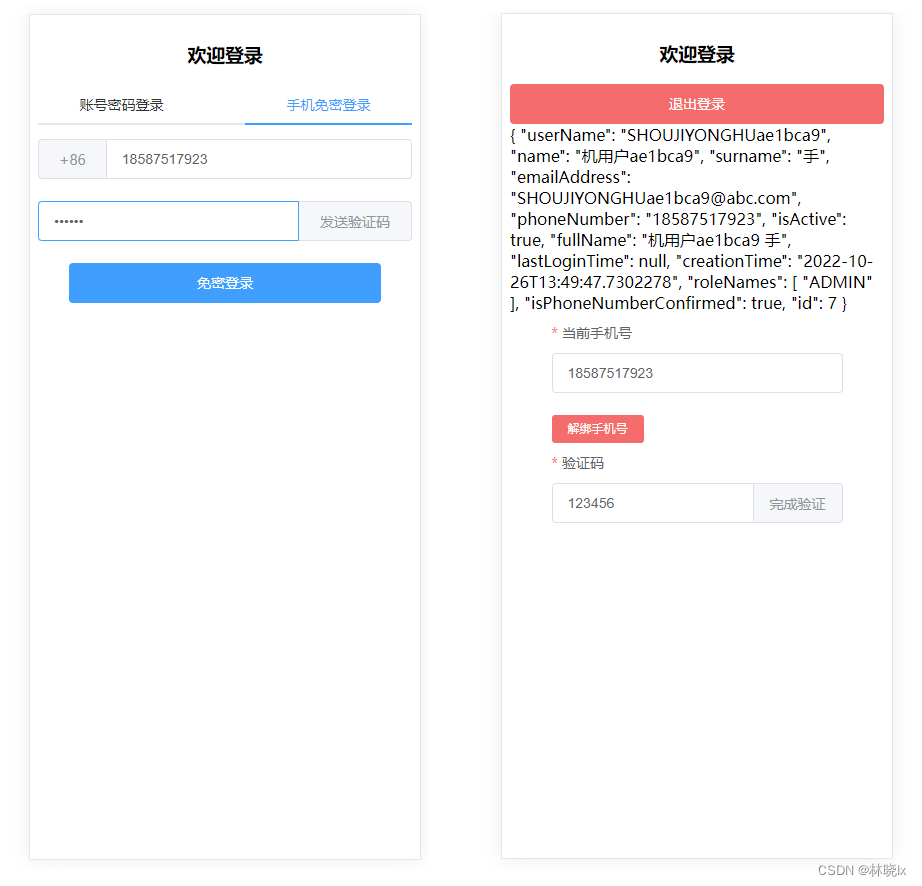
登录成功后,系统需获取当前用户的详细信息,将其存入 userInfo 对象,并在页面上进行简要展示。
<span>{<!--{cke_protected}{C}%3C!%2D%2D%20%2D%2D%3E-->{ userInfo }}</span>定义一个获取当前用户信息的函数接口。
async getCurrentUser() {
    await request(
    `${this.host}${this.prefix}/User/GetCurrentUser`,
    "get",
    null
    )
    .catch((re) => {
        var res = re.response.data;
        this.errorMessage(res.error.message);
    })
    .then(async (re) => {
        var result = re.data.result as any;
        this.userInfo = result;
        this.token = getToken();
        clearInterval(this.timer);
        this.smsSendCd = 0;
        this.currentVerifyingType = null;
        this.successMessage("登录成功");
    });
}
该函数在登录成功回调中调用,同时也用于处理已登录状态下刷新页面或打开网页时的初始化场景,在 handleLogin 函数完成 API 请求后执行后续操作。
.then(async (res) => {
    var data = res.data.result;
    setToken(data.accessToken);
    await this.getCurrentUser();
})
获取用户信息功能模块
登出操作需将 Token 及用户信息置空,清除本地会话状态。
<el-button
    :loading="loading"
    type="danger"
    style="width: 100%"
    @click.native.prevent="logout">
    退出登录
</el-button>
logout() {
    setToken(null);
    this.token = null;
    this.userInfo = null;
},
至此,所有功能模块开发完毕。
最终效果展示
项目地址
Github仓库:matoapp-samples
到此这篇关于 Vue elementUI 实现免密登陆与号码绑定功能的文章就介绍到这了,更多相关 Vue 免密登陆与号码绑定内容请搜索本站以前的文章或继续浏览下面的相关文章希望大家以后多多支持本站!