

本文详细介绍如何使用JavaScript和Canvas元素实现鼠标跟随特效。通过定义画布、监听鼠标移动事件以及循环更新箭头方向,结合CSS与原生JS技术,实现动态的鼠标跟随动画效果。
前言
canvas是一个功能强大的元素,例如绘制表格或海报时都需要使用canvas,此前曾利用css制作过鼠标跟随的恶魔之眼动画,现探讨是否可用canvas实现类似的鼠标跟随效果。
创建canvas画布
可通过直接使用canvas标签来创建画布。
<canvas></canvas>
无需复杂样式,画布内容主要依赖JavaScript实现。
const canvas = document.querySelector("canvas");
let ctx = canvas.getContext("2d");
定义一个canvas 2D的画布
定义鼠标 x / y
var mouse = {
  x: innerWidth / 2,
  y: innerHeight / 2
};
innerWidth 和 innerHeight 都属于window下面的参数
初始化canvas
初始化过程即为设定canvas的宽高,通常直接设置为全屏窗口的尺寸。
function init() {
  canvas.width = window.innerWidth;
  canvas.height = window.innerHeight;
}
画箭头
箭头由两条线经旋转角度后拼接而成。
draw() {
    const center = {
      x: this.x,
      y: this.y
    };


    const xDist = this.x - mouse.x;
    const yDist = this.y - mouse.y;

    const distance = Math.sqrt(Math.pow(xDist, 2) + Math.pow(yDist, 2));

    let radius = this.radius / 3 + this.radius * distance / 600;

    if (radius < this.radius) {
      radius = this.radius;
    }

    let angle, x, y;

    ctx.beginPath();

    angle = Math.atan2(yDist, xDist) - 90;
    x = radius * Math.cos(angle) + center.x;
    y = radius * Math.sin(angle) + center.y;

    ctx.moveTo(x, y);

    nextPoint();

    ctx.lineTo(x, y);

    nextPoint();

    ctx.lineWidth = 1 + distance / 600 * 4;

    ctx.stroke();

    function nextPoint() {
      angle += 1 / 3 * (2 * Math.PI);
      x = radius * Math.cos(angle) + center.x;
      y = radius * Math.sin(angle) + center.y;
      ctx.lineTo(x, y);
    }
}
nextPoint 方法就是循环画线的,通过在某个节点调用这个方法就可以循环画线
为便于响应鼠标事件更新,可将画线逻辑封装至类中。
class Arrow {
    // 画线的方法
}
在初始化阶段,直接调用该类的方法即可。
let arrows;

function init() {
  canvas.width = window.innerWidth;
  canvas.height = window.innerHeight;
  arrows = [];
  for (var x = 0; x <= canvas.width + 40; x += 40) {
    for (var y = 0; y <= canvas.height + 40; y += 40) {
      arrows.push(new Arrow(x, y, -20));
    }
  }
}
循环动画
动画需持续更新箭头方向,因此需在画线类中添加更新方法以刷新绘制。
class Arrow {
    // 画线的方法

    // 更新方法
    update() {
        this.draw();
    }
}
添加完更新方法之后,就可以开始循环动画了
function animate() {
  ctx.clearRect(0, 0, canvas.width, canvas.height);
  arrows.forEach(Arrow => {
    Arrow.update();
  });
  requestAnimationFrame(animate);
}
鼠标事件
鼠标在页面上随意移动时的事件方法
addEventListener("mousemove", function (event) {
  mouse.x = event.clientX;
  mouse.y = event.clientY;
});
监听窗口大小,便于修改canvas的宽度和更新初始化方法
addEventListener("resize", function () {
  canvas.width = innerWidth;
  canvas.height = innerHeight;
  init();
});
还可以加上移动端上的 touch 事件
document.addEventListener("touchstart", function (e) {
  e.preventDefault();
  mouse.x = e.targetTouches[0].clientX;
  mouse.y = e.targetTouches[0].clientY;
});

document.addEventListener("touchmove", function (e) {
  e.preventDefault();
  mouse.x = e.targetTouches[0].clientX;
  mouse.y = e.targetTouches[0].clientY;
});
实现效果
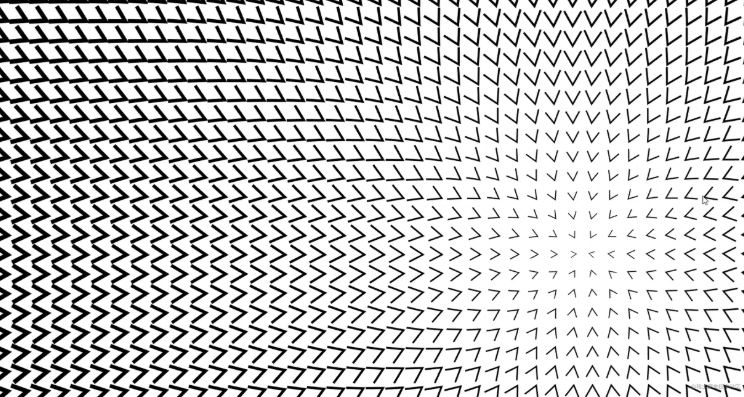
以上就是JavaScript利用canvas实现鼠标跟随特效的详细内容,更多关于JavaScript canvas鼠标跟随特效的资料请关注本站其它相关文章!