

本文详细记录了从零搭建基于 Vite、Vue3 和 TypeScript 的基础项目模板过程。内容涵盖路由与状态管理初始化,重点解决 ESLint 在 Vue3 环境下的兼容性问题(如 defineProps、根元素限制及行尾风格),集成 Prettier 实现代码格式化,并通过 Husky、lint-staged 和 commitlint 建立提交前校验与规范机制,旨在提供一套高效、规范的工程化最佳实践。
近期时间相对宽裕,计划着手构建一个基础项目模板,以便为后续的新项目做准备。在搭建过程中遇到了一些典型问题,现将解决思路与配置经验整理如下,供参考使用。
项目初始化
本项目基于 Vite 构建,因此直接遵循 Vite 官方推荐的命令进行初始化。这里采用命令行方式搭建基础项目骨架:
yarn create vite my-vue-app --template vue执行上述命令后,生成的项目目录结构如下所示:
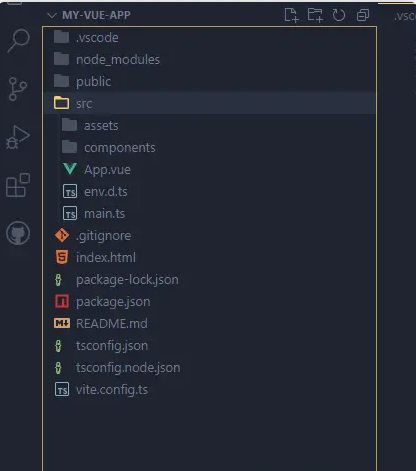
接下来开始安装必要的依赖库(这一步骤可能涉及较多配置调整):
安装router和pinia
安装这两个库的过程相对简单,基本可参照官方文档完成。执行以下命令进行安装:
yarn add vue-router@4 在根目录下新建 router 文件夹,并在其中创建 index.ts 文件,代码配置如下:
import { createRouter,createWebHashHistory, RouteRecordRaw} from 'vue-router'
import HelloWorld from '@/components/HelloWorld.vue'
const routes: Array<RouteRecordRaw> = [
    {
        path: '/',
        name: 'HelloWorld',
        component: HelloWorld
    }
]
const router = createRouter({
    history: createWebHashHistory(),
    routes
})

export default router
此时需要在 main.ts 文件中引入路由配置:
import { createApp } from 'vue'
import router from './router'
import App from './App.vue'

createApp(App).use(router).mount('#app')
执行代码后,控制台可能会报错,具体表现如下:
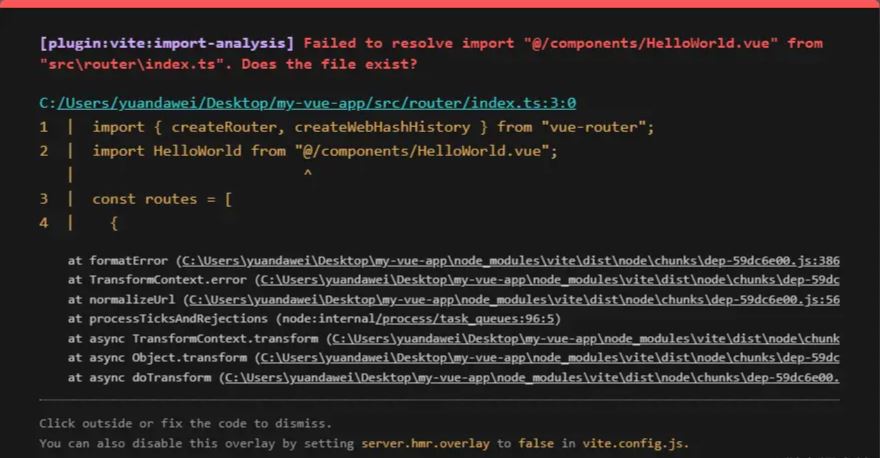
这是因为 Vite 默认无法识别 @ 别名。这与 Webpack 的配置逻辑类似,需要通过重定向解决。打开 vite.config.ts 配置文件并添加以下内容:
import { defineConfig } from 'vite'
import path from 'path'
import vue from '@vitejs/plugin-vue'

// https://vitejs.dev/config/
export default defineConfig({
  plugins: [vue()],
+  resolve: {
+    alias: [
+    {
+       find: '@',
+       replacement: path.resolve(__dirname, 'src'),
+     },
+   ],
+  },
})
此时仍存在问题,因为系统无法识别 path 模块,需要安装 @types/node 依赖:
yarn add @types/node -D同时,需要在 tsconfig.node.json 配置文件中添加 `compilerOptions.allowSyntheticDefaultImports: true`,具体修改如下:
"compilerOptions":{
+  allowSyntheticDefaultImports:true
}
完成上述配置后,之前的报错即可解决。接下来继续安装 pinia:
yarn add piniaPinia 作为当前 Vuex 的替代方案,值得尝试。新增 store 目录,并在其中创建 index.ts 文件:
import { defineStore }from 'pinia'
const useStore = defineStore('main',{
    state:()=>{
        return {
            counter: 0,
            name:'RadiomM'
        }
    },
    actions:{
        reset(){
            this.$reset()
        }
    }
})
export default useStore
经过初步测试,其语法简洁且易用。此处仅展示最简示例,在 main.ts 中引入即可:
import { createApp } from 'vue'
import router from './router'
import { createPinia}  from 'pinia'
import App from './App.vue'
createApp(App).use(createPinia()).use(router).mount('#app')
安装ESlint
配置 ESLint 相对繁琐,期间查阅了大量资料并参考了他人配置。虽然过程中遇到不少坑,且部分插件安装目的不明确,但本次展示将详细说明每个插件的作用。开始执行命令:
npx eslint --init按照以下步骤进行选择,可完成基础的 ESLint 配置:

选择 ESLint 的用途

选择模块引入方式
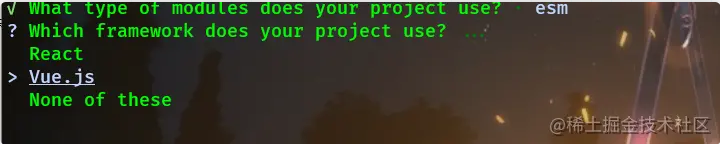
选择使用的框架
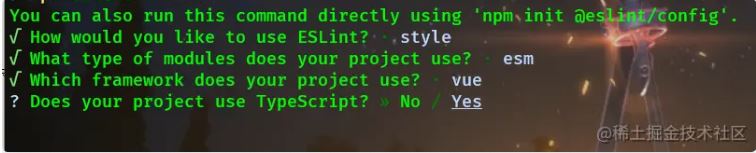
确认是否使用 TypeScript

选择运行环境
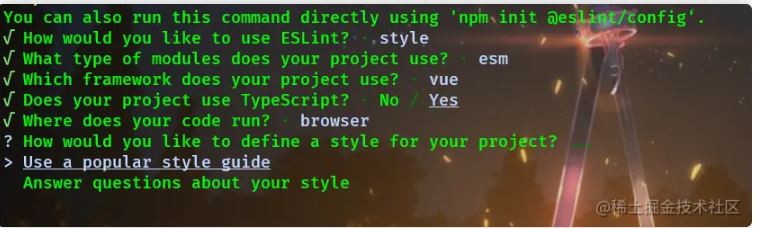
选择流行规则集
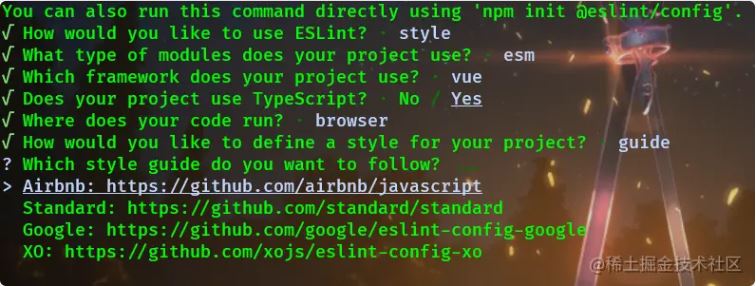
选择 Airbnb 规则
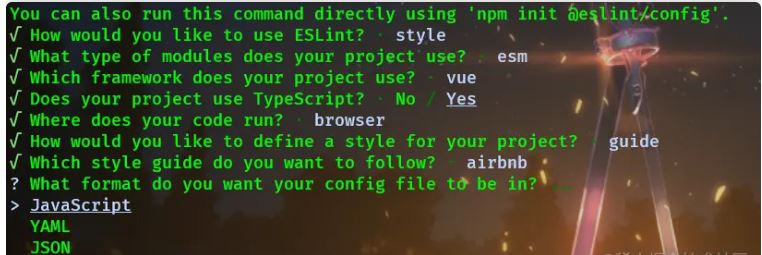
选择配置文件类型
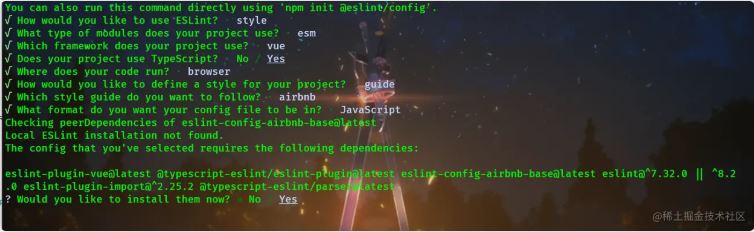
确认是否开始安装
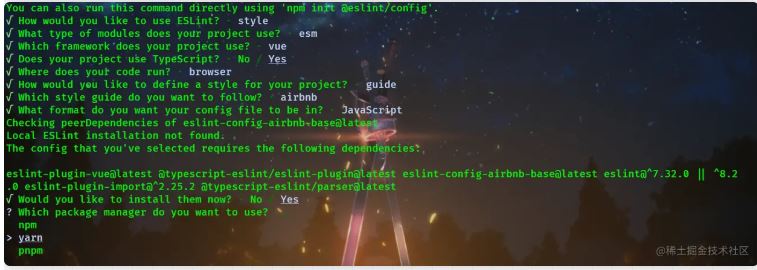
选择安装工具
完成上述步骤后,项目中会新增一个 eslintrc.js 文件。但这仅仅是开始,接下来将面对各种配置坑点。
eslint的vue规则需要切换
出现如下报错,在 app.vue 文件中可见,提示需要一个根元素。实际上,Vue3 已不再强制要求包裹根元素:
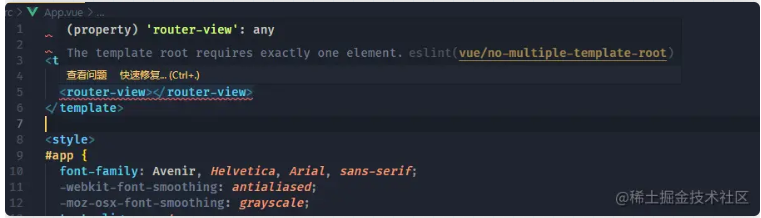
此时需要修改 .eslintrc.js 配置文件,具体调整如下:
module.exports = {
  env: {
    browser: true,
    es2021: true,
+   'vue/setup-compiler-macros': true, // 这是为了兼容defineProps这种API的
  },
  extends: [
-   'plugin:vue/essential',
+   'plugin:vue/vue3-recommended', // 兼容vue3语法规范
    'airbnb-base',
  ],
+ parser: 'vue-eslint-parser' // 这个插件其实已经安装了,用来解析template语法
  parserOptions: {
    ecmaVersion: 'latest',
    parser: '@typescript-eslint/parser',
    sourceType: 'module',
  },
  plugins: [
    'vue',
    '@typescript-eslint',
  ],
  rules: {
  },
};
修改后,检查其他文件时可能会出现 linebreak-style 错误。这是因为 ESLint 默认配置为 unit(即 lr 行尾风格)。现在可以直接在 .eslintrc.js 文件中添加新规则:
'linebreak-style':['error','windows']注意,若添加后未生效,可能需要重启 VSCode。实际上,许多新配置都需要重启编辑器才能生效。完成此步后,项目将不再报错,接着进行下一步。
安装prettier
单纯安装 ESLint 仅会提示代码格式错误,不会自动修复。此时需要借助 Prettier 实现自动格式化。执行以下命令:
yarn add eslint-plugin-prettier eslint-config-prettier prettier -D此时需要重新修改 .eslintrc.js 配置文件,具体调整如下:
module.exports = {
  env: {
    browser: true,
    es2021: true,
  },
  extends: [
    'plugin:vue/vue3-recommended',
    'airbnb-base',
+   'plugin:prettier/recommended',
  ],
  parserOptions: {
    ecmaVersion: 'latest',
    parser: '@typescript-eslint/parser',
    sourceType: 'module',
  },
  plugins: [
    'vue',
    '@typescript-eslint',
  ],
  rules: {
+    'prettier/prettier':'error',
+    'linebreak-style':['erro','window']
  },
};
这里解释相关插件的作用:
eslint-plugin-prettier 主要用于禁用一些不必要且与 Prettier 冲突的 ESLint 规则。
eslint-config-prettier 在不符合 Prettier 规则时会报错,同时可通过 `eslint --fix` 命令进行修复。
此外,需新增 .prettierrc.js 文件,写入以下内容:
module.exports = {
  printWidth: 80, // 每行代码长度(默认80)
  tabWidth: 2, // 每个tab相当于多少个空格(默认2)
  useTabs: false, // 是否使用tab进行缩进(默认false)
  singleQuote: true, // 使用单引号(默认false)
  semi: false, // 声明结尾使用分号(默认true)
  trailingComma: 'es5', // 多行使用拖尾逗号(默认none)
  bracketSpacing: true, // 对象字面量的大括号间使用空格(默认true)
  bracketSameLine: false,
  arrowParens: 'avoid', // 只有一个参数的箭头函数的参数是否带圆括号(默认avoid)
  endOfLine: 'crlf', // 添加这个属性时,可以将eslint中的linebreak-style删除。
}
接着,我们可以在 package.json 中新增一个脚本命令:
"scripts":{
    "lint:script": "eslint --ext .js,.jsx,.ts,.tsx --fix --quiet ./",
}
然后运行该命令,感受双工具协同的效果(尽管目前代码尚少,体验有限):
yarn lint:script当然,仅靠命令修复还不够。我们希望保存代码时自动格式化,此时需要在 vscode 的 setttings.json 文件中添加如下配置:
    "[vue]": {
        "editor.defaultFormatter": "esbenp.prettier-vscode",
        "editor.codeActionsOnSave": {
            "source.fixAll.eslint": true,
         },
    },
同时,你的 VSCode 需要安装两个插件,具体如下图所示:
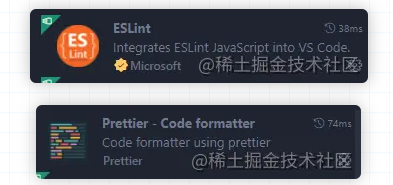
此时保存代码即可自动格式化。此外,我们也可以在运行项目时让格式错误实时报错。安装相关插件:
yarn add vite-plugin-eslint -D然后在 vite.config.ts 配置文件中添加:
import viteEslint from 'vite-plugin-eslint';
// 具体配置
{
    plugins: [
    // 省略其它插件
    viteEslint(),
    ]
}
现在尝试重新启动项目,ESLint 的错误信息已能实时显示在命令行窗口中。
----------------------------------------补充----------------------------------------- 在执行 yarn lint:script 命令时,可能会出现以下错误:
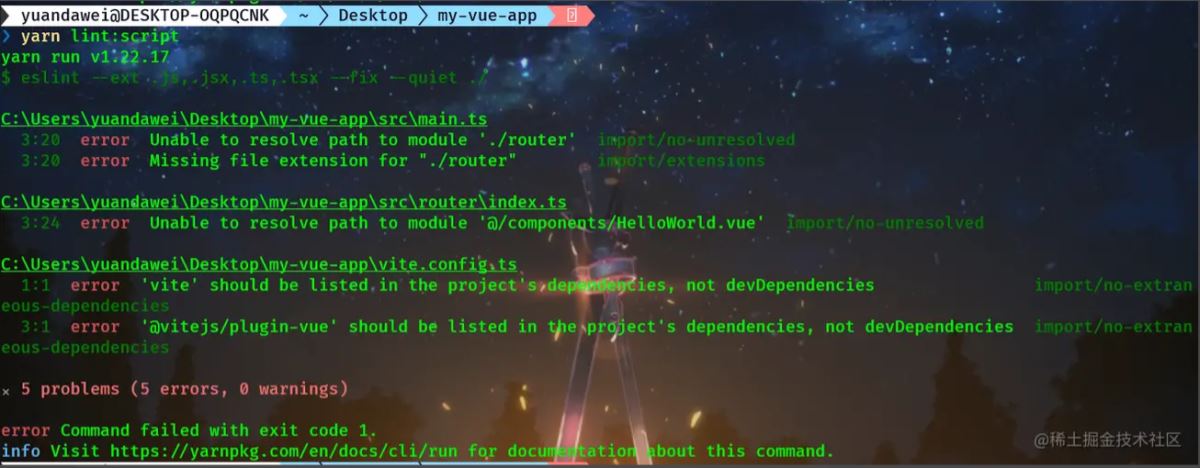
这里需要逐一解决。首先是 import/extensions 问题,主要是 airbnb 规范中的配置与 Vue 项目存在差异,因此需要在 ESLint 规则中加入以下内容:
 'import/extensions': [
      'error',
      'ignorePackages',
      {
        js: 'never',
        jsx: 'never',
        ts: 'never',
        tsx: 'never',
      },
    ],
解决依赖位置报错问题 import/no-extraneous-dependencies,虽然该报错本身可能存在误判,但仍需通过新增规则来解决:
'import/no-extraneous-dependencies': ['error', { devDependencies: true }],接下来是比较复杂的 import/no-unresolved 问题,参考国外用户的配置解决。
首先需要安装插件:
yarn add -D eslint-import-resolver-typescript接下来需要在 .eslintrc.js 文件中添加如下配置(与 rules 同级):
  settings: {
    'import/resolver': {
      typescript: {}, // this loads <rootdir>/tsconfig.json to eslint
    },
  },
关于此配置,还有 JS 版本的解决方案,可参考相关网站。最后展示 .eslintrc.js 文件内容:
module.exports = {
  env: {
    browser: true,
    es2021: true,
    'vue/setup-compiler-macros': true,
  },
  extends: [
    'plugin:vue/vue3-recommended',
    'airbnb-base',
    'plugin:prettier/recommended',
  ],
  parser: 'vue-eslint-parser',
  parserOptions: {
    ecmaVersion: 'latest',
    parser: '@typescript-eslint/parser',
    sourceType: 'module',
  },
  plugins: ['vue', '@typescript-eslint'],
  rules: {
    'prettier/prettier': 'error',
    'linebreak-style': ['error', 'windows'],
+    'import/extensions': [
+      'error',
+      'ignorePackages',
+      {
+        js: 'never',
+        jsx: 'never',
+        ts: 'never',
+        tsx: 'never',
+      },
+    ],
+   'import/no-extraneous-dependencies': ['error', { devDependencies: true }],
  },
+  settings: {
+    'import/resolver': {
+      typescript: {}, // this loads <rootdir>/tsconfig.json to eslint
+    },
+  },
}
安装stylelint
这是用于样式格式化的插件,直接安装:
yarn add stylelint stylelint-prettier stylelint-config-prettier stylelint-config-recess-order stylelint-config-standard stylelint-config-standard-scss stylelint-config-recommended-vue -D同样需要新建 .stylelintrc.js 文件,写入以下内容:
module.exports = {
    // 注册 stylelint 的 prettier 插件
    plugins: ['stylelint-prettier'],
    // 继承一系列规则集合
    extends: [
      // standard 规则集合
      'stylelint-config-standard',
      // standard 规则集合的 scss 版本
      'stylelint-config-standard-scss',
      // 样式属性顺序规则
      'stylelint-config-recess-order',
      // 接入 Prettier 规则
      'stylelint-config-prettier',
      'stylelint-prettier/recommended',
      'stylelint-config-recommended-vue'

    ],
    // 配置 rules
    rules: {
      // 开启 Prettier 自动格式化功能
      'prettier/prettier': true,
      // "no-empty-source": null  // style不能是空
    }
  };
再次在 settings.json 文件中添加配置,目标同样是实现保存文件时自动格式化。
    "[vue]": {
        "editor.defaultFormatter": "esbenp.prettier-vscode",
        "editor.codeActionsOnSave": {
            "source.fixAll.eslint": true,
+           "source.fixAll.stylelint": true
         },
    },
+    "stylelint.validate": ["css", "less", "scss","vue"],
此时可以在 package.json 文件中添加命令:
script: {
  "lint:style": "stylelint --fix \"src/**/*.{css,scss}\""
}
这与上面的 ESLint 命令类似。当然,同样有运行时报错的插件,如下:
yarn add @amatlash/vite-plugin-stylelint -D然后在 Vite 配置文件中添加如下内容:
import viteStylelint from '@amatlash/vite-plugin-stylelint';

{ plugins:
    [
    // 省略其它插件
    viteStylelint({
    // 对某些文件排除检查
    exclude: /node_modules/ }),
    ]
}
最后展示相关文件内容:
import { defineConfig } from 'vite'
import path from 'path'
import vue from '@vitejs/plugin-vue'
import viteEslint from 'vite-plugin-eslint'
import viteStylelint from '@amatlash/vite-plugin-stylelint'

export default defineConfig({
  plugins: [
    vue(),
    viteEslint(),
    viteStylelint({
      // 对某些文件排除检查
      exclude: /node_modules/,
    }),
  ],
  resolve: {
    alias: [
      {
        find: '@',
        replacement: path.resolve(__dirname, 'src'),
      },
    ],
  },
})
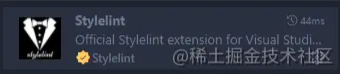
同样,可以在 VSCode 中安装以下插件。
安装husky
安装此工具主要用于代码提交前的校验,确保线上代码规范统一。执行以下命令:
yarn add husky -D- 紧接着初始化 husky
npx husky install,并将 husky 作为项目启动前的脚本,具体配置如下:
{
    "scripts": {
        // 会在安装 npm 依赖后自动执行
        "postinstall": "husky install"
    }
}- 添加 Husky 钩子,在终端执行以下命令:
npx husky add .husky/pre-commit "npm-run-lint"注意,Windows 系统下双引号内容需要连接符,而 Mac 系统则不需要。随后,你将在项目根目录的 .husky 目录中看到名为 pre-commit 的文件,其中包含了 git commit 前执行的脚本。现在,当你执行 git commit 时,会首先执行 npm run lint 脚本,通过 Lint 检查后才会正式提交代码记录。但会出现一种情况:即使只修改了一个文件,检查仍是全量的。因此需要另一个工具来解决此问题。
lint-staged 用于解决上述全量扫描问题,它可实现仅对存入 暂存区 的文件进行 Lint 检查,大大提高了提交代码的效率。
yarn add -D lint-staged然后在 package.json 中添加如下配置:
  "lint-staged": {
    "**/*.{js,jsx,tsx,ts}": [
      "npm run lint:script",
      "git add ."
    ],
    "**/*.scss": [
      "npm run lint:style",
      "git add ."
    ]
  }
接下来我们需要在 Husky 中应用 lint-stage,回到 .husky/pre-commit 脚本中,将原来的 npm run lint 替换为如下脚本:
npx --no -- lint-staged这样,我们便实现了提交代码时的 增量 Lint 检查。
安装commitlint
在团队合作中,你是否遇到过同事提交代码时,提交信息仅包含 提交 二字的情况?这让人无法了解其修改的功能、新增的需求或修复的 Bug。因此,我们需要规范提交信息:
yarn add commitlint @commitlint/cli @commitlint/config-conventional -D接下来新建 .commitlintrc.js 配置文件:
module.exports = { extends: ["@commitlint/config-conventional"] };该插件的提交规范主要由两部分组成,分别为 <type> 和 subject。常用的 type 值包括如下:
feat: 添加新功能。fix: 修复 Bug。chore: 一些不影响功能的更改。docs: 专指文档的修改。perf: 性能方面的优化。refactor: 代码重构。test: 添加一些测试代码等等。
接下来我们将 commitlint 的功能集成到 Husky 的钩子中,在终端执行以下命令即可:
npx husky add .husky/commit-msg "npx --no-install commitlint -e $HUSKY_GIT_PARAMS"然后即可完成提交信息的规范。当提交信息不符合规范时,提交操作将被终止并提示错误。至此,我们完成了从零搭建项目的全部步骤。
总结
本次搭建过程中未安装 CSS 处理插件,但在 Vite 中安装诸如 sass、less 等工具较为简单。例如,sass 直接运行 yarn add sass 即可(本文许多插件均以 Sass 为模板安装)。本次踩坑之旅暂告一段落,期待下次的探索。仓库地址:
参考:
《深入浅出vite》
从 0 开始手把手带你搭建一套规范的 Vue3.x 项目工程环境
到此这篇关于从零搭建一个vite+vue3+ts规范基础项目的文章就介绍到这了,更多相关vite+vue3+ts项目搭建内容请搜索本站以前的文章或继续浏览下面的相关文章希望大家以后多多支持本站!