

本文详细讲解如何使用 Node.js 结合 Koa 框架、koa-body 参数解析、@koa/multer 文件处理及 axios 前端请求,实现完整的图片上传与回显功能。内容涵盖 Web 服务搭建、跨域处理、静态目录配置及文件存储逻辑,提供从环境准备到代码实现的完整步骤。
前言
代码地址
开发前需要掌握的一些库
koa:用来起一个web服务器
koa2-cors: 解决跨域问题
@koa/router: koa的路由处理
koa-body: koa参数的获取
koa-static: 静态内容
@koa/multer multer:图片上传的插件
代码结构
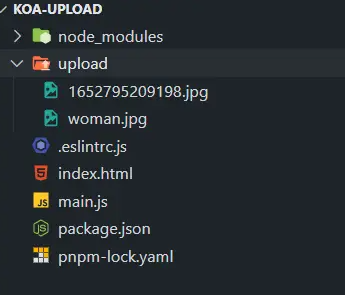
实现代码
第一步:使用 koa 和 koa-router 构建基础的 Web 服务。
//main.js
const Koa = require('koa') // 引入koa
const Router = require('koa-router') // 引入koa-router
const koaBody = require('koa-body')
router.get('/', async (ctx) => {
    ctx.type = 'html'
    ctx.body = '<h1>hello world!</h1>'
})
app.use(router.routes())
    .use(router.allowedMethods())
    .use(koaBody())

// 启动服务监听本地3000端口
app.listen(3000, () => {
    console.log('应用已经启动,http://localhost:3000')
})
启动服务后,访问 http://localhost:3000 即可看到 'hello world' 响应。
接下来,创建名为 upload 的文件夹,并在代码中引入 koa-static 模块以配置静态资源路径。
//mian.js 新增代码
const serve = require('koa-static')
const path = require('path')
app.use(serve(path.join(__dirname, './upload')))
配置完成后,若将图片放入 upload 文件夹,即可通过 http://localhost:3000/图片名.png 直接访问该图片(需替换图片名及后缀)。
新增 index.html 文件,并编写前端页面代码以提供文件选择与上传界面。
<!DOCTYPE html>
<html lang="en">
<head>
  <meta charset="UTF-8">
  <meta http-equiv="X-UA-Compatible" content="IE=edge">
  <meta name="viewport" content="width=device-width, initial-scale=1.0">
  <title>Document</title>
</head>
<body>
  <input type="file" class="file" name="avatar">
  <button onclick="send()">上传</button>
  <script src="https://unpkg.com/axios/dist/axios.min.js"></script>
  <script>
    let formData = new FormData()
    document.querySelector('.file').addEventListener('change', function(e) {
          let files = e.target.files
          console.log(files)
          if (!files.length) return
          formData.append('file', files[0], files[0].name)
        })
        function send(){
          axios.post('http://localhost:3000/upload',formData,{
            Headers:{
              "Content-type":"multipart/form-data"
            }
          })
        }
  </script>
</body>
</html>
尝试选择图片并上传时,浏览器会提示跨域错误。为解决此问题,需在后端添加跨域支持代码。
//mian.js新增代码
const cors = require('koa2-cors')
app.use(cors())//注意这个配置要在router前使用不然不生效
跨域问题解决后,再次上传会发现返回 404 错误,这是因为尚未定义对应的上传路由,需补充路由处理逻辑。
router.post('/upload', async (ctx) => {
    ctx.body = 'ok'
})
此时后端已能接收到前端传来的数据,核心环节在于配置并使用 @koa/multer 插件来处理文件上传。
const multer = require('@koa/multer')
const storage = multer.diskStorage({
    destination: function (req, file, cb) {
        cb(null, './upload')
    },
    filename: function (req, file, cb) {
        const fileFormat = (file.originalname).split('.')
        cb(null, Date.now() + '.' + fileFormat[fileFormat.length - 1])
    }
})
const upload = multer({ storage })
完成 multer 配置后,修改路由以调用 upload.single('file') 方法。
router.post('/upload', upload.single('file'), async (ctx) => {
    console.log('ctx.request.body', ctx.request.body)
    ctx.body = 'done'
})
注意:upload.single('file') 中的参数 'file' 必须与前端 index.html 中 FormData 对象的字段名保持一致,配置正确后即可成功上传文件。
至此,利用 Node.js、Koa 和 Axios 实现图片上传及回显的功能已全部介绍完毕。如需了解更多相关技术细节,可查阅本站历史文章或继续浏览后续内容,感谢支持。